
Introduction to Red Velvet Oreo Cheesecake
Hey there, fellow dessert lovers! If you’re on the hunt for something truly special, let me introduce you to my go-to indulgence: Red Velvet Oreo Cheesecake. This show-stopping dessert is not just a feast for the eyes but also a delightful treat that comes together fairly quickly. Perfect for busy days when you need to impress at a gathering or simply treat yourself, this cheesecake combines the best of both worlds. The creamy layers of red velvet and luscious cream cheese will have everyone coming back for seconds, if not thirds!
Why You’ll Love This Red Velvet Oreo Cheesecake
This Red Velvet Oreo Cheesecake is a treasure trove of flavors and textures that won’t take all day to make. It’s surprisingly easy, which is fantastic news for busy moms and professionals like us. The rich, velvety taste combined with the crunch of Oreos creates a dessert experience that leaves everyone delighted and wanting more. Plus, it’s perfect for any occasion, adding that wow factor to your table.
Ingredients for Red Velvet Oreo Cheesecake
Gathering your ingredients is the first step to creating this culinary masterpiece. Here’s what you’ll need to bring your Red Velvet Oreo Cheesecake to life:
- Oreo cookie crumbs: The base of our cheesecake. You could also use chocolate graham crackers if you want a twist.
- Unsalted butter: This keeps the crust moist and helps it hold together. If you’re dairy-free, consider coconut oil as a substitute.
- Cream cheese: The heart of both layers! Make sure it’s softened for easy blending. Neufchatel cheese is a lighter alternative.
- Granulated sugar: Sweetens the layers. For a healthier twist, you might use coconut sugar.
- Sour cream: This adds tanginess and creaminess. Greek yogurt works wonders if you’re looking for a substitute.
- Large eggs: Essential for binding. If you’re vegan, flaxy eggs or aquafaba can be great alternatives.
- Cocoa powder: This enhances the chocolate flavor of the red velvet layer. A good quality brand will make a difference!
- Vanilla extract: Adds depth and warmth. Homemade vanilla extract is even more delightful!
- Red food coloring: Helps bring that classic red velvet appeal. You can use beet juice for a natural option, but keep in mind the color may vary.
- Heavy cream: This is essential for making the smooth chocolate ganache. You could also use a non-dairy cream for a vegan version.
- Semi-sweet chocolate chips: For the ganache, feel free to switch to dark or milk chocolate based on your preference.
- Whipped cream: This is for garnish, adding both taste and presentation. Homemade whipped cream is always a crowd-pleaser!
- Whole Oreos: These will top your cheesecake, making it even more irresistible.
- Oreo cookie crumbs: For additional garnish to sprinkle on top, providing that extra crunch.
Exact measurements for these ingredients can be found at the bottom of the article, along with a printable version of the recipe. Happy baking!

How to Make Red Velvet Oreo Cheesecake
Now comes the fun part! Making this Red Velvet Oreo Cheesecake is a delightful journey, and I can’t wait to guide you through each step. Grab your apron, and let’s get started!
Prepare Your Ingredients
First things first, let’s get organized. Preheat your oven to 325°F (163°C). This warms things up nicely for baking later. While it’s heating, gather all your ingredients. Softened cream cheese, butter, eggs, and everything else should be ready to go. It’s all about flow here!
Create the Oreo Crust
Take those Oreo cookie crumbs and combine them with melted butter in a bowl. Mix them until they resemble wet sand. Press this mixture firmly into the bottom of a greased 9-inch springform pan. Bake it for 8-10 minutes until set, then set it aside to cool. You want that crust to be just right—a crunchy, decadent foundation for your cheesecake!
Make the Red Velvet Layer
In a large bowl, beat together softened cream cheese and granulated sugar until smooth. Next, add in the sour cream, eggs, cocoa powder, and vanilla extract. Don’t forget that vibrant red food coloring—it’ll make your cheesecake pop! Mix it all together until it’s richly colored and creamy. Pour this luscious red velvet batter over your cooled crust, spreading it evenly for a gorgeous layer.
Prepare the Vanilla Cheesecake Layer
Now, let’s whip up that creamy vanilla layer! In another bowl, beat the cream cheese with sugar until smooth again. Then, add the sour cream, eggs, and vanilla extract while mixing until combined. Gently pour this over the red velvet layer, smoothing the top with a spatula. Can you already picture those colorful layers? Yum!
Bake the Cheesecake
It’s time for the oven! Bake this beauty for 50-60 minutes. The edges should be set, but the center will still jiggle gently. Once it’s done, turn off the oven and leave the cheesecake inside with the door cracked open for about an hour. This slow cooling helps to prevent cracks. Nobody wants a cracked cake, right?
Chill the Cheesecake
Transfer your masterpiece to the fridge for at least 6 hours, but overnight is best. Imagine the anticipation as it chills, the flavors melding together! This step is crucial to achieving that perfect, creamy texture.
Make the Chocolate Ganache
After chilling, let’s create that gorgeous chocolate ganache! Heat heavy cream in a saucepan until hot, but don’t let it boil. Pour it over semi-sweet chocolate chips in a bowl and let it sit for 2 minutes. Stir until smooth and silky. Let it cool a bit before pouring over your cheesecake, creating a beautiful glaze that’ll make your dessert irresistible.
Garnish and Serve
Finally, it’s decoration time! Pipe some whipped cream around the edges, sprinkle with Oreo crumbs, and place whole Oreos on top for that extra touch. Slice your Red Velvet Oreo Cheesecake and serve it chilled, inviting everyone to taste the magic you’ve created. Enjoy every delightful bite!
Tips for Success
- Always use softened cream cheese; it blends effortlessly for a creamy texture.
- Let your cheesecake chill long enough for the best flavors and texture—overnight is ideal!
- If you notice any cracks while baking, don’t fret! Just cover them with ganache.
- Experiment with the sweetness of your ganache to match your taste buds!
- Have fun adding sprinkles or fruit for a cheerful twist!
Equipment Needed
- 9-inch springform pan: Perfect for easy removal. A regular cake pan works too, just be cautious when serving.
- Mixing bowls: Two large ones for blending layers; glass or metal are ideal.
- Electric mixer: Makes whipping cream cheese a breeze. A whisk will do in a pinch!
- Spatula: For smoothing layers and transferring mixes without wasting a drop.
- Oven: Essential for baking the cheesecake; ensure it’s pre-heated!
Variations
- Gluten-Free: Use gluten-free Oreo cookies and gluten-free crumbs for the crust to enjoy a gluten-free version without losing flavor.
- Vegan: Substitute cream cheese with vegan cream cheese, use flax eggs instead of regular eggs, and swap heavy cream with coconut cream for the ganache.
- Add-Ins: Consider adding mini chocolate chips or chopped nuts into the batter for some delightful texture surprise in every bite.
- Flavor Twist: For a unique spin, blend in a hint of almond or orange extract in place of vanilla for a refreshing change.
- Cheesecake Bars: Transform this cheesecake into bars by pressing the crust into a lined baking dish, then layering and baking as per instructions.
Serving Suggestions
- Pair with a scoop of vanilla ice cream for extra creaminess and flavor contrast.
- Serve alongside fresh berries, like strawberries or raspberries, for a pop of color and a tart freshness.
- Dust with powdered sugar for an elegant look!
- Teas and coffees make delightful beverage companions, balancing all that sweetness.
- Present on a decorative cake stand for an eye-catching display at gatherings!
FAQs about Red Velvet Oreo Cheesecake
Can I use regular Oreos for the crust?
Absolutely! Regular Oreos work perfectly for the crust of this Red Velvet Oreo Cheesecake. They provide that rich chocolate flavor, making every bite deliciously indulgent.
How long will the cheesecake last in the fridge?
This luscious cheesecake can last up to 5 days in the fridge if stored properly in an airtight container. Just try to resist devouring it all in one go!
Can I freeze the Red Velvet Oreo Cheesecake?
Yes! You can freeze this cheesecake for up to 3 months. Wrap it tightly in plastic wrap and then in aluminum foil to prevent freezer burn. Thaw it in the fridge before serving for best results.
What can I substitute for cream cheese?
If you need a substitute, consider using ricotta or mascarpone cheese for a slightly different taste and texture. Vegan cream cheese is a great option for dairy-free diets too!
Is there a way to make this cheesecake less sweet?
Definitely! You can reduce the sugar in both the cheesecake layers and the ganache to suit your taste. Just remember to taste as you go to ensure it’s still balanced.
Final Thoughts
Creating this Red Velvet Oreo Cheesecake is a true labor of love. As you layer the creamy red velvet and vanilla cheesecake, you’ll realize it’s as much about the journey as the destination. Each bite offers a symphony of flavors and textures, turning even the most ordinary day into something magical. Picture the smiles around the table as everyone digs in! Whether it’s for a special occasion or just to treat yourself, this cheesecake is sure to bring joy. So, roll up your sleeves, unleash your inner baker, and get ready to indulge in a delicious slice of happiness!
Print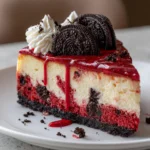
Red Velvet Oreo Cheesecake: Indulge in Rich Layers Today!
- Total Time: 7 hours 30 minutes
- Yield: 12 servings 1x
- Diet: Vegetarian
Description
A decadent Red Velvet Oreo Cheesecake featuring layers of creamy red velvet and traditional vanilla cheesecake, topped with a rich chocolate ganache.
Ingredients
- 2 ½ cups Oreo cookie crumbs (about 25–30 cookies, crushed)
- 5 tbsp unsalted butter, melted
- 16 oz (2 blocks) cream cheese, softened (for both layers)
- ¾ cup granulated sugar (for both layers)
- ¼ cup sour cream (for both layers)
- 2 large eggs (for both layers)
- 1 ½ tbsp cocoa powder
- 1 ½ tsp vanilla extract (for both layers)
- 1 tbsp red food coloring
- ½ cup heavy cream (for ganache)
- ¾ cup semi-sweet chocolate chips (for ganache)
- Whipped cream (for garnish)
- Oreo cookie crumbs (for garnish)
- Whole Oreos (for garnish)
Instructions
- Preheat the oven to 325°F (163°C). Grease a 9-inch springform pan and line the bottom with parchment paper.
- Mix Oreo cookie crumbs and melted butter until combined. Press the mixture into the bottom of the pan. Bake for 8-10 minutes, then set aside to cool.
- In a large bowl, beat cream cheese and sugar until smooth. Add sour cream, eggs, cocoa powder, vanilla extract, and red food coloring, mixing until combined. Pour the red velvet batter over the cooled crust and spread evenly.
- In another bowl, beat cream cheese and sugar until smooth. Add sour cream, eggs, and vanilla extract, mixing until fully incorporated. Carefully pour over the red velvet layer, smoothing the top.
- Bake at 325°F (163°C) for 50-60 minutes, until the edges are set but the center is slightly jiggly. Turn off the oven and leave the cheesecake inside with the door slightly open for 1 hour.
- Transfer to the refrigerator and chill for at least 6 hours or overnight.
- Heat heavy cream in a saucepan until hot (but not boiling). Pour over chocolate chips and let sit for 2 minutes, then stir until smooth. Let cool slightly, then pour over the cheesecake, spreading evenly.
- Pipe whipped cream around the edges and sprinkle with Oreo crumbs. Decorate with whole Oreos on top.
- Slice and serve chilled. Enjoy!
Notes
- Ensure the cream cheese is softened for easy blending.
- Let the cheesecake chill adequately for the best texture.
- Feel free to adjust the sweetness of the ganache according to your preference.
- Prep Time: 30 minutes
- Cook Time: 1 hour
- Category: Dessert
- Method: Baking
- Cuisine: American
Nutrition
- Serving Size: 1 slice
- Calories: 420
- Sugar: 30g
- Sodium: 250mg
- Fat: 28g
- Saturated Fat: 17g
- Unsaturated Fat: 9g
- Trans Fat: 0g
- Carbohydrates: 38g
- Fiber: 2g
- Protein: 6g
- Cholesterol: 100mg