Introduction to Grinch Brownies
As the holiday season rolls around, I find myself in a flurry of activity. Between juggling work and family, it can be tough to find time for festive baking. That’s why I adore these Grinch Brownies! They’re not only simple to whip up, but they also bring a splash of festive cheer to any gathering. Imagine serving a delightful dessert that looks stunning and tastes incredible—perfect for a quick solution when you want to impress your loved ones. Trust me, these vibrant, minty treats will put a grin on everyone’s face!
Why You’ll Love This Grinch Brownies
These Grinch Brownies are a delightful way to infuse some holiday spirit into your busy life! They’re quick to prepare, making them the ideal treat for those last-minute gatherings. Plus, the rich chocolate, creamy mint topping, and crunchy Oreos create an irresistible combination that everyone will rave about. With a recipe this simple, even the most hectic holiday schedule won’t stand in the way of joyous baking!
Ingredients for Grinch Brownies
Gathering the right ingredients is key to making your Grinch Brownies a festive masterpiece! Here’s a list to help you get started:
- Brownie Mix: Grab your favorite brownie mix to easily create a rich, chocolatey base.
- Ingredients for Brownies: Follow the package instructions; typically, you’ll need eggs, oil, and water for a creamy texture.
- Mint Oreos: These are a fun twist that adds a crunchy texture and a minty flavor. Feel free to sub with regular Oreos if you wish!
- White Chocolate Chips: For the vibrant green topping, these chips melt smoothly and add sweetness.
- Heavy Whipping Cream: This ingredient creates a dreamy, silky topping. You can also use milk for a lighter option.
- Peppermint Extract: A little goes a long way in making the topping refreshingly minty. Adjust the amount to suit your taste.
- Green Gel Food Coloring: This adds the festive touch! A couple of drops will transform your topping into a Grinch-worthy green.
- Red M&Ms: These bright candies are not just for crunch—they’ll give your brownies a pop of cheerful color!
Craving the measurements? Check out the bottom of the article for detailed quantities, perfect for printing! With these colorful ingredients, your Grinch Brownies will be a spectacle on any dessert table.
How to Make Grinch Brownies
Now that you’ve gathered your ingredients, let’s dive into making these delicious Grinch Brownies! This step-by-step guide will walk you through the process, ensuring that your festive treat turns out perfect every time. So, roll up your sleeves, and let’s get started!
Step 1: Prepare the Brownies
Start by preparing the brownie mix according to the package instructions. This usually means mixing together eggs, oil, and water with the dry ingredients. Once blended, pour the batter into a greased 9×13 pan. Bake as directed, and while they’re cooking, enjoy that rich chocolate aroma wafting through your kitchen. When the timer goes off, let the brownies cool at room temperature. This step is crucial for a perfectly set dessert!
Step 2: Make the Green Chocolate Topping
While the brownies cool, it’s time to make the luscious green topping. In a microwave-safe bowl, combine the white chocolate chips and heavy whipping cream. Heat it in 30-second intervals, stirring after each, until melted and smooth. Don’t rush this part; the last thing you want is chocolate that’s burnt!
Step 3: Add the Peppermint Flavoring
Once your chocolate is melted, add the peppermint extract. Just a splash will do, but feel free to taste and adjust it. To achieve that jolly green color, add a few drops of green gel food coloring and stir until your desired shade is reached. You want it bright, like the Grinch himself!
Step 4: Assemble the Brownies
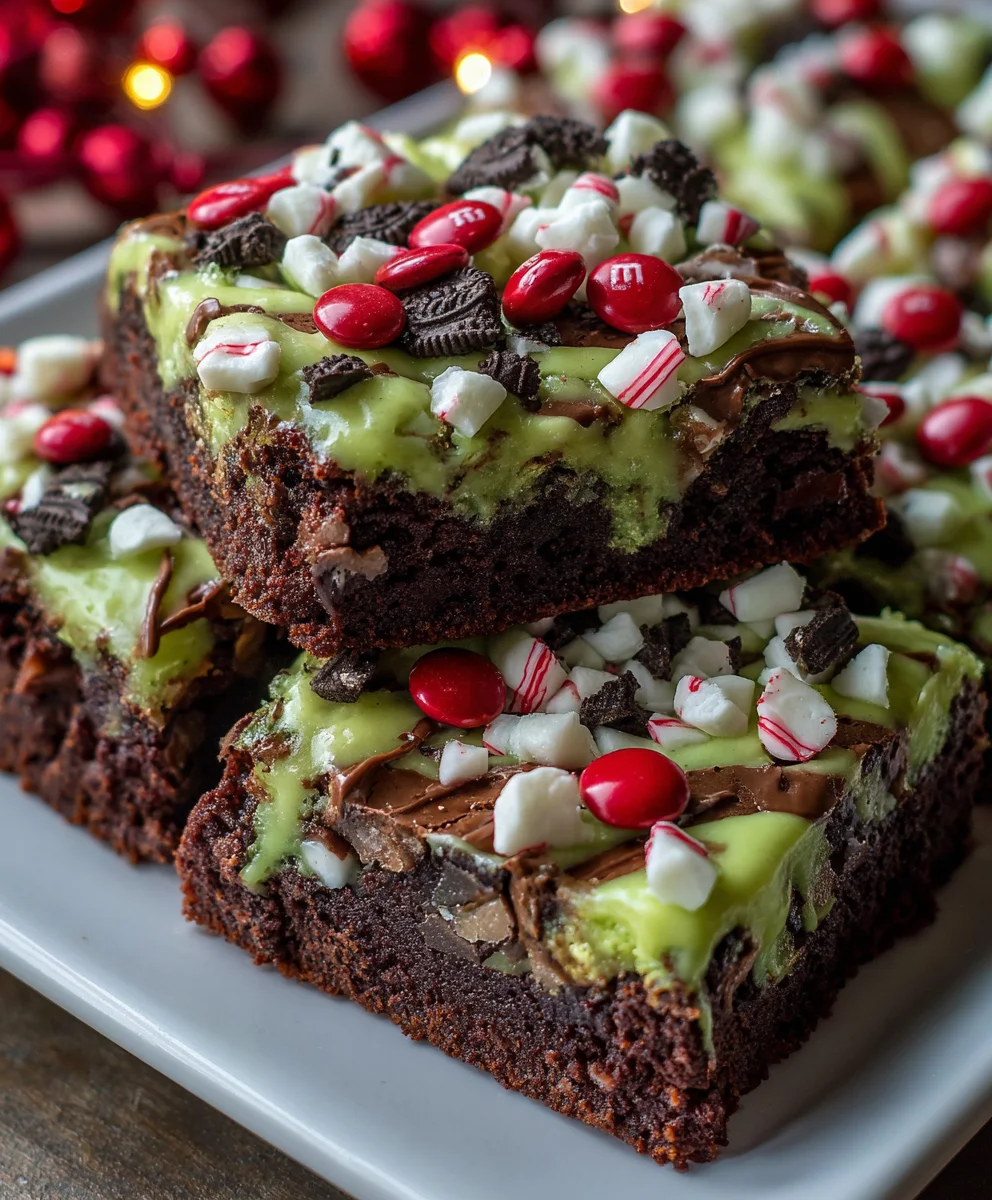
Now comes the fun part—assembling your brownies! Pour the vibrant green topping over the cooled brownies, spreading it evenly for a lush appearance. It’s truly satisfying to see that splash of color contrasting against the dark chocolate. Next, sprinkle the chopped Mint Oreos and bright red M&Ms on top. They’ll add a delightful crunch and festive cheer!
Step 5: Chill and Set
For the finishing touch, chill your brownies in the refrigerator for at least an hour. This allows the chocolate topping to set properly, making cutting and serving much easier. If you can resist sneaking a bite during this time, you’re stronger than I am!
Step 6: Serve and Enjoy
After chilling, carefully cut the brownies into squares. Serve them on a decorative plate for a festive presentation. I like to add some extra M&Ms on the side for a pop of color. Watch the smiles spread as your loved ones take a bite of these delightful Grinch Brownies, bringing joy to your holiday celebrations!
Tips for Success
- Make sure to let your brownies cool completely before adding the topping for best results.
- Use a rubber spatula to spread the green topping evenly—it makes life easier!
- If you’re in a hurry, pop the brownies in the freezer for quicker chilling.
- Taste your green topping mix before pouring it on to adjust sweetness and mintiness.
- Have fun with the decorations—get creative with sprinkles or festive toppings!
Equipment Needed for Grinch Brownies
- 9×13 Pan: A classic choice for brownies. Alternatively, use two 8×8 pans for smaller servings.
- Mixing Bowls: Use various sizes for blending your ingredients. Any good bowls will do!
- Rubber Spatula: Perfect for spreading toppings. You can also use a butter knife if you’re in a pinch.
- Microwave-Safe Bowl: Ideal for melting chocolate. A glass bowl works just as well!
- Whisk: Great for mixing ingredients. A fork can serve in a hurry!
Variations of Grinch Brownies
- Gluten-Free Option: Use a gluten-free brownie mix to accommodate dietary needs without sacrificing flavor.
- Dark Chocolate Twist: Swap the regular brownie mix for a dark chocolate one for a richer taste that elevates your brownies.
- Nutty Delight: Add chopped walnuts or pecans to the brownie batter for a delightful crunch and added flavor.
- Vegan Version: Replace eggs with unsweetened applesauce and use plant-based milk and dairy-free chocolate for a vegan treat.
- Extras Galore: Mix in mini marshmallows or caramel bits to the brownie batter for added sweetness and a twist in texture.
Serving Suggestions for Grinch Brownies
- Serve with a scoop of vanilla ice cream for a delightful contrast to the rich brownies.
- Pair with peppermint hot cocoa for a cozy holiday treat.
- Top with whipped cream and a sprig of mint for an elegant touch.
- Display on a festive platter, garnished with extra Red M&Ms and sprinkles for flair.
- Consider serving alongside fresh fruit, like strawberries, for a refreshing balance.
FAQs about Grinch Brownies
As you dive into the whimsical world of Grinch Brownies, you might have a few questions lingering in your mind. No worries! I’m here to help with some common inquiries that fellow bakers often have.
Can I make Grinch Brownies ahead of time?
Absolutely! You can prepare and assemble your Grinch Brownies a day in advance. Just chill them in the refrigerator until you’re ready to serve. This actually enhances the flavor as the ingredients marry overnight!
How should I store leftover Grinch Brownies?
To keep them fresh, store your brownies in an airtight container in the refrigerator. They’ll be good for up to a week. Just be prepared for everyone to come back for seconds!
Can I use a homemade brownie recipe?
Definitely! If you have a favorite homemade brownie recipe, feel free to swap it in. Just ensure it’s baked in a 9×13 pan to maintain the festive look of the Grinch Brownies!
What if I don’t have heavy whipping cream?
If whipping cream is out of stock, you can substitute it with half-and-half or milk. The topping won’t be as rich, but it will still taste delightful. Just adjust the amount of chocolate chips to ensure the right consistency.
Can I freeze Grinch Brownies?
Yes, you can! Just make sure to wrap them tightly in plastic wrap or foil before placing them in a freezer-safe container. They’ll stay fresh for up to three months. When you’re ready to enjoy, just thaw them in the fridge!
Final Thoughts on Grinch Brownies
Bringing these Grinch Brownies to life reminded me just how joyful baking can be, even amidst our whirlwind of daily tasks. The vibrant colors and delightful flavors come together, making every bite a celebration. Watching my family and friends bask in the holiday cheer as they savor these treats warms my heart.
This recipe not only satisfies a sweet craving but also adds a splash of fun to any occasion. So, as we dive into this festive season, I encourage you to whip up a batch and create your own delicious memories around the table!
Print
Grinch Brownies
- Total Time: 1 hour 50 minutes
- Yield: 12 servings 1x
- Diet: Vegetarian
Description
Festive Grinch Brownies topped with vibrant green white chocolate and sprinkled with Mint Oreos and Red M&Ms.
Ingredients
- 1 Brownie Mix to be prepared in a 9X13 pan
- Ingredients to prepare the brownies based on the package instructions
- 20 Mint Oreos chopped into large pieces
- 2 cups White Chocolate Chips
- 1/2 cup Heavy Whipping Cream
- 1/2 teaspoon Peppermint Extract
- Green Gel Food Coloring
- 1/4 cup Red M&Ms
Instructions
- Prepare the brownies based on the package instructions. Set aside and allow them to cool at room temperature.
- Place the white chocolate chips and cream in a microwave safe bowl. Heat in 30 second intervals in the microwave, stirring after each interval, until melted and combined.
- Add in the peppermint extract and the green gel food coloring until the mixture is a vibrant green color.
- Pour the mixture on top of the brownies.
- Sprinkle the chopped Oreos and Red M&Ms on top.
- Chill the brownies for at least 1 hour so that the topping can set.
- Cut, serve and enjoy!
Notes
- Adjust the amount of peppermint extract to taste.
- The brownies can be stored in the refrigerator for up to a week.
- Prep Time: 20 minutes
- Cook Time: 30 minutes
- Category: Dessert
- Method: Baking
- Cuisine: American
Nutrition
- Serving Size: 1 brownie
- Calories: 240
- Sugar: 18g
- Sodium: 150mg
- Fat: 12g
- Saturated Fat: 7g
- Carbohydrates: 30g
- Fiber: 1g
- Protein: 3g
- Cholesterol: 30mg