Introduction to Peanutty Banana Bliss Pops
When the sun blazes and the temperatures soar, I find myself craving something refreshing and delicious. That’s when I whip up my Peanutty Banana Bliss Pops! These treats are not only a perfect way to cool down but also a nutritious snack that makes my heart sing. As a busy mom, I understand how hectic life can get, and these pops are a delightful way to spoil my family without spending hours in the kitchen. Plus, who can resist the creamy, sweet goodness of bananas and peanut butter on a hot day? Let’s dive into this treat!
Why You’ll Love This Peanutty Banana Bliss Pops
These Peanutty Banana Bliss Pops are a dream come true for busy lives! They’re incredibly easy to make—perfect for those quick snack cravings. With just a few ingredients, you can whip them up in no time. Plus, the delicious taste of creamy peanut butter combined with sweet bananas is simply irresistible. Trust me, you’ll impress your family and friends while keeping their health in mind. What’s not to love?
Ingredients for Peanutty Banana Bliss Pops
Gathering the right ingredients can make or break your culinary adventure, and these Peanutty Banana Bliss Pops are no exception. Here’s what you’ll need to create this delightful frozen treat:
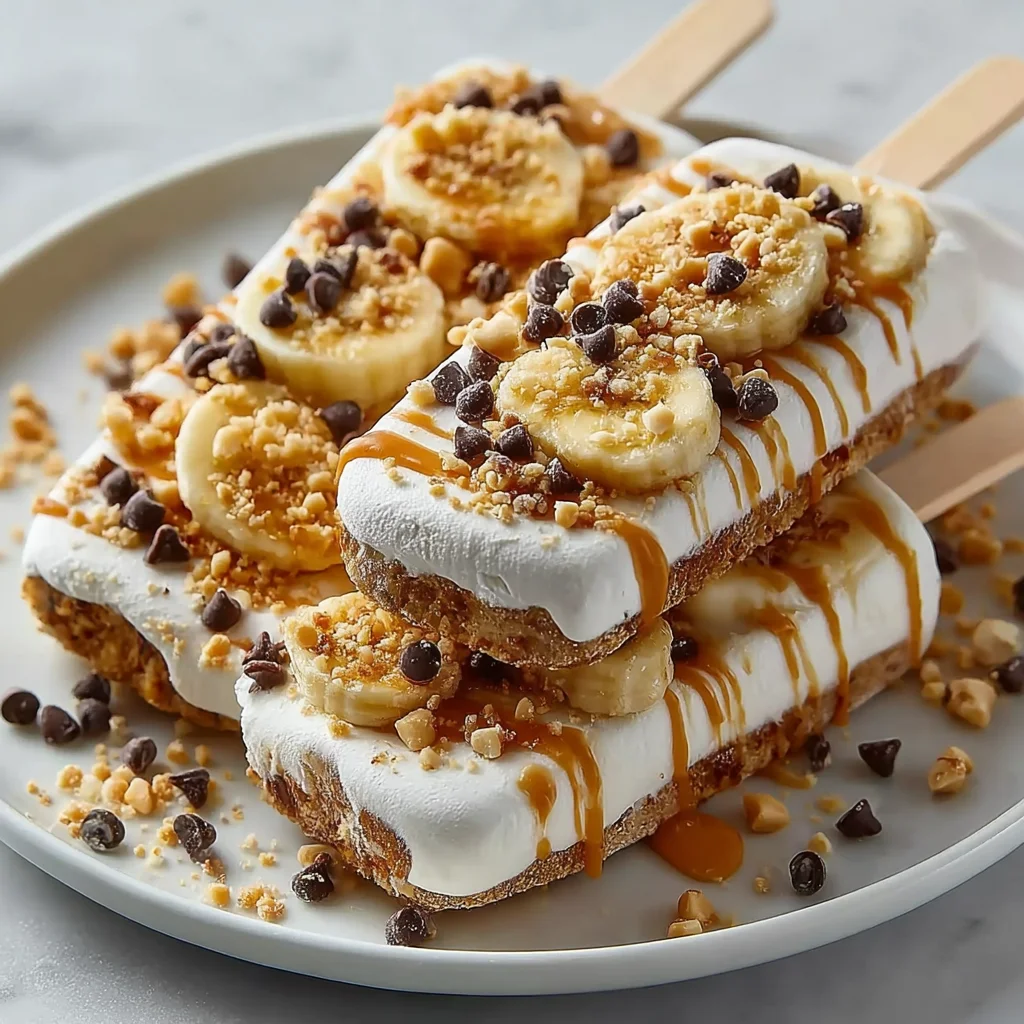
- Ripe Bananas: Choose bananas that are perfectly ripe for the best flavor. They’ll be sweet and easy to blend, giving your pops a creamy texture.
- Plain Greek Yogurt: This creamy goodness adds protein and a tangy flavor. You can substitute with any other yogurt if you prefer, but Greek is thicker and works beautifully!
- Creamy Peanut Butter: Go for a smooth variety to easily coat your bananas. Nut butters can also be swapped if you have allergies—just check for creaminess.
- Honey or Maple Syrup: A drizzle of these sweeteners is optional for those who enjoy a little extra sweetness. They are both great choices for enhancing flavor!
- Vanilla Extract: A splash of this adds a warm, inviting aroma and rounds out the flavors beautifully.
- Mini Chocolate Chips: These add a fun crunch and sweetness on top. Feel free to skip these if you want to keep things simple!
- Crushed Nuts: Walnuts, almonds, or peanuts work well for a delightful texture. Sprinkle them on for an added nutty element!
- Popsicle Molds and Sticks: The fun part! You’ll need molds to shape your pops, and grab some sticks to hold on to during munching.
For exact measurements, you’ll find all the details at the bottom of the article for easy printing. Now, with those ingredients prepped, let’s create the magic!

How to Make Peanutty Banana Bliss Pops
Now that we’ve gathered our ingredients, it’s time to get hands-on! Making these Peanutty Banana Bliss Pops is a fun task that the whole family can join in on. Let’s break it down step by step and have some fun in the kitchen!
Step 1: Prep the Bananas
First things first, grab those ripe bananas! Peel each one carefully, letting the tantalizing scent fill the air. Then, slice them into halves or thirds, depending on how big you want your pops. I prefer bite-sized pieces that are easy for kids to hold.
Step 2: Make the Yogurt Mixture
In a mixing bowl, combine the plain Greek yogurt and creamy peanut butter. Now, add the honey or maple syrup and sprinkle in the vanilla extract. With a fork or a whisk, blend everything together until it’s smooth and creamy. Don’t be shy to taste your mixture! It should scream “delicious”!
Step 3: Coat the Bananas
Here comes the messy but fun part! Dip each banana piece in the peanut butter yogurt mix, making sure they’re fully coated. Use a spoon to ensure every nook and cranny gets that rich and creamy goodness. Trust me, this step is where the magic happens!
Step 4: Add Toppings (Optional)
If you’re feeling adventurous, now’s the time to sprinkle on those mini chocolate chips or crushed nuts. These toppings add a delightful crunch and a pop of sweetness to contrast with the smooth, creamy pops. Consider letting the kids choose their own toppings—it’s a sure way to make them more excited!
Step 5: Mold the Pops
Carefully place the coated banana pieces into your popsicle molds. Make sure to insert the sticks into each piece, right in the center. The fun part is placing each banana on the stick so they’re ready for freezing!
Step 6: Freeze
Now, slide those molds into the freezer, making sure they sit flat. Let them freeze for at least 4 hours, or until solid. As you wait, you can dream about your tasty treats and how refreshing they’ll be on a hot day!
Step 7: Remove from Molds
When your pops are finally frozen, it’s time for the grand reveal! Run warm water over the outside of the molds for a few seconds to help them release. Gently tug on the sticks, and watch the pops slide out. It’s like a mini magic show!
Step 8: Enjoy!
It’s time to dig in! Serve those Peanutty Banana Bliss Pops immediately and watch your family enjoy them with smiles all around. If you have any leftovers (doubtful!), store them in an airtight container in the freezer for a cool, healthy snack later.
Tips for Success
- Ensure your bananas are ripe for the best taste and creaminess.
- Use a sturdy popsicle mold to keep the pops from breaking.
- Try freezing the banana pieces before dipping for easier coating.
- Experiment with different nut butter varieties for a unique flavor.
- If your mixture is too thick, add a splash of milk to thin it out.
Equipment Needed
- Popsicle Molds: Any silicone or plastic molds work wonderfully! If you don’t have molds, use paper cups instead.
- Sticks: Wooden sticks are ideal, but you can use spoons in a pinch.
- Mixing Bowl: A large bowl for combining ingredients; a medium one works just fine!
- Whisk or Fork: For blending the yogurt and peanut butter; a spatula can be handy too!
Variations
- Chocolate-Covered Bliss: Dip the frozen pops in melted dark chocolate for a decadent treat!
- Fruit Fusion: Blend in some berries, like strawberries or blueberries, into the yogurt for a fruity twist.
- Nut-Free Option: Use sun butter instead of peanut butter for those with nut allergies.
- Vegan Delight: Swap Greek yogurt with a plant-based yogurt and use maple syrup as the sweetener.
- Spiced Up: Add a pinch of cinnamon or nutmeg to the yogurt mixture for a warm flavor boost!
Serving Suggestions for Peanutty Banana Bliss Pops
- Pair these pops with a refreshing fruit salad for a colorful, healthy dessert.
- Serve alongside a glass of chilled almond milk for a creamy beverage option.
- Present them on a cute platter, garnished with fresh mint for a lovely touch.
- Offer alongside a scoop of Greek yogurt for an extra protein boost!
- Enjoy with a drizzle of honey for those with a sweet tooth.
FAQs about Peanutty Banana Bliss Pops
As I share my favorite Peanutty Banana Bliss Pops, I often receive questions from fellow home cooks who want to get the most out of this delightful recipe. Here are some of the most common inquiries, along with my personal insights:
Can I make these pops ahead of time?
Absolutely! These Peanutty Banana Bliss Pops can be prepared a day or two in advance. Just store any leftovers in an airtight container in the freezer. They’re perfect for quick snacks when you’re busy!
What can I use instead of Greek yogurt?
If Greek yogurt isn’t your thing, you can substitute it with any regular yogurt you like. Coconut yogurt is a wonderful dairy-free option too. Just keep in mind the consistency may vary slightly.
Can I use different fruits in this recipe?
Definitely! Feel free to experiment with fruits like strawberries, peaches, or even mangoes. Just remember to keep the fruit ripe for the best flavor. Each variation brings a unique twist!
How do I prevent the pops from sticking to the molds?
Using silicone molds is a game changer! They help the pops release easily. If you’re using plastic molds, running them under warm water helps loosen the pops, making it easy to get them out.
Can these pops be made sugar-free?
For a sugar-free version, skip the honey or maple syrup and use a sugar substitute like stevia. The natural sweetness from the bananas and peanut butter may be enough for your taste buds!
Final Thoughts
These Peanutty Banana Bliss Pops are more than just a tasty treat; they’re a celebration of simple joys in the kitchen. Each bite not only delivers a burst of creamy banana and rich peanut butter but also brings a smile to my family’s faces. As I watch them savor these delights on hot days, I’m reminded of the power of homemade snacks. They’re quick, wholesome, and have that magic touch only a warm kitchen can create. So why not treat your loved ones to this delightful frozen bliss? It’s a recipe that will surely become a favorite!
Print
Peanutty Banana Bliss Pops are a tasty treat you’ll love!
- Total Time: 4 hours 15 minutes
- Yield: 6–8 pops 1x
- Diet: Vegetarian
Description
Peanutty Banana Bliss Pops are a delicious and healthy frozen treat made with ripe bananas, Greek yogurt, and peanut butter, perfect for warm days.
Ingredients
- 2 ripe bananas
- 1 cup plain Greek yogurt
- 1/2 cup creamy peanut butter
- 2 tablespoons honey or maple syrup (optional, for extra sweetness)
- 1 teaspoon vanilla extract
- 1/4 cup mini chocolate chips (optional, for topping)
- 1/4 cup crushed nuts (e.g., walnuts, almonds, or peanuts for topping)
- Popsicle molds and sticks
Instructions
- Prep the Bananas: Peel the ripe bananas and cut them into halves or thirds, depending on the size you prefer for your pops.
- Make the Yogurt Mixture: In a mixing bowl, combine the plain Greek yogurt, creamy peanut butter, honey or maple syrup (if using), and vanilla extract. Mix well until smooth and creamy, ensuring there are no lumps.
- Coat the Bananas: Dip each banana piece into the peanut butter yogurt mixture, making sure it’s completely covered. Use a spoon to help if necessary.
- Add Toppings (Optional): After coating the bananas, you can sprinkle them with mini chocolate chips or crushed nuts for added texture and flavor.
- Mold the Pops: Place the coated banana pieces into the popsicle molds. Insert wooden sticks into each piece, making sure they are centered.
- Freeze: Carefully transfer the molds to the freezer and freeze for at least 4 hours, or until completely solid.
- Remove from Molds: Once the pops are frozen, run warm water over the outside of the molds for a few seconds to help release the pops easily. Gently pull on the sticks to remove the pops.
- Enjoy: Serve immediately, or store any leftover pops in an airtight container in the freezer for a cool, healthy snack later!
Notes
- Feel free to adjust the toppings based on your preferences.
- These pops can be stored in the freezer for a quick snack anytime!
- Prep Time: 15 minutes
- Category: Dessert
- Method: Freezing
- Cuisine: American
Nutrition
- Serving Size: 1 pop
- Calories: 150
- Sugar: 8g
- Sodium: 50mg
- Fat: 7g
- Saturated Fat: 1.5g
- Unsaturated Fat: 4g
- Trans Fat: 0g
- Carbohydrates: 20g
- Fiber: 2g
- Protein: 5g
- Cholesterol: 5mg