
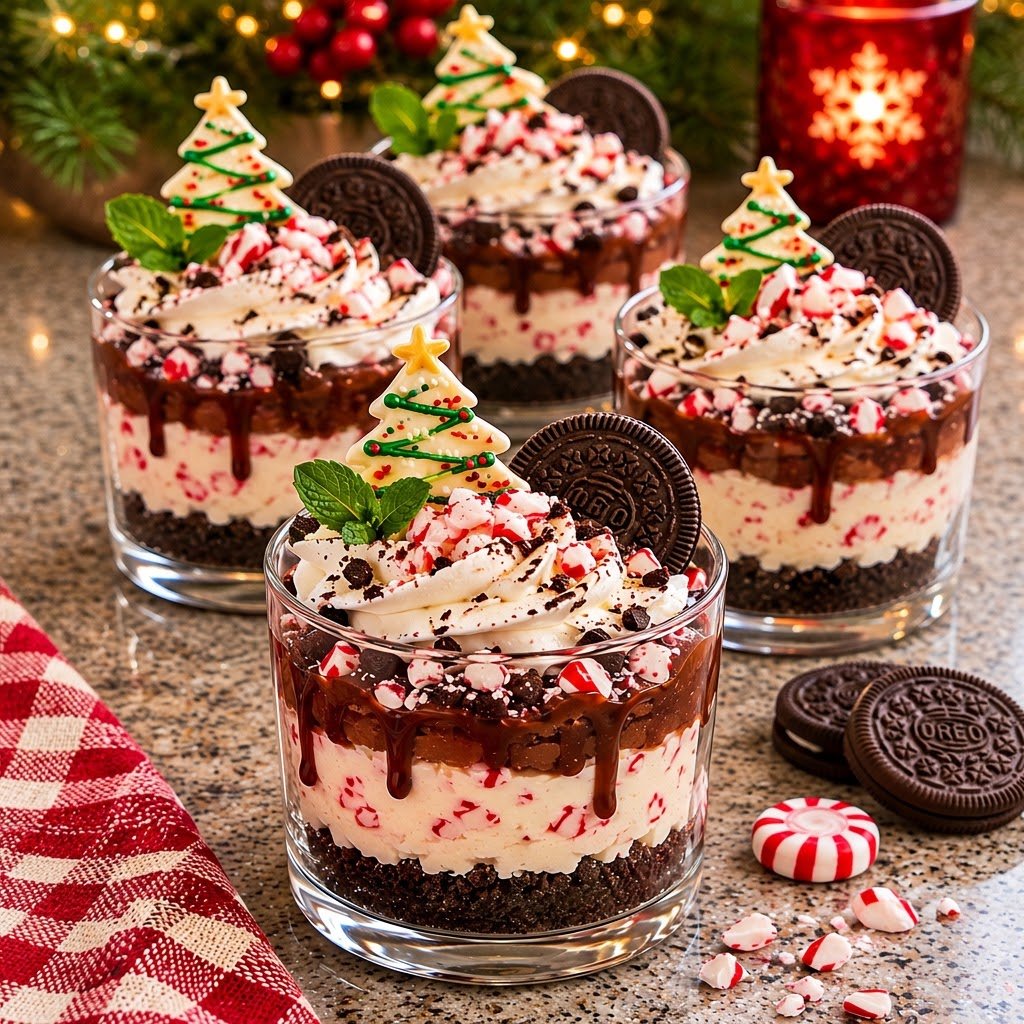
Introduction to Christmas Oreo Peppermint Cheesecake Cups
Ah, the holiday season! It’s a time filled with joy, laughter, and the sweet aroma of festive treats wafting through our kitchens. If you’re anything like me, the Christmas Oreo Peppermint Cheesecake Cups bring a sparkle to your eye. These delightful desserts not only taste amazing, but they also look stunning, making them perfect for impressing loved ones at holiday gatherings. Plus, they are a quick solution for those busy days when you’re juggling holiday shopping and family festivities. Trust me, you’ll want to take these to every celebration!
Why You’ll Love This Christmas Oreo Peppermint Cheesecake Cups
These Christmas Oreo Peppermint Cheesecake Cups are a game changer in holiday dessert making. They come together quickly, with no baking required, which is a lifesaver during this busy season. The luscious creamy filling combined with the crunchy Oreo crust offers a delightful contrast everyone will adore. Plus, the festive flavors of peppermint and chocolate make them a seasonal treat that guests will be raving about long after the last bite!
Ingredients for Christmas Oreo Peppermint Cheesecake Cups
Gathering the right ingredients is the first step to creating these festive treats. Here’s what you’ll need to whip up your Christmas Oreo Peppermint Cheesecake Cups:
- Oreo cookies: These beloved chocolate sandwich cookies form the base of our crust and add that signature flavor.
- Melted butter: Helps bind the crushed Oreos together for a sturdy crust. You can use unsalted butter for a controlled saltiness.
- Cream cheese: The creamy heart of our cheesecake filling! Make sure it’s softened to mix easily and yield that luscious texture.
- Cold heavy whipping cream: This is what makes your filling light and fluffy. Don’t skimp out on quality here; cold cream whips up better.
- Powdered sugar: Adds sweetness and helps achieve that smooth consistency in the filling.
- Vanilla extract: A pinch of vanilla will enhance all the flavors, giving a warm and inviting aroma.
- Peppermint extract: This little drop of minty goodness is what brings that holiday cheer into each bite!
- Chopped Oreo cookies: Fold these into the filling for an extra layer of crunch and flavor.
- Semi-sweet chocolate: Essential for creating a smooth, decadent ganache that sits on top of the cheesecake.
- Heavy cream: Used in the ganache to create a rich texture and balance the sweetness.
- Whipped cream: Perfect for decorating and adding a touch of elegance to your cups.
- Mini candy canes: Not just for decoration! These add a festive crunch that’s so fun during the holidays.
- More Oreo cookies: For those who can’t get enough, these are perfect as a topping option.
- Crushed peppermint candies: A delightful way to sprinkle a little more holiday cheer on top! They provide a delightful burst of flavor.
- Chocolate cookie crumbs: Use these for a gourmet touch and added texture in your presentation.
Don’t worry; I’ve provided exact measurements at the bottom of this article for your convenience, which you can easily print. Now that you have the scoop on the ingredients, let’s get ready to bring these festive cheesecake cups to life!
How to Make Christmas Oreo Peppermint Cheesecake Cups
Creating these Christmas Oreo Peppermint Cheesecake Cups is a delightful experience that combines flavors and textures beautifully. Follow these steps to craft your own festive treats that are sure to impress.
Step 1: Prepare the Oreo Crust
Start by mixing the finely crushed Oreo cookies with melted butter in a bowl. Stir until the crumbs are fully coated and it resembles wet sand.
Next, divide this mixture evenly among 4 to 6 clear round dessert glasses or cups.
With the back of a spoon, press the crumb mixture gently into the bottom to form a sturdy crust. You want it compact and ready to hold all that scrumptious filling!
Step 2: Make the Cheesecake Filling
In another large bowl, beat the softened cream cheese with powdered sugar, vanilla extract, and peppermint extract until it’s wonderfully smooth.
The cream cheese needs to be soft to blend perfectly; no lumps should remain!
Now, whip the cold heavy whipping cream in a separate bowl until stiff peaks form.
You’ll know it’s ready when you can hold the bowl upside down without it spilling all over!
Gently fold the whipped cream into the cream cheese mixture, combining them carefully to keep the airiness intact.
Step 3: Fold in Chopped Oreos
Take those roughly chopped Oreo cookies and gently fold them into the cheesecake filling.
This adds fun bites of chocolate goodness throughout!
Be careful, as you want to maintain the light texture of your filling.
A spatula works wonders for this part; it’s all about the gentle mixing!
Step 4: Create the Ganache
To make the ganache, heat ⅓ cup of heavy cream in a small saucepan over medium heat until it just starts to steam.
Then, pour the hot cream over the chopped semi-sweet chocolate in a separate bowl.
Let it sit for about 2 minutes to soften, then stir until you achieve a silky-smooth consistency.
Once it’s combined, allow it to cool slightly before using to avoid melting your cheesecake layer.
Step 5: Assemble the Cups
Now, it’s time to layer! Spoon the luscious cheesecake filling over the Oreo crust in each glass.
You can use a piping bag for a fancy touch, or simply a spoon works too.
After filling each cup, drizzle or spoon the cool ganache over the cheesecake layer, allowing it to cascade beautifully.
You can even let it run down the sides for an artful touch!
Step 6: Chill and Set
Cover your dessert cups with plastic wrap or foil and place them in the refrigerator.
Let them chill for at least 2 hours, or even longer if you prefer.
This will help the filling set up nicely, creating a deliciously creamy dessert that’s ready to impress.
Tips for Success
- Ensure your cream cheese is at room temperature for easy mixing.
- Use cold cream for whipping to achieve maximum fluffiness.
- Don’t rush the ganache cooling process; a lukewarm temperature is ideal to prevent melting the filling.
- For a more vibrant mint flavor, adjust the peppermint extract to your taste.
- Get creative with decorations! Use festive toppings to make it your own.
Equipment Needed
- Mixing bowls: Have a couple on hand; glass or stainless steel works great.
- Electric mixer: A hand mixer or stand mixer makes cream cheese and whipped cream mixing easy.
- Spatula: Perfect for folding ingredients and scraping down the sides of the bowl.
- Dessert glasses or cups: Clear options showcase your beautiful layers; you can also use mason jars!
- Double boiler or microwave-safe bowl: For melting chocolate to create that luscious ganache.
Variations
- Chocolate Oreo Peppermint Cheesecake Cups: Swap regular Oreos for chocolate-filled Oreos for an extra chocolatey twist.
- Gluten-Free Option: Use gluten-free Oreo cookies to make this dessert suitable for those avoiding gluten.
- Vegan Variation: Substitute cream cheese with vegan cream cheese and use coconut cream instead of heavy whipping cream for a plant-based treat.
- Different Extracts: Experiment with other extracts like almond or even orange for a unique flavor profile.
- Layered Parfaits: Instead of cups, layer the cheesecake filling with peppermint-flavored whipped cream and crushed cookies in a large trifle dish for a show-stopping dessert.
Serving Suggestions
- Serve with hot cocoa: Pair these desserts with a warm cup of hot chocolate for a cozy indulgence.
- Fancy it up: Present the cheesecake cups on a festive tray, garnished with fresh mint leaves for a pop of color.
- Complement with fruit: Fresh berries, like strawberries or raspberries, add a lovely contrast.
- Add holiday flair: Use themed plates or napkins to enhance your holiday table setting.
- Gift ready: These cups can be beautifully packaged in jars for delightful DIY gifts!
FAQs about Christmas Oreo Peppermint Cheesecake Cups
What can I substitute for cream cheese in this recipe?
If you’re avoiding dairy, vegan cream cheese works well as a substitute. You can also try using ricotta cheese for a slightly different texture—just make sure it’s well blended!
How long will these cheesecake cups last in the refrigerator?
These Christmas Oreo Peppermint Cheesecake Cups can last up to five days in the fridge if stored properly in an airtight container. Just make sure to keep the decorations fresh until serving!
Can I freeze the cheesecake cups?
While I recommend enjoying them fresh, you can freeze the cheesecake layers without the toppings. Thaw them in the refrigerator overnight before serving.
Can I make these cups ahead of time?
Absolutely! These cups can be prepared a day or two in advance. Just store them covered in the refrigerator, and add your toppings right before serving to keep them fresh and pretty!
How can I make the peppermint flavor stronger?
If you love a strong peppermint presence, simply increase the peppermint extract by a few drops. Just be careful not to overdo it, as it can get quite potent!
Final Thoughts
There’s something truly magical about sharing these Christmas Oreo Peppermint Cheesecake Cups with family and friends. Each bite envelops you in creamy comfort, while the crunch of chocolate adds a delightful twist.
As they sit proudly on your holiday table, they’ll not only impress your guests but also spark joy in your heart. The laughter, the compliments, and those happy faces—these moments are what holidays are all about.
So, roll up your sleeves and dive into this festive treat. I promise, these cheesecake cups will become a cherished part of your celebration!
PrintChristmas Oreo Peppermint Cheesecake Cups
- Total Time: 2 hours 30 minutes
- Yield: 4–6 servings 1x
- Diet: Vegetarian
Description
Delicious and festive Christmas Oreo Peppermint Cheesecake Cups with a crunchy Oreo crust, creamy cheesecake filling, and a rich chocolate ganache, perfect for the holiday season.
Ingredients
- 18 Oreo cookies, finely crushed
- 3 tablespoons melted butter
- 8 oz (225 g) cream cheese, softened
- ¾ cup (180 ml) cold heavy whipping cream
- ⅓ cup powdered sugar
- 1 teaspoon vanilla extract
- ⅛ teaspoon peppermint extract
- 6 Oreo cookies, roughly chopped
- 4 oz (115 g) semi-sweet chocolate
- ⅓ cup (80 ml) heavy cream
- Whipped cream for decoration
- Mini candy canes for decoration
- Oreo cookies for decoration
- Crushed peppermint candies for decoration
- Chocolate cookie crumbs for decoration
Instructions
- Mix finely crushed Oreo cookies with melted butter. Divide among 4–6 clear round dessert glasses and press gently.
- Beat softened cream cheese, powdered sugar, vanilla, and peppermint extract until smooth.
- Whip the cold heavy cream until stiff peaks form, then gently fold it into the cream cheese mixture.
- Fold in the chopped Oreo cookies and pipe the cheesecake filling over the crust.
- Heat ⅓ cup heavy cream until steaming. Pour over the chopped chocolate, let stand for 2 minutes, then stir until smooth. Cool until lukewarm.
- Spoon the ganache over the cheesecake filling.
- Refrigerate for at least 2 hours until set.
- Before serving, decorate with whipped cream, mini candy canes, Oreo cookies, and crushed peppermint candies.
Notes
- For best results, use cold heavy whipping cream for the cheesecake filling.
- Let the ganache cool slightly before pouring it over the filling to prevent it from melting the cream cheese layer.
- Prep Time: 30 minutes
- Cook Time: 0 minutes
- Category: Dessert
- Method: No-bake
- Cuisine: American
Nutrition
- Serving Size: 1 cup
- Calories: 350
- Sugar: 20g
- Sodium: 200mg
- Fat: 25g
- Saturated Fat: 12g
- Unsaturated Fat: 8g
- Trans Fat: 0g
- Carbohydrates: 30g
- Fiber: 1g
- Protein: 4g
- Cholesterol: 50mg