
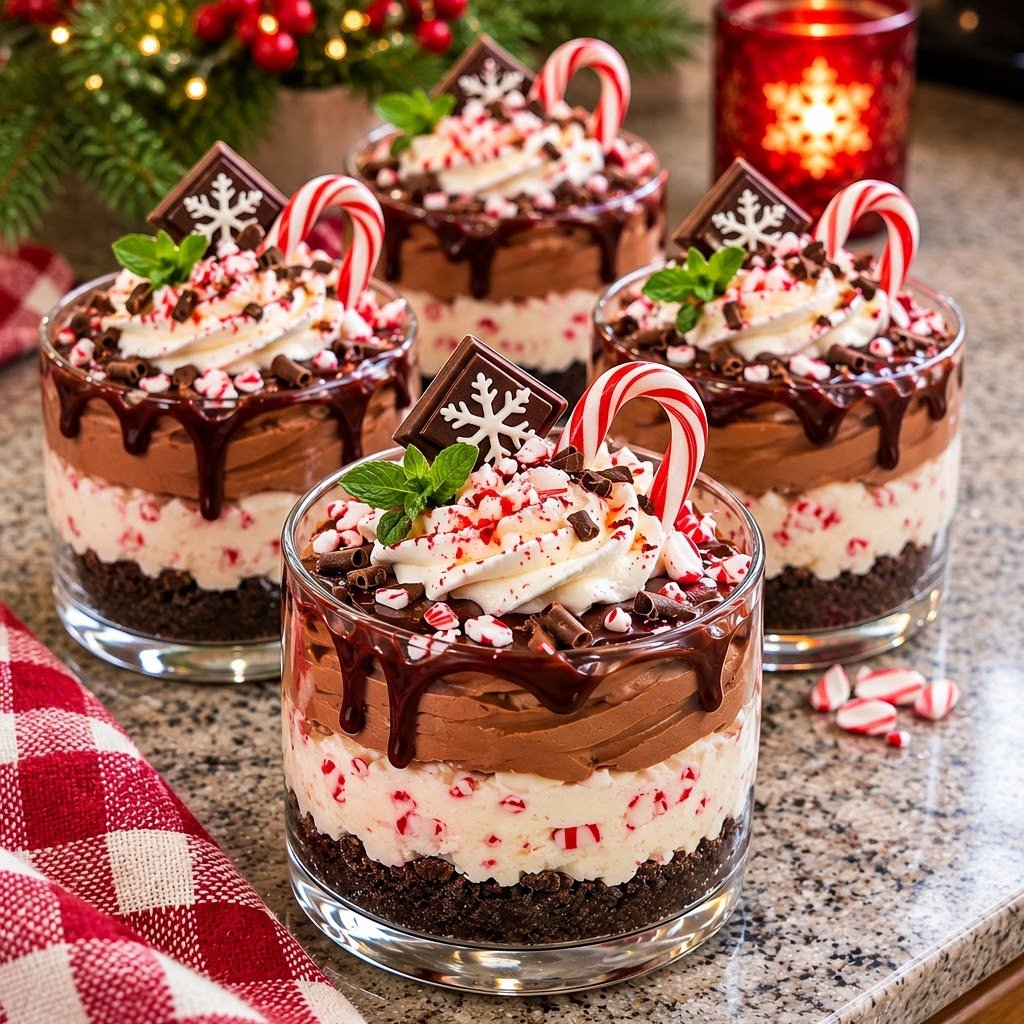
Introduction to Christmas Peppermint Chocolate Cheesecake Cups
With the holiday season in full swing, I’m always on the lookout for delightful treats that bring joy without a time-consuming fuss. Enter my Christmas Peppermint Chocolate Cheesecake Cups! These little gems combine layers of rich, velvety indulgence in a way that’s sure to impress family and friends. Plus, they’re beautifully festive and perfect for any gathering. Whether you’re trying to whip up a last-minute dessert or looking to elevate your holiday table, this recipe is just what you need. Let’s bring some holiday cheer to your kitchen!
Why You’ll Love This Christmas Peppermint Chocolate Cheesecake Cups
These Christmas Peppermint Chocolate Cheesecake Cups are a dream come true for busy schedules! They’re easy to make and require no baking, which means less stress for you. Each layer melds rich chocolate and refreshing peppermint perfectly, creating a taste sensation that sings “holiday magic.” Plus, they can be made ahead of time, so you can enjoy quality moments with loved ones instead of being stuck in the kitchen!
Ingredients for Christmas Peppermint Chocolate Cheesecake Cups
Gathering the right ingredients is the first step toward yummy success with these Christmas Peppermint Chocolate Cheesecake Cups. Let’s dive into each component that makes these mini desserts so irresistible!
- Chocolate Cookie Crust: Crushed Oreo cookies create a delicious, chocolatey base, but feel free to substitute with your favorite gluten-free cookies for a gluten-free version. The melted butter binds everything together, providing rich flavor and a lovely texture.
- Peppermint Cheesecake Layer: Softened cream cheese gives a smooth consistency, while powdered sugar adds just the right amount of sweetness. Cold heavy whipping cream is essential for a light, airy texture, and peppermint extract brings that refreshing minty flavor. Don’t forget the finely crushed candy canes—they add a delightful crunch and holiday flair!
- Chocolate Mousse Layer: Semi-sweet chocolate serves as the star of this velvety mousse. It’s important to let it cool to the right temperature before adding whipped cream. This ensures your mousse stays light and fluffy.
- Chocolate Ganache: This luscious topping is made from semi-sweet chocolate chips and heavy cream. Heating the cream beforehand ensures that the chocolate melts nicely, creating the smooth finish that crowns each dessert cup.
- Christmas Decorations: Elevate your cups with festive touches! Whipped cream can add a creamy puff on top, while mini candy canes and crushed peppermint candies give that extra holiday spirit. Chocolate curls and decorated chocolate squares will make your dessert look like it’s straight out of a bakery!
For exact measurements of each ingredient, check the end of this article where I’ve listed everything for printing. Happy cooking!
How to Make Christmas Peppermint Chocolate Cheesecake Cups
Now that we have our ingredients ready, let’s dive into creating these heavenly Christmas Peppermint Chocolate Cheesecake Cups! Follow these steps, and soon enough you’ll have a dessert that lights up your holiday season.
Prepare the Chocolate Cookie Crust
Begin by mixing your crushed Oreo cookies with melted butter in a bowl. It should resemble wet sand.
Next, divide the mixture evenly among your dessert glasses or cups. Use the back of a spoon or your fingers to press the mixture down firmly. You want a nice, compact crust that will hold up to the layers above.
A little tip: If you have trouble pressing the crust, try using a small glass to help. It’ll create even pressure and make for an even base!
Create the Peppermint Cheesecake Layer
In a mixing bowl, start by beating softened cream cheese until smooth.
Gradually add in the powdered sugar and peppermint extract, mixing until everything is well incorporated and creamy.
Now, in another bowl, whip the cold heavy cream until stiff peaks form. This is a crucial step for that light and airy texture.
Gently fold the whipped cream into the cream cheese mixture, taking care not to deflate the air you’ve whipped in. Finally, fold in your crushed candy canes for that festive crunch and flavor. This layer is going to be irresistible!
Layer the Chocolate Mousse
For the chocolate mousse, start by melting semi-sweet chocolate in a heatproof bowl. You can use the microwave for about 30 seconds at a time, stirring in between until just melted. Let it cool until it’s lukewarm but still pourable.
Whip the remaining heavy cream in a separate bowl until soft peaks form. This will create that luxurious creaminess in your mousse.
Stir a spoonful of the whipped cream into the melted chocolate to lighten it up. Then, gently fold in the rest of the whipped cream. This technique keeps the mousse airy and light.
Add the Chocolate Ganache
Now it’s time to create the rich chocolate ganache that will glide over each dessert cup!
In a small saucepan, heat the heavy cream until it’s steaming but not boiling. Pour this hot cream over the semi-sweet chocolate chips in a bowl.
Let it sit for about two minutes. The heat will melt the chocolate. Then stir until it’s completely smooth.
To get a perfect ganache, let it cool slightly—it doesn’t need to thicken too much but should be pourable. This glossy finish will make your cheesecake cups pop!
Assemble and Chill
Let’s layer everything together! First, pipe the peppermint cheesecake mixture over the chilled cookie crust in each cup, filling them about two-thirds full.
Next, add a layer of the chocolate mousse on top of the cheesecake. You can use a piping bag or just a spoon to gently layer it on.
Finish by drizzling on the chocolate ganache, letting it cascade over the sides of your cups for a beautiful presentation.
Now, cover your dessert cups with plastic wrap and refrigerate them for at least two hours. This step is vital for letting all those incredible layers set beautifully!
Tips for Success
- Make sure to use softened cream cheese for easy mixing; it will blend smoothly with the other ingredients.
- Keep all your cream cold before whipping; it helps achieve those fluffy, airy peaks.
- For more uniform layers, use a piping bag for the cheesecake and mousse layers.
- Chill your dessert cups longer if you can; they taste even better when fully set!
- Experiment with festive toppings to make each cup visually exciting.
Equipment Needed
- Mixing bowls: Essential for preparing layers. Any large bowl will do.
- Whipping mixer: A hand mixer or stand mixer will save you time.
- Dessert glasses or cups: Use any small serving glasses or mason jars.
- Piping bags: Optional, but they help create professional-looking layers.
- Microwave-safe bowl: For melting chocolate easily.
Variations
- For a gluten-free option, substitute traditional Oreo cookies with gluten-free chocolate cookies.
- Try adding a splash of peppermint schnapps to the peppermint cheesecake layer for an adult twist!
- Swap out semi-sweet chocolate for dark chocolate for a richer flavor profile.
- For a lower-sugar version, use sugar-free cookies and a sugar substitute in the cheesecake layer.
- Experiment with different flavored extracts, such as vanilla or almond, in the cheesecake layer for added depth.
Serving Suggestions for Christmas Peppermint Chocolate Cheesecake Cups
- Serve alongside a warm cup of hot cocoa, adding to the festive charm!
- Pair with peppermint-flavored coffee for a delightful after-dinner treat.
- Garnish each cup with a sprig of fresh mint for an elegant touch.
- Present on a festive platter, surrounded by glittering holiday ornaments for a stunning display.
- Consider adding some seasonal fruit, like pomegranate or berries, for a refreshing contrast.
FAQs about Christmas Peppermint Chocolate Cheesecake Cups
Can I make Christmas Peppermint Chocolate Cheesecake Cups ahead of time?
Absolutely! These cheesecake cups are perfect for preparing in advance. They can be stored in the refrigerator for up to three days before serving. This is a great way to free up time on busy holiday days!
How can I make these cheesecake cups gluten-free?
To make your Christmas Peppermint Chocolate Cheesecake Cups gluten-free, simply use gluten-free chocolate cookies instead of regular Oreos for the crust. It’s an easy swap that keeps everything just as delicious!
What’s the best way to store leftovers?
Leftovers can be stored in the refrigerator, covered loosely with plastic wrap or a lid. They will stay fresh for about three days. Just keep in mind that the layers may soften slightly over time.
Can I use different toppings for the cheesecake cups?
Definitely! Feel free to experiment with toppings like crushed nuts, sprinkles, or even different types of chocolate decorations. The possibilities are endless!
Is this recipe suitable for a crowd?
This recipe yields about 4-6 servings, but it’s easily scalable. You can double or triple the ingredients to serve more guests. Your holiday gathering will be a hit with these festive treats!
Preparation Cues and Common Mistakes
To ensure your Christmas Peppermint Chocolate Cheesecake Cups turn out perfectly, pay attention to these preparation cues and avoid common pitfalls.
- Measure Accurately: Use a kitchen scale for precision, especially with ingredients like powdered sugar and chocolate chips, as small variations can affect texture and sweetness.
- Don’t Rush Cream Cheese: Allow cream cheese to sit at room temperature for at least 30 minutes before mixing. This ensures creamy consistency and prevents lumps.
- Whip to Stiff Peaks: When whipping cream, watch closely for the right consistency. Over-whipping can lead to graininess and a butter-like texture.
- Cool Chocolate Properly: Let melted chocolate cool slightly before combining it with whipped cream; too hot chocolate can melt the cream, negating the airy mousse effect.
- Bake the Crust Right: If your cookie crust feels too crumbly after pressing, add a little more melted butter to help it bind together better.
Final Thoughts on Christmas Peppermint Chocolate Cheesecake Cups
There’s something truly magical about Christmas Peppermint Chocolate Cheesecake Cups. They bring together the nostalgia of holiday flavors with modern convenience in the kitchen. Each bite is a delightful blend of creamy cheesecake, rich chocolate, and a touch of peppermint that feels like a warm hug on a chilly evening. Whether you’re sharing these with loved ones or sneaking a bite for yourself, these cups embody the joy of the season. So, roll up your sleeves, gather your ingredients, and let the spirit of the holidays shine through in your kitchen this year!
PrintChristmas Peppermint Chocolate Cheesecake Cups
- Total Time: 2 hours 45 minutes
- Yield: 4–6 servings 1x
- Diet: Vegetarian
Description
Delicious mini cheesecake cups with layers of peppermint cheesecake, chocolate mousse, and chocolate ganache, perfect for the holiday season.
Ingredients
- Chocolate Cookie Crust
- 1½ cups crushed Oreo cookies
- 3 tablespoons melted unsalted butter
- Peppermint Cheesecake Layer
- 8 oz (225 g) cream cheese, softened
- ⅓ cup powdered sugar
- ¾ cup (180 ml) cold heavy whipping cream
- ¼ teaspoon peppermint extract
- 2 tablespoons finely crushed candy canes
- Chocolate Mousse Layer
- 4 oz (115 g) semi-sweet chocolate
- ¾ cup (180 ml) cold heavy whipping cream
- Chocolate Ganache
- ⅓ cup (60 g) semi-sweet chocolate chips
- ¼ cup (60 ml) heavy cream
- Christmas Decorations
- Whipped cream
- Mini candy canes
- Crushed peppermint candies
- Chocolate curls
- Small decorated chocolate Christmas squares
Instructions
- Mix crushed Oreo cookies with melted butter. Divide among 4–6 round dessert glasses and press gently.
- Beat cream cheese with powdered sugar and peppermint extract until smooth. Whip ¾ cup heavy cream separately until stiff peaks form. Fold it into the cream cheese mixture with the crushed candy canes.
- Pipe the peppermint cheesecake mixture over the cookie crust.
- Melt 4 oz semi-sweet chocolate and let cool until just lukewarm. Whip the remaining ¾ cup heavy cream until soft peaks form. Stir a little whipped cream into the chocolate, then gently fold in the rest.
- Pipe the chocolate mousse over the peppermint cheesecake layer.
- Heat ¼ cup heavy cream until steaming, pour over the chocolate chips, let stand for 2 minutes, and stir until smooth. Cool until slightly thickened, then spoon a thin layer over the mousse.
- Refrigerate the dessert cups for at least 2 hours until set.
- Just before serving, decorate with whipped cream, mini candy canes, chocolate curls, crushed peppermint, and chocolate decorations.
Notes
- Ensure the cream cheese is softened for easier mixing.
- You can substitute gluten-free cookies for a gluten-free version.
- Store any leftovers in the refrigerator, covered.
- Prep Time: 30 minutes
- Cook Time: 15 minutes
- Category: Dessert
- Method: No-Bake
- Cuisine: American
Nutrition
- Serving Size: 1 cup
- Calories: 300
- Sugar: 20g
- Sodium: 150mg
- Fat: 24g
- Saturated Fat: 14g
- Unsaturated Fat: 6g
- Trans Fat: 0g
- Carbohydrates: 30g
- Fiber: 1g
- Protein: 4g
- Cholesterol: 50mg