Introduction to Easter Egg Cheesecake Jars
As the vibrant colors of spring bloom around us, nothing captures the essence of Easter quite like these delightful Easter Egg Cheesecake Jars. They’re not just a sweet treat; they embody joy and celebration. I remember the first time I made these, my kids’ faces lit up with excitement when they saw those colorful candies on top. It’s a perfect dessert for busy moms, combining no-bake convenience with a festive flair. So, if you’re looking for a delicious way to bring a smile to your family this Easter—let’s get started!
Why You’ll Love This Easter Egg Cheesecake Jars
These Easter Egg Cheesecake Jars are a game-changer in the busy kitchen. They take just 20 minutes of prep time, making them perfect for hectic schedules. The blend of creamy cheesecake and crunchy crust offers a taste that’s simply irresistible! Plus, children can help decorate them with their favorite candies, bringing family together while creating sweet memories. Trust me, this dessert will leave everyone asking for seconds!
Ingredients for Easter Egg Cheesecake Jars
Gather your ingredients for these delightful Easter Egg Cheesecake Jars! You’ll need creamy cream cheese, sweet powdered sugar, a touch of vanilla extract, fluffy heavy cream, crunchy graham crackers, and melted butter. Don’t forget the mini chocolate eggs or any festive Easter candies you love! Exact quantities are at the bottom, ready for printing, so don’t worry about memorizing everything just yet!
Cream Cheese and Sugar
Cream cheese acts as the star ingredient, bringing a rich and creamy texture to your cheesecake filling. It’s like a silky blanket that wraps around your taste buds! The powdered sugar adds just the right amount of sweetness, elevating that creamy goodness to dessert perfection. Together, they create a scrumptious base that’s utterly irresistible.
Heavy Cream
Heavy cream is what gives these jars their dreamy lightness and luxurious creaminess. Whipping it until stiff peaks form creates that fluffy texture that makes each bite oh-so-delightful! It’s like a sprinkle of magic, transforming the cheesecake filling into something that feels extra special and indulgent.
Graham Crackers and Butter
Now, let’s talk crust! Crushed graham crackers combined with melted butter create a golden, buttery base that complements the cheesecake beautifully. It’s the perfect balance of crunch and flavor, reminding me of sun-soaked picnics by the lake. The graham cracker crust holds everything together, giving each spoonful a satisfying crunch!
Festive Toppings
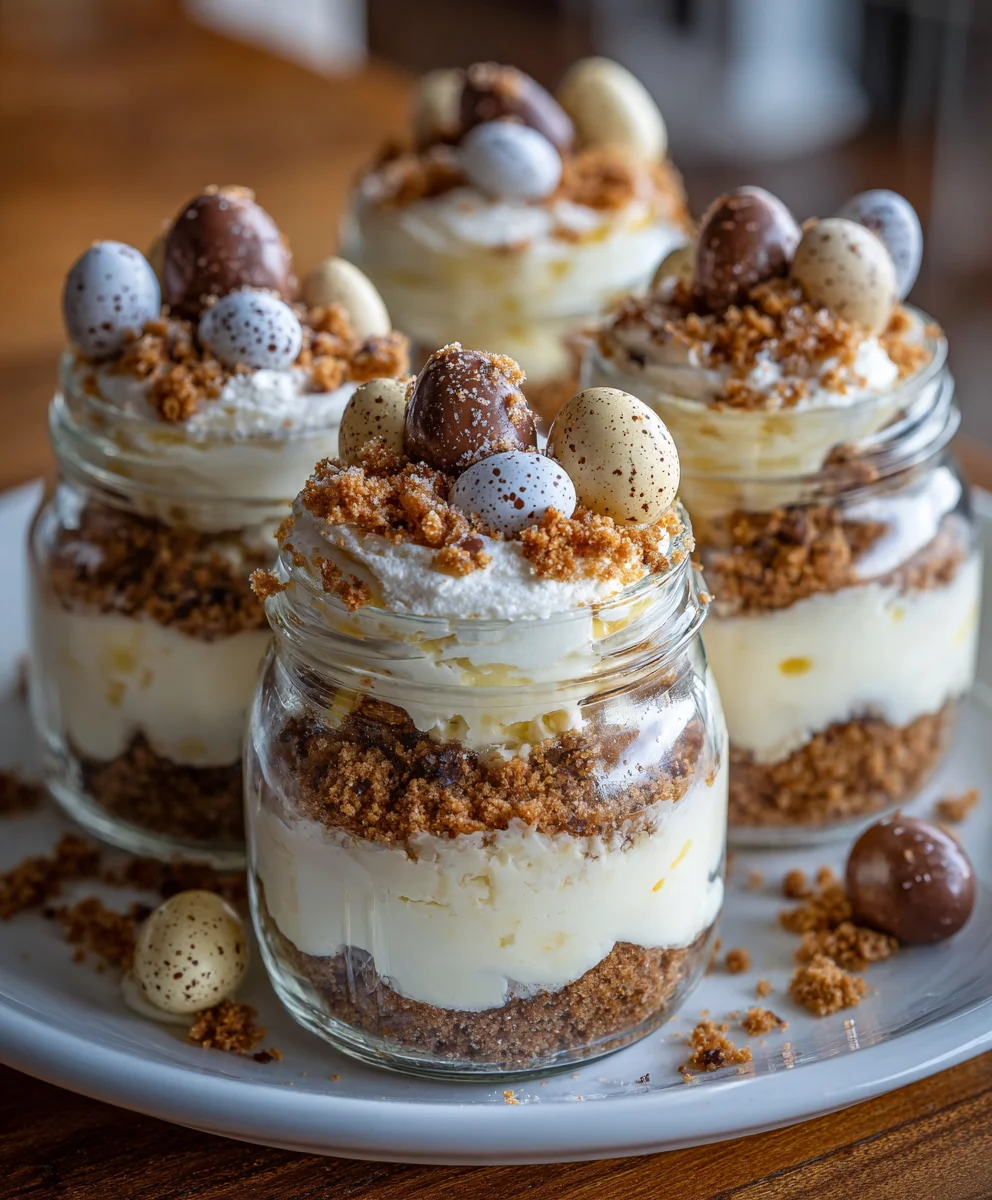
Of course, we can’t forget the fun part—decorating! Mini chocolate eggs or colorful candies are ideal for topping your jars. They add a playful pop of color and sweetness that makes the jars feel festive. You can let your creativity flow here—think jellybeans, chocolate bunnies, or even pastel-colored sprinkles if you like! The options are endless!
How to Make Easter Egg Cheesecake Jars
Let’s dive into the fun of making these Easter Egg Cheesecake Jars! The process is simple yet rewarding. I’ll walk you through each step, ensuring you create a dessert that not only tastes fantastic but also looks delightful. Let’s get those jars ready!
Prepare the Cream Cheese Mixture
Start by softening your cream cheese. It should feel like a fluffy cloud, not a hard block! I like to let it sit out for about 30 minutes before mixing. In a bowl, beat the softened cream cheese until it’s smooth and creamy, free of lumps. Gradually add in the powdered sugar and vanilla extract. Keep mixing until everything is well blended. The mixture should be thick yet smooth, perfect for a cheesecake filling!
Whip the Heavy Cream
Next, let’s make that heavy cream light! In a separate bowl, whip your heavy cream until it forms stiff peaks. This can be done with an electric mixer or a whisk—it’s a workout either way! When the peaks stand upright without drooping, you’re ready to fold the whipped cream into the cream cheese mixture. Remember, folding is key here. Go slowly so you don’t deflate that lovely airiness you just created!
Make the Graham Cracker Crust
Now, it’s crust time! In another bowl, combine your crushed graham crackers with melted butter. Stir until everything is coated and resembles wet sand. This buttery goodness is what gives your crust its delightful crunch! Grab a spoon and taste a bit of the mix—oh, it’s like summer in your mouth! You’re now ready to layer this crust in the jars.
Layer the Cheesecake Mixture
Grab those jars and start building your masterpiece! First, spoon a layer of the graham cracker crust into the bottom of each jar, packing it down gently. Then, layer a generous portion of the cheesecake mixture on top. Repeat the layers until the jar is filled, making sure the last layer is cheesecake. This creates a beautiful presentation that’s wonderfully inviting!
Add Your Toppings
Time to make it festive! Decorate the tops of each jar with mini chocolate eggs or any Easter candy you adore. I love using bright colors to make the jars pop! Feel free to get creative; even a sprinkle of crushed graham cracker on top adds a nice touch. Remember, it’s all about that whimsical, festive vibe!
Chill Before Serving
Lastly, the waiting game! Place your jars in the refrigerator for at least two hours. This time helps the flavors meld and allows the cheesecake to set just right. When you’re ready to serve, pull them out, and watch the smiles spread as you dig into that creamy goodness. Trust me, your patience will be rewarded!
Tips for Success
- Make sure your cream cheese is at room temperature for a smoother mix.
- Use an electric mixer for whipping the heavy cream to achieve stiff peaks effortlessly.
- Pack the graham cracker crust firmly in each jar to avoid crumbling.
- Refrigerate longer than two hours if you prefer a firmer cheesecake texture.
- Experiment with different candies for a unique twist each time you make them!
Equipment Needed
- Mixing bowls – any standard size will do!
- Electric mixer or whisk for whipping cream – go with what you have on hand.
- Measuring cups and spoons – essential for accuracy.
- Spoon for layering – your regular kitchen spoon works perfectly.
- Small jars or cups for assembling – mason jars are a charming option!
Variations on Easter Egg Cheesecake Jars
- Use flavored cream cheese, like strawberry or chocolate, for a fruity or richer twist!
- Swap out heavy cream for coconut cream to make dairy-free cheesecake jars.
- Mix in crushed berries or lemon zest for a refreshing flavor boost!
- For a gluten-free version, use gluten-free graham crackers in the crust.
- Try different toppings such as fresh fruit, nuts, or a drizzle of caramel for a unique spin.
Serving Suggestions
- Pair these jars with a light fruit salad for a refreshing contrast.
- Serve alongside hot coffee or tea to balance the sweetness.
- Display them on a colorful serving tray for a festive look.
- Garnish with fresh mint leaves for an elegant touch.
FAQs about Easter Egg Cheesecake Jars
Can I make Easter Egg Cheesecake Jars ahead of time?
Absolutely! These jars can be made a day in advance, allowing the flavors to meld beautifully. Just make sure to keep them refrigerated until you’re ready to serve.
What can I substitute for the cream cheese?
If you’re looking for a lighter option, you can use Greek yogurt or mascarpone cheese. They’ll provide a similar creamy texture while adding their unique flavors.
Are Easter Egg Cheesecake Jars suitable for kids?
Yes! This no-bake dessert is a hit with kids, especially when they get to help decorate their own jars. Just keep an eye on the candy toppings to ensure they’re age-appropriate.
How long do these cheesecake jars last in the fridge?
Your Easter Egg Cheesecake Jars will stay fresh for about 3–4 days in the refrigerator. Just make sure they’re well-covered to prevent them from absorbing other flavors.
Can I use sugar alternatives in the recipe?
Definitely! You can substitute powdered sugar with a sugar alternative like erythritol or monk fruit sweetener. Just be sure to adjust the amount according to the product’s instructions for best results!
Final Thoughts
Creating these Easter Egg Cheesecake Jars brings such joy to my kitchen! Every step is filled with laughter, memories, and, of course, deliciousness. Watching my family dive into these colorful treats is like witnessing spring itself—full of life and happiness. This recipe allows busy moms like us to whip up something special without all the fuss.
These jars aren’t just desserts; they’re little moments of celebration, bringing us together to share sweetness with each other. So, this Easter, let’s make it a memorable one with a little help from these delightful cheesecake jars!
Print
Easter Egg Cheesecake Jars
- Total Time: 2 hours 20 minutes
- Yield: 4 jars 1x
- Diet: Vegetarian
Description
Easter Egg Cheesecake Jars are a delightful and festive dessert that combines creamy cheesecake filling with a crunchy graham cracker crust, topped with colorful Easter candies.
Ingredients
- 8 oz cream cheese, softened
- 1/2 cup powdered sugar
- 1 tsp vanilla extract
- 1 cup heavy cream
- 1 cup crushed graham crackers
- 1/4 cup unsalted butter, melted
- Mini chocolate eggs or other Easter candies for topping
Instructions
- In a mixing bowl, beat the softened cream cheese until smooth.
- Gradually add the powdered sugar and vanilla extract, mixing until well combined.
- In a separate bowl, whip the heavy cream until stiff peaks form, then gently fold it into the cream cheese mixture.
- In another bowl, combine crushed graham crackers with melted butter and mix well.
- In small jars or cups, layer the graham cracker mixture, followed by the cheesecake filling.
- Repeat the layers until the jars are filled.
- Top each jar with mini chocolate eggs or other candies.
- Refrigerate for at least 2 hours before serving to allow the flavors to meld and the cheesecake to firm up.
Notes
- For best results, use full-fat cream cheese.
- Let the jars sit in the refrigerator longer for a firmer cheesecake.
- You can customize the toppings based on your favorite Easter candies.
- Prep Time: 20 minutes
- Cook Time: 0 minutes
- Category: Dessert
- Method: No-Bake
- Cuisine: American
Nutrition
- Serving Size: 1 jar
- Calories: 350
- Sugar: 15g
- Sodium: 150mg
- Fat: 25g
- Saturated Fat: 15g
- Unsaturated Fat: 5g
- Trans Fat: 0g
- Carbohydrates: 30g
- Fiber: 1g
- Protein: 4g
- Cholesterol: 80mg