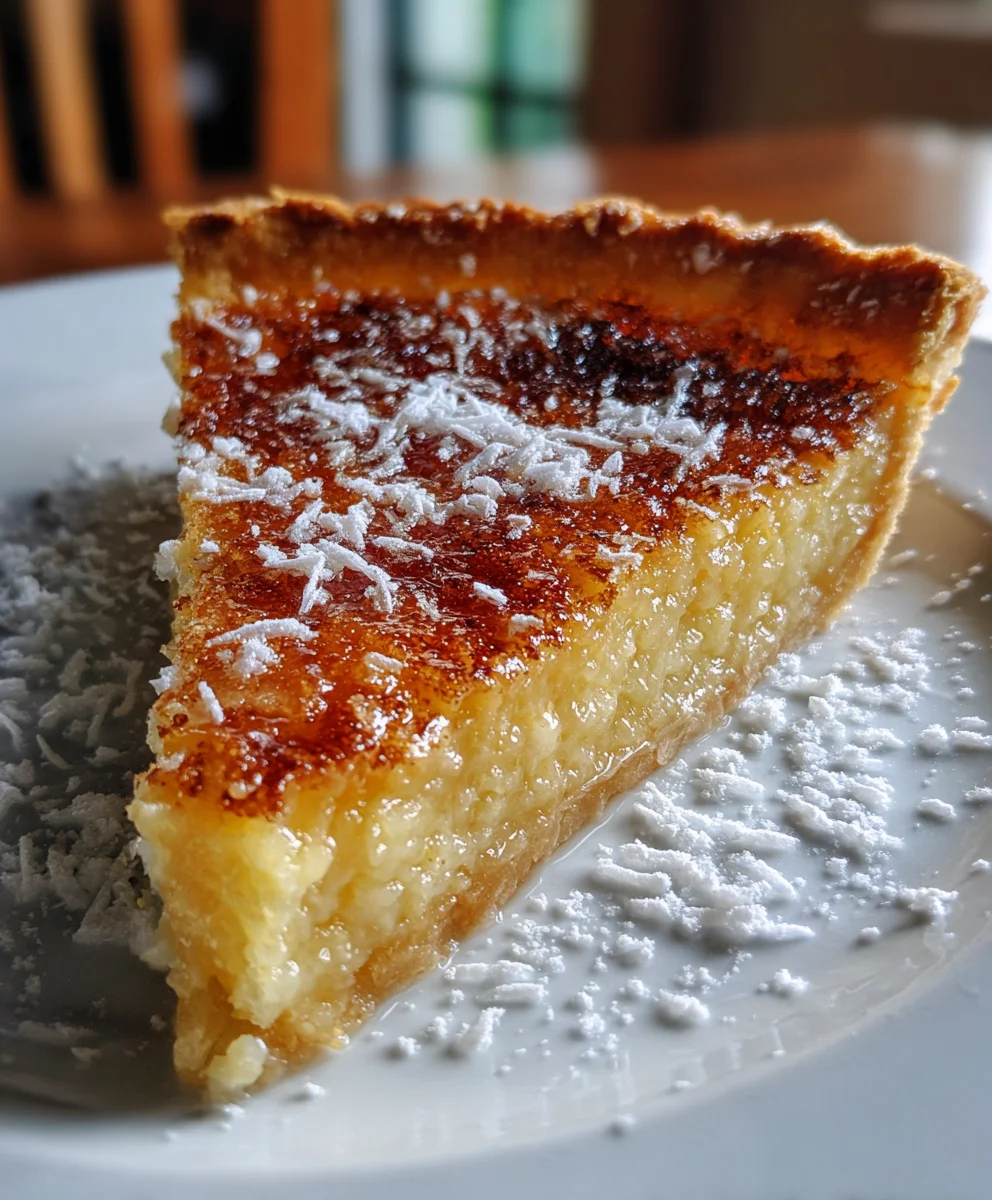
Introduction to Hillbilly Pie
Hey there, fellow dessert lovers! Have you ever craved a sweet treat that feels like a warm hug? Let me introduce you to Hillbilly Pie—a comforting dessert that showcases rich flavors and blends textures in a delightful way. Whether you need a quick solution for a busy weeknight or something special to impress your loved ones, this recipe is perfect. It’s simple, crowd-pleasing, and just bursting with nostalgia. Plus, it’s the kind of dessert that makes you feel right at home, no matter where you are. So, let’s dive into this delicious journey together!
Why You’ll Love This Hillbilly Pie
This Hillbilly Pie is not just any dessert; it’s your new best friend in the kitchen! It’s quick to whip up, taking just over an hour from start to finish. The flavors are simply divine, offering a sweet taste that warms your heart. Plus, it’s an impressive showstopper that looks fancy, yet it’s so easy to make. Trust me, everyone will be asking for seconds!
Ingredients for Hillbilly Pie
Let’s gather our delightful ingredients for this scrumptious Hillbilly Pie! Here’s what you’ll need to bring this sweet wonder to life:
- Unbaked pie crust: The foundation of your pie—store-bought or homemade, both work like a charm!
- Unsalted butter: Melted, it adds richness and a luscious buttery flavor. Just be sure to let it cool to avoid cooking your eggs.
- Granulated sugar: The sweet star of our show! It brings the right amount of sweetness to balance everything.
- Large eggs: These help bind your filling together, giving it a perfect, custard-like texture.
- All-purpose flour: Just a tablespoon is enough to provide some structure without making it dense. A great way to stabilize without overpowering!
- Buttermilk: This creamy delight adds tanginess and moisture, keeping the pie tender and scrumptious.
- Vanilla extract: A splash elevates all the flavors to new heights, making every bite feel like a hug!
- Salt: A pinch intensifies the sweetness and balances the flavors beautifully.
- Ground cinnamon and nutmeg (optional): These warm spices are optional but can amp up the cozy fall vibes with every bite!
- Powdered sugar: To create a sweet glaze that’s the cherry on top of your pie, adding a visual and delicious finish.
- Milk or cream: Just a little for your glaze, providing the perfect consistency to drizzle over the pie.
- Extra vanilla extract (for the glaze): Because who doesn’t want a little more vanilla goodness?
All the ingredients listed here will create a flavor-packed Hillbilly Pie. If you’re curious about the exact measurements, don’t worry! You can find them at the bottom of the article, ready for printing. Let’s get cooking!
How to Make Hillbilly Pie
Now that we have our ingredients ready, let’s jump into making this fantastic Hillbilly Pie! Follow these simple steps, and soon you’ll have a dessert that delights everyone who tastes it!
Step 1 – Preheat and Prepare
First things first, preheat your oven to 350°F (175°C). While that’s warming up, prepare your pie crust. Whether you’re using a store-bought crust or a homemade one, this step is essential for a perfectly baked pie!
Step 2 – Melt the Butter
Next, melt your unsalted butter in a microwave or on the stove. Make sure to let it cool slightly after melting. This helps to avoid cooking the eggs in the next step—no scrambled eggs in our dessert!
Step 3 – Mix Eggs and Sugar
In a large mixing bowl, whisk together the large eggs and granulated sugar until you achieve a smooth and creamy mixture. This creates the sweet base for your Hillbilly Pie, and it’s essential for that lovely texture!
Step 4 – Incorporate Butter
Now, slowly add the cooled melted butter into your sweet egg mixture while continuing to whisk. This step ensures a silky texture that binds everything together beautifully.
Step 5 – Add Buttermilk and Vanilla
Time to enhance the flavor! Stir in the buttermilk and a teaspoon of vanilla extract. These ingredients will give depth to your filling and make it irresistibly delicious.
Step 6 – Combine Dry Ingredients
Now, it’s time to bring in the dry ingredients! Add the all-purpose flour, salt, and any optional spices like cinnamon and nutmeg. Mix until the texture is smooth and creamy, reminiscent of a comforting custard.
Step 7 – Fill the Pie Crust
Gently pour your delightful filling into the prepared pie crust. Don’t be afraid to lick a spoon while you’re at it—it’s that good! Keep it neat; a clean edge makes for a lovely presentation.
Step 8 – Bake to Perfection
Pop your pie into the preheated oven and bake for 45 to 55 minutes. You’ll know it’s done when it’s golden brown and the kitchen fills with that heavenly aroma! Resist the urge to peek too often; we want all that warmth to stay inside.
Step 9 – Cool and Glaze
Once baked, allow the pie to cool completely. This step is crucial for the filling to set. While it cools, prepare your glaze by mixing powdered sugar, milk or cream, and a touch of vanilla extract. Drizzle that sweet goodness on top before serving!
Tips for Success
- Always let the melted butter cool before adding it to the eggs. It prevents any cooking mishaps.
- Make sure your pie crust is well-chilled for a flaky texture.
- If you want a richer flavor, don’t hesitate to add an extra sprinkle of cinnamon or nutmeg.
- For a perfect glaze, mix until smooth, adjusting the consistency with more milk or cream as needed.
- Pair with whipped cream or vanilla ice cream for an extra touch of indulgence!
Equipment Needed for Hillbilly Pie
- Mixing bowls: A large bowl for combining ingredients and a smaller one for whisking.
- Whisk: Essential for blending eggs and sugar smoothly; a fork can work too in a pinch.
- Measuring cups and spoons: To ensure ingredient accuracy; use kitchen scales as an alternative.
- Pie dish: A 9-inch dish for baking; an oven-safe skillet can be a fun alternative!
- Oven mitts: To protect your hands while removing the hot pie.
Variations on Hillbilly Pie
- Fruit-Enhanced Hillbilly Pie: Add a cup of fresh berries or chopped apples to the filling for a fruity twist. It adds flavor and makes your pie even prettier!
- Nutty Delight: Incorporate chopped walnuts or pecans into the filling for a delightful crunch. Just be sure to adjust the sugar slightly since nuts are naturally sweet!
- Chocolate Version: For chocolate lovers, mix in half a cup of mini chocolate chips. Just imagine the gooey chocolate melting into the sweet custard—heavenly!
- Gluten-Free Option: Substitute all-purpose flour with a gluten-free baking blend. It’ll still yield that rich, satisfying texture without the gluten!
- Spiced Hillbilly Pie: Experiment with different spices, like ginger or allspice, for a unique flavor profile. Each spice brings its own cozy vibe to this comforting dessert.
Serving Suggestions for Hillbilly Pie
- Serve each slice warm, topped with a generous dollop of whipped cream or a scoop of vanilla ice cream for a creamy contrast.
- A drizzle of chocolate or caramel sauce adds an indulgent touch that sweetens the experience!
- Pair with a cup of hot coffee or spiced tea for a delightful after-dinner treat.
FAQs about Hillbilly Pie
What is Hillbilly Pie?
Hillbilly Pie is a delectable comfort dessert that combines buttery goodness with a sweet custard-like filling. It’s a crowd-pleaser that captures the essence of homestyle baking, making it perfect for family gatherings or just a simple weekend treat.
Can I make Hillbilly Pie ahead of time?
Absolutely! You can bake Hillbilly Pie a day in advance. Just store it in the refrigerator once it’s completely cooled. When you’re ready to serve, drizzle on the glaze and enjoy! It tastes just as good the next day, preserving that comforting flavor.
What can I serve with Hillbilly Pie?
This pie pairs beautifully with whipped cream or vanilla ice cream! You might also enjoy it alongside a steaming cup of coffee or a cozy herbal tea for a lovely dessert experience.
Is it possible to customize Hillbilly Pie?
Yes! You can enjoy many variations, like adding fruits or nuts. Get creative with spices, or even try a chocolate version if you’re feeling adventurous. The beauty of Hillbilly Pie lies in its versatility!
How do I store leftovers?
To store any leftover Hillbilly Pie, cover it tightly with plastic wrap or foil and keep it in the refrigerator. It should stay fresh for up to three days. Just remember to bring it back to room temperature before serving for the best flavor.
Final Thoughts
Baking Hillbilly Pie isn’t just about creating a dessert; it’s crafting a slice of happiness that brings everyone together. As you savor each bite, the combination of buttery crust and sweet, creamy filling will evoke memories and warm smiles. This recipe is your ticket to a delightful escape—a comforting reminder of home baked treats. Whether you share it with loved ones or savor it alone, every slice is a moment of joy. So roll up your sleeves, embrace the mess, and let Hillbilly Pie fill your kitchen with love and laughter. Happy baking, friends!
Print
Hillbilly Pie
- Total Time: 1 hour 10 minutes
- Yield: 8 servings 1x
- Diet: Vegetarian
Description
Hillbilly Pie is a delectable comfort dessert that blends rich flavors and textures in a delightful way.
Ingredients
- 1 unbaked pie crust
- 1/2 cup unsalted butter, melted
- 1 cup granulated sugar
- 2 large eggs
- 1 tablespoon all-purpose flour
- 1 cup buttermilk
- 1 teaspoon vanilla extract
- 1/4 teaspoon salt
- 1/2 teaspoon ground cinnamon (optional)
- 1/4 teaspoon nutmeg (optional)
- 1 cup powdered sugar
- 2 tablespoons milk or cream
- 1/2 teaspoon vanilla extract
Instructions
- Preheat oven to 350°F (175°C) and prepare pie crust.
- Melt butter and let it cool slightly.
- Whisk eggs and sugar until smooth.
- Add butter slowly while mixing.
- Stir in buttermilk and vanilla.
- Add dry ingredients and mix until smooth.
- Pour filling into crust.
- Bake 45–55 minutes until golden.
- Cool completely before serving.
- Prepare glaze and drizzle on top.
Notes
- Ensure the butter is cooled to prevent cooking the eggs.
- Serve with whipped cream for added flavor.
- For a richer taste, add more spices as desired.
- Prep Time: 15 minutes
- Cook Time: 55 minutes
- Category: Dessert
- Method: Baking
- Cuisine: American
Nutrition
- Serving Size: 1 slice
- Calories: 350
- Sugar: 30g
- Sodium: 200mg
- Fat: 18g
- Saturated Fat: 10g
- Unsaturated Fat: 6g
- Trans Fat: 0g
- Carbohydrates: 45g
- Fiber: 1g
- Protein: 4g
- Cholesterol: 60mg