Introduction to Mini Quiches
As a busy mom, I know how precious time can be, especially when it comes to meal prep. That’s why I absolutely adore making Mini Quiches! These delightful bite-sized snacks are not just easy to whip up, but they’re also a crowd-pleaser at any gathering.
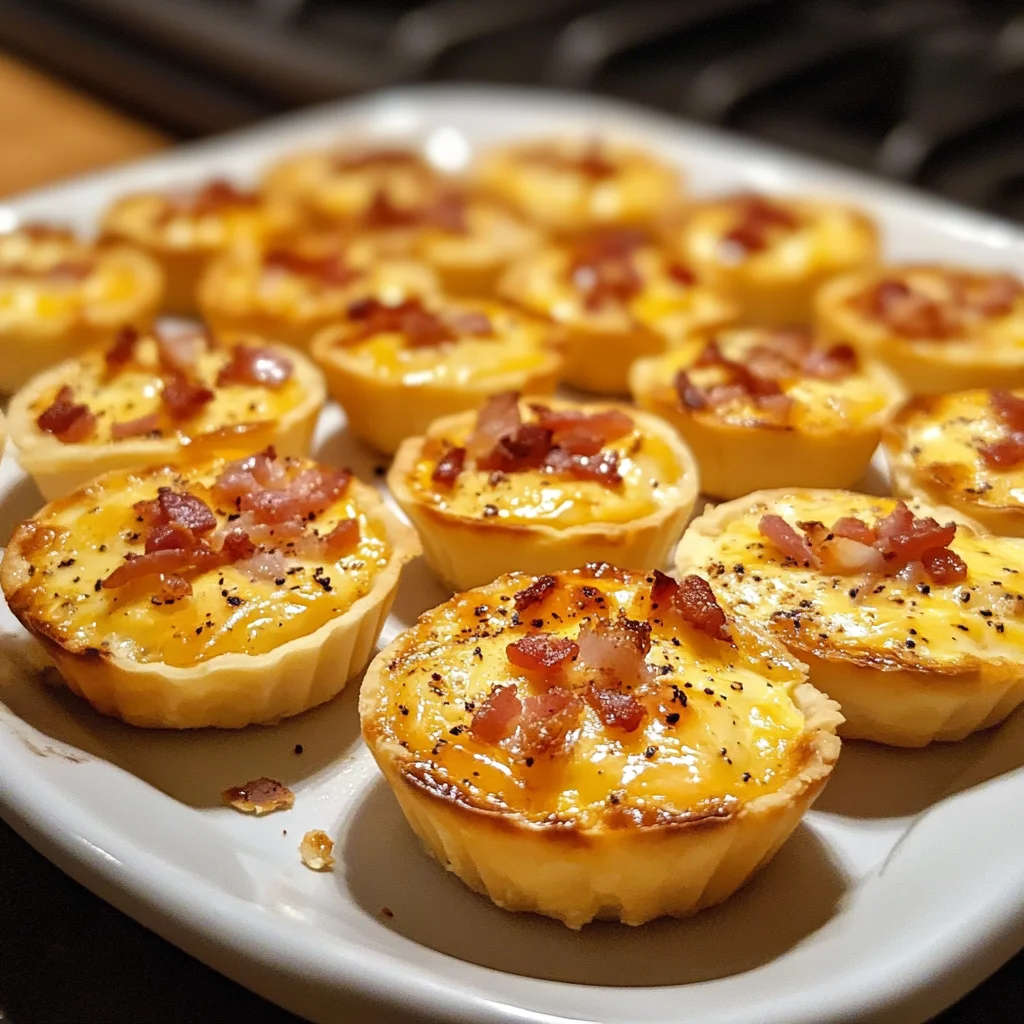
Whether it’s a quick breakfast before the school rush or a fun appetizer for friends, Mini Quiches provide a versatility that’s hard to beat. They are packed with cheesy goodness and smoky bacon, making them the perfect treat to impress your loved ones and satisfy those picky eaters!
Why You’ll Love This Mini Quiches
Let me tell you why Mini Quiches are a total game changer! First off, they’re super quick to make, taking just 40 minutes from start to finish. Plus, they’re perfect for customizing, allowing you to cater to everyone’s tastes. And let’s not forget the flavor explosion you get in each bite! These little morsels are not only delicious but also make meal times feel special—perfect for any occasion.
Ingredients for Mini Quiches

Gathering the right ingredients is half the fun of making Mini Quiches! Here’s what you need:
- Shredded cheddar cheese: This creamy cheese adds a rich flavor. You can switch it up with mozzarella or pepper jack for a different twist.
- Cooked bacon: Crumbled bacon provides a salty crunch. For a lighter version, try turkey bacon or sautéed veggies instead.
- Finely chopped onion: Onions bring a subtle sweetness. Green onions or shallots can make a delicious alternative!
- Milk: Milk helps create a fluffy texture. Almond or oat milk can be used for a dairy-free option.
- Heavy cream: Adds richness. You can substitute it with half-and-half for a lighter quiche.
- Large eggs: The base for your filling. Chickpea flour mixed with water can work for a vegan version.
- Salt: Just a pinch helps enhance all the flavors.
- Black pepper: A dash of pepper adds just the right kick. Feel free to play with spices like paprika or garlic powder!
- Mini pie crusts: These are the perfect vessels for your fillings. Look for pre-made crusts in the store or make your own if you’re feeling adventurous.
The exact quantities of these ingredients can be found at the bottom of the article, and they’re available for easy printing, so you’ll never lose your mini quiches recipe again!
How to Make Mini Quiches
Now for the exciting part! Making Mini Quiches is a delightful experience that fills your kitchen with mouthwatering aromas. Let’s get started on this quick and enjoyable adventure.
Step 1: Preheat the Oven
The first step is to preheat your oven to 375°F (190°C). This is crucial! A well-preheated oven ensures that your Mini Quiches bake evenly and develop that lovely golden color on top.
Step 2: Prepare the Mini Pie Crusts
Next, it’s time to lay out your mini pie crusts on a baking sheet. Think of leaving a little space in between them, just like friends holding hands at a party. This spacing allows heat to circulate for even cooking.
Step 3: Mix the Filling
In a medium mixing bowl, whisk together the eggs, milk, and heavy cream until you have a smooth blend. This creamy mixture creates the base for your quiches. The better you mix it, the fluffier your Mini Quiches will turn out!
Step 4: Add Seasoning
Now comes the magic of seasoning! Add salt and black pepper to the egg mixture. A little salt can bring out the flavors beautifully. If you want to throw in some garlic powder or paprika for a kick, go right ahead!
Step 5: Combine Fillings with Egg Mixture
Gently fold in the shredded cheese, crumbled bacon, and onions into the egg mixture. Make sure to distribute everything evenly. You want every Mini Quiche to be a delightful medley of flavors!
Step 6: Fill the Crusts
Carefully pour the filling into each mini pie crust, filling them about three-quarters full. Be cautious not to overfill, or you might end up with a messy oven, and we all want to dodge that hassle!
Step 7: Bake to Perfection
Pop the baking sheet into the oven and bake for about 20-25 minutes. Keep an eye out for that perfect golden-brown top! You can check for doneness by inserting a toothpick into the center of a quiche—if it comes out clean, you’re good to go.
Step 8: Cool and Serve
Once baked, let the Mini Quiches cool on the sheet for a few minutes before transferring them to a serving plate. Serving them warm or at room temperature makes for the best taste. Enjoy every bite of these delightful morsels!
Tips for Success

- Make sure your eggs are at room temperature for a fluffier texture.
- Don’t skip the preheating step; it’s key for even baking.
- Use a ladle to fill the crusts for mess-free pouring.
- Try not to over-bake—watch closely so they don’t dry out!
- Experiment with different fillings for fun flavors each time!
Equipment Needed
- Baking sheet: A sturdy one will help your Mini Quiches bake evenly; a cookie sheet works too.
- Medium mixing bowl: For whisking the egg mixture; any bowl will do, even a large measuring cup!
- Whisk or fork: For blending the ingredients smoothly; use a handheld mixer for convenience.
- Measuring cups: For precise measuring of ingredients; you can eyeball it for fun!
- Small knife: To lift the cooled quiches from crusts; a spatula can work in a pinch.
Variations
- Veggie Delight: Add in diced bell peppers, spinach, or mushrooms for a colorful, healthy twist.
- Gourmet Flavors: Try adding feta cheese and sun-dried tomatoes for a Mediterranean flair.
- Spicy Kick: Incorporate jalapeños or diced green chilies for some heat.
- Herb Infusion: Experiment with fresh herbs like basil or chives to elevate the flavor profile.
- Low-Carb Option: Replace the crust with almond flour or a cauliflower-based base for a keto-friendly version.
- Egg White Quiches: Use egg whites instead of whole eggs for a lighter, protein-packed bite.
Serving Suggestions
- Pair Mini Quiches with a fresh garden salad for a refreshing crunch.
- Serve alongside a bowl of fruit salad for a colorful, healthy contrast.
- Try them with tangy dipping sauces like ranch or sriracha for added flavor.
- For a brunch vibe, enjoy with mimosas or coffee for a bubbly touch.
- Present them on a beautiful platter, garnished with fresh herbs for an elegant touch!
FAQs about Mini Quiches
Can I make Mini Quiches ahead of time?
Absolutely! You can prepare the filling and fill the mini pie crusts in advance. Just cover them and refrigerate until you’re ready to bake. They also freeze well, so don’t hesitate to make a batch for future snacks!
What is the best way to store leftover Mini Quiches?
Store any leftovers in an airtight container in the fridge. They can stay fresh for up to three days. Just reheat in the oven for the best texture! A microwave can make them a bit soggy, so I recommend sticking to the oven.
Can I freeze Mini Quiches?
Yes, indeed! Freeze them after baking. Just allow them to cool completely, then place them in a freezer-safe bag or container. They can last for about 2-3 months in the freezer. Perfect for busy days!
What can I use instead of bacon in Mini Quiches?
There are plenty of delicious alternatives! Try crumbled sausage, diced ham, or even sautéed mushrooms for a flavor-packed vegetarian option. The beauty of Mini Quiches is that you can really personalize the filling!
How can I customize the flavors in my Mini Quiches?
Get creative! You can add different cheeses, vegetables, or even herbs. Spinach and feta create a lovely Mediterranean twist, while a smoky cheese can add depth. Let your taste buds guide you!
Final Thoughts
Making Mini Quiches is not just about the end result, but the joy of crafting something delicious that can bring your family together. They’re like little treasures packed with flavors that brighten any day. Whether you whip them up for brunch or a cozy dinner, each bite is a celebration of creativity and comfort. Plus, with all the customizable options, they never get old. You’ll find yourself smiling as you share them with friends or enjoy them during a quiet moment. Trust me, once you taste these, you’ll be hooked!
Print
Mini Quiches
- Total Time: 40 minutes
- Yield: 12 mini quiches 1x
- Diet: Low Calorie
Description
Mini Quiches are delightful bite-sized snacks filled with cheese, bacon, and onion, perfect for parties or quick meals.
Ingredients
- 1 1/2 cups shredded cheddar cheese
- 1/2 cup cooked bacon, crumbled
- 1/4 cup finely chopped onion
- 1/2 cup milk
- 1/2 cup heavy cream
- 4 large eggs
- 1/2 teaspoon salt
- 1/4 teaspoon black pepper
- 1 package mini pie crusts (about 12)
Instructions
- Preheat the oven to 375°F (190°C).
- Place the mini pie crusts on a baking sheet, ensuring they are evenly spaced.
- In a medium mixing bowl, whisk together the eggs, milk, and heavy cream until smooth and well-combined.
- Add the salt and black pepper to the egg mixture and whisk again to incorporate.
- Stir in the shredded cheddar cheese, crumbled bacon, and finely chopped onion into the egg mixture.
- Carefully pour the egg mixture into each mini pie crust, filling them about three-quarters of the way.
- Make sure to distribute the cheese, bacon, and onion evenly among the crusts.
- Place the baking sheet with the mini quiches into the preheated oven.
- Bake for 20-25 minutes, or until the quiches are golden brown on top and a toothpick inserted into the center comes out clean.
- Remove the mini quiches from the oven and let them cool for a few minutes on the baking sheet.
- Use a small knife to gently lift the quiches out of the pie crusts and transfer them to a serving plate.
- Serve warm or at room temperature for the best taste.
Notes
- Feel free to customize the filling with your favorite vegetables or meats.
- These mini quiches can be made ahead of time and reheated before serving.
- They are great for brunch or as appetizers for gatherings.
- Prep Time: 15 minutes
- Cook Time: 25 minutes
- Category: Snack, Appetizer
- Method: Baking
- Cuisine: American
Nutrition
- Serving Size: 1 mini quiche
- Calories: 150
- Sugar: 1g
- Sodium: 300mg
- Fat: 10g
- Saturated Fat: 5g
- Unsaturated Fat: 3g
- Trans Fat: 0g
- Carbohydrates: 8g
- Fiber: 0g
- Protein: 6g
- Cholesterol: 70mg