
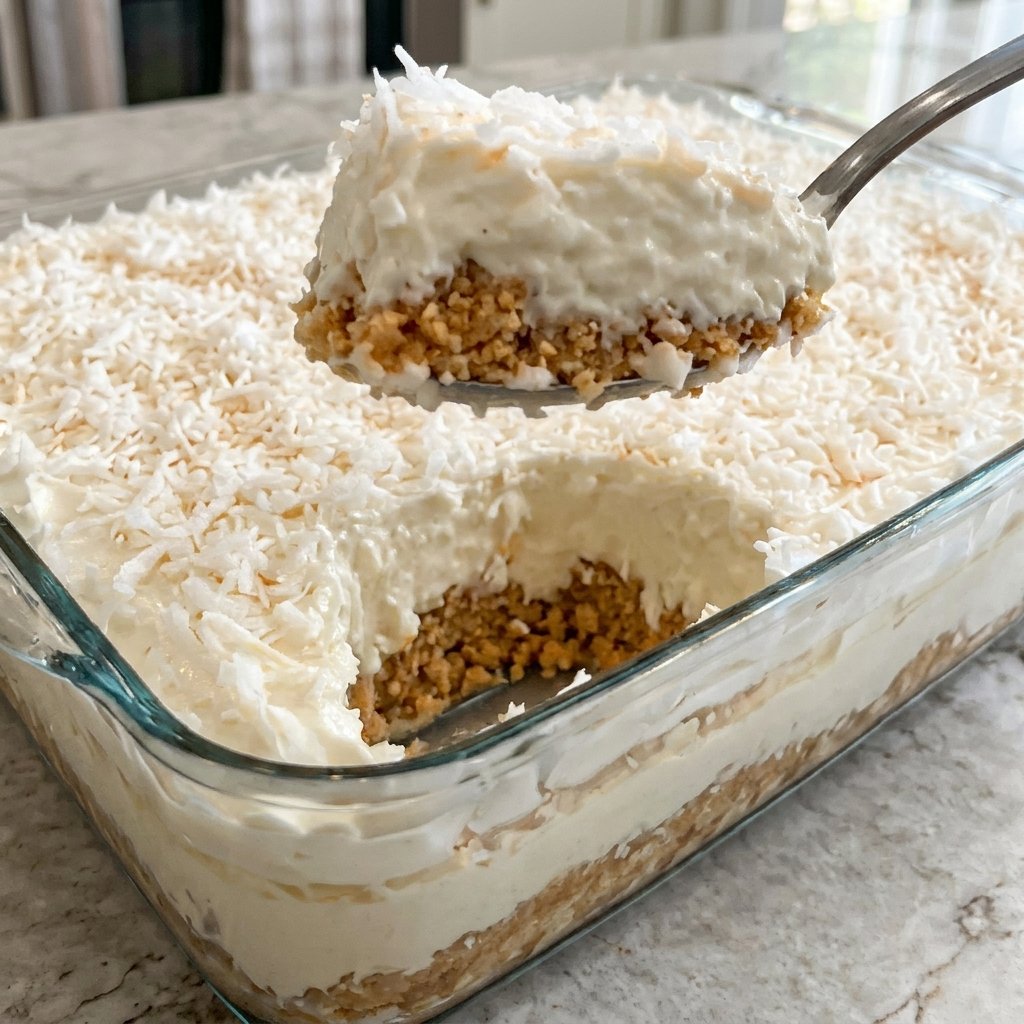
Introduction to No Bake Coconut Cream Dream
As a busy mom, I know how precious time can be, especially when it comes to whipping up something sweet. That’s why I’m excited to share my No Bake Coconut Cream Dream with you! This delightful dessert is not only a quick solution for those hectic days, but it also impresses everyone at the table. Imagine a creamy coconut filling nestled on a buttery graham cracker crust, all without turning on the oven. It’s the perfect treat to satisfy your sweet tooth while keeping your kitchen cool and your spirits high!
Why You’ll Love This No Bake Coconut Cream Dream
This No Bake Coconut Cream Dream is a lifesaver for busy days. It’s incredibly easy to make, requiring just 20 minutes of prep time. Plus, it’s a crowd-pleaser with its rich, creamy texture and tropical flavor. You won’t have to worry about baking or complicated techniques. Just mix, chill, and serve! It’s the perfect dessert to bring joy to your family without the fuss.
Ingredients for No Bake Coconut Cream Dream
Gathering the right ingredients is key to creating this delightful No Bake Coconut Cream Dream. Here’s what you’ll need:
- Graham cracker crumbs: These form the base of your crust, providing a sweet and crunchy texture.
- Unsalted butter: Melted butter binds the crumbs together, adding richness to the crust.
- Sweetened shredded coconut: This ingredient brings that tropical flair and a chewy texture to the filling.
- Heavy whipping cream: Whipped to soft peaks, it creates a light and airy texture in the filling.
- Sweetened condensed milk: This adds sweetness and creaminess, making the filling luscious and indulgent.
- Vanilla extract: A splash of vanilla enhances the overall flavor, making it even more delightful.
- Pinch of salt: Just a touch balances the sweetness and elevates the flavors.
For those looking to switch things up, consider toasting the shredded coconut for an extra layer of flavor. You can find all the exact measurements at the bottom of the article, ready for printing!
How to Make No Bake Coconut Cream Dream
Now that you have all your ingredients ready, let’s dive into making this No Bake Coconut Cream Dream! Follow these simple steps, and you’ll have a delicious dessert that’s sure to impress.
Step 1: Prepare the Crust
Start by combining the graham cracker crumbs and melted butter in a mixing bowl. Use a fork or your hands to mix until it resembles wet sand. This is where the magic begins!
Next, press the mixture firmly into the bottom of a 9-inch pie dish. Make sure it’s even and compact. This crust will hold all that creamy goodness, so don’t skip this step!
Step 2: Make the Coconut Filling
In a separate bowl, whip the heavy cream until soft peaks form. This is where you’ll create that light, airy texture that makes this dessert so dreamy.
Once your cream is ready, gently fold in the sweetened condensed milk, vanilla extract, shredded coconut, and a pinch of salt. Be careful not to deflate the whipped cream; you want to keep it fluffy!
Step 3: Assemble the Dessert
Now it’s time to bring it all together! Pour the coconut mixture over the prepared crust. Use a spatula to spread it evenly, ensuring every bite is filled with that luscious coconut flavor.
Feel free to sprinkle some extra shredded coconut on top for a beautiful presentation. It adds a nice touch and a hint of texture!
Step 4: Chill and Serve
Cover the pie dish with plastic wrap and refrigerate for at least 4 hours, or until set. This chilling time allows the flavors to meld beautifully.
When you’re ready to serve, slice it up and enjoy! You can garnish with more coconut or even some fresh fruit for a pop of color. Trust me, your family will be asking for seconds!
Tips for Success
- Make sure your heavy cream is cold for better whipping results.
- Press the crust firmly to avoid it crumbling when sliced.
- For a richer flavor, toast the shredded coconut before adding it to the filling.
- Let the dessert chill overnight for the best texture and flavor.
- Use a sharp knife to slice for clean edges and a beautiful presentation.
Equipment Needed
- 9-inch pie dish: A standard size for this dessert; a tart pan works too.
- Mixing bowls: Use two medium bowls for mixing the crust and filling.
- Electric mixer or whisk: An electric mixer makes whipping cream easier, but a whisk works just fine.
- Spatula: Essential for spreading the filling evenly.
Variations
- Chocolate Coconut Dream: Add cocoa powder to the filling for a chocolate twist. It’s a delightful combination!
- Fruit-Infused Delight: Fold in diced pineapple or mango for a fruity burst that complements the coconut beautifully.
- Nutty Coconut Crunch: Mix in chopped nuts like almonds or pecans for added texture and flavor.
- Vegan Option: Substitute heavy cream with coconut cream and use a dairy-free condensed milk for a vegan-friendly treat.
- Gluten-Free Version: Use gluten-free graham crackers to make the crust suitable for gluten-sensitive friends.
Serving Suggestions
- Pair with a refreshing fruit salad for a light and vibrant contrast.
- Serve alongside a scoop of vanilla ice cream for an indulgent treat.
- Drizzle with chocolate sauce for an extra touch of decadence.
- Garnish with fresh mint leaves for a pop of color and freshness.
- Enjoy with a chilled glass of coconut water or iced tea for a tropical vibe.
FAQs about No Bake Coconut Cream Dream
Can I make No Bake Coconut Cream Dream ahead of time?
Absolutely! This dessert is perfect for making ahead. Just prepare it the night before and let it chill overnight. The flavors will meld beautifully, making it even more delicious!
How long does the No Bake Coconut Cream Dream last in the fridge?
This delightful dessert can last up to 4 days in the fridge. Just make sure to cover it well to keep it fresh and prevent it from absorbing any odors.
Can I use unsweetened coconut in this recipe?
Yes, you can! If you prefer a less sweet dessert, unsweetened coconut works well. Just keep in mind that you might want to adjust the sweetness of the filling slightly.
What can I substitute for heavy whipping cream?
If you’re looking for a lighter option, you can use whipped topping or coconut cream. Both will give you a creamy texture without the heaviness of heavy cream.
Is this No Bake Coconut Cream Dream suitable for special diets?
Yes! With a few simple substitutions, you can make it vegan or gluten-free. Just swap the heavy cream for coconut cream and use gluten-free graham crackers for the crust.
Final Thoughts
Creating this No Bake Coconut Cream Dream is like capturing a slice of paradise in your kitchen. The joy of mixing simple ingredients into a creamy, dreamy dessert is truly rewarding. It’s a treat that brings smiles to faces and warmth to hearts, perfect for family gatherings or a quiet evening at home. Plus, the ease of preparation means you can spend more time enjoying the moment rather than stressing in the kitchen. So, gather your loved ones, slice into this delightful dessert, and savor the sweet memories you’ll create together. Trust me, it’s a dream worth sharing!
Print
No Bake Coconut Cream Dream
- Total Time: 4 hours 20 minutes
- Yield: 8 servings 1x
- Diet: Vegetarian
Description
A delicious and easy no-bake dessert featuring a creamy coconut filling on a graham cracker crust.
Ingredients
- 2 cups graham cracker crumbs
- ½ cup unsalted butter, melted
- 1 cup sweetened shredded coconut
- 1 cup heavy whipping cream
- 1 cup sweetened condensed milk
- 1 teaspoon vanilla extract
- Pinch of salt
Instructions
- In a mixing bowl, combine the graham cracker crumbs and melted butter until well mixed.
- Press the mixture into the bottom of a 9-inch pie dish to form the crust.
- In another bowl, whip the heavy cream until soft peaks form.
- Gently fold in the sweetened condensed milk, vanilla extract, shredded coconut, and a pinch of salt until combined.
- Pour the coconut mixture over the crust and spread it evenly.
- Refrigerate for at least 4 hours or until set.
- Slice and serve chilled, garnished with extra coconut if desired.
Notes
- For an extra flavor boost, toast the shredded coconut in the oven before adding it to the filling!
- Prep Time: 20 minutes
- Cook Time: 0 minutes
- Category: Dessert
- Method: No Bake
- Cuisine: American
Nutrition
- Serving Size: 1 slice
- Calories: 350
- Sugar: 20g
- Sodium: 150mg
- Fat: 25g
- Saturated Fat: 15g
- Unsaturated Fat: 5g
- Trans Fat: 0g
- Carbohydrates: 30g
- Fiber: 2g
- Protein: 3g
- Cholesterol: 50mg
