
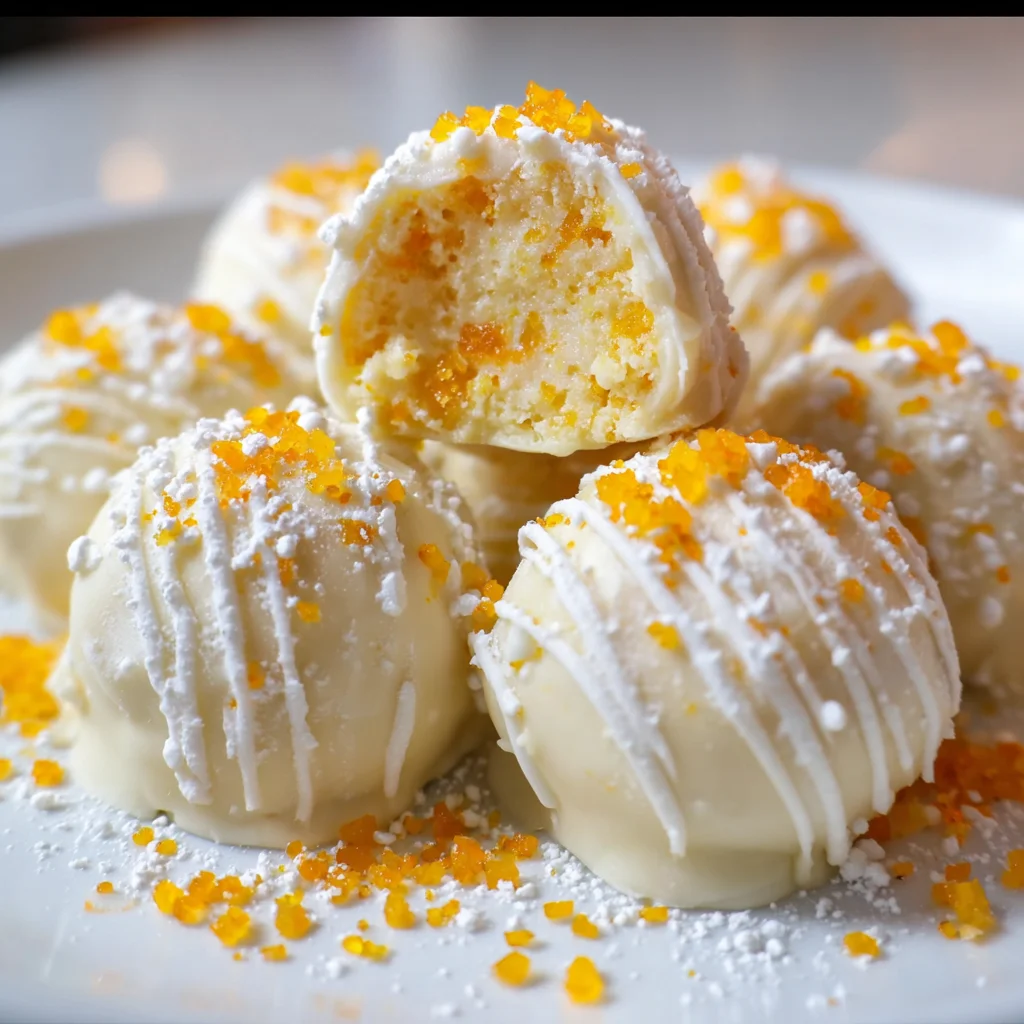
Introduction to Orange Truffles
Have you ever craved something sweet and refreshing, but felt pressed for time? Let me introduce you to my favorite indulgence: Orange Truffles. These delightful, chocolate-covered treats are infused with a vibrant citrus flavor that brings a burst of sunshine to any day. Whether you’re treating yourself after a long week or looking to impress your loved ones at a gathering, this recipe is quick and simple. In just under an hour, you can whip up 24 delicious truffles that are sure to delight. Trust me, these little bites of joy will become a go-to dessert in your kitchen!
Why You’ll Love This Orange Truffles
These Orange Truffles are a home cook’s dream! They’re quick to make and require no baking, which means less mess and more time for you. The sweet and tangy citrus flavor dances with the rich chocolate, creating a taste sensation that’s hard to resist. Perfect for special occasions or simple indulgences, these truffles are easy enough for a busy mom while still impressing your guests. You’ll find yourself making them again and again!
Ingredients for Orange Truffles
Gathering your ingredients for these delightful Orange Truffles is part of the fun! Here’s what you’ll need:
- Powdered sugar: This sweet ingredient gives the truffles a smooth texture, perfect for melting in your mouth.
- Butter: Softened butter helps create a creamy base, adding richness to each truffle.
- Crushed vanilla wafers: These add a subtle crunch and lend a delicious vanilla flavor that complements the orange.
- Frozen orange juice concentrate: This is the star of the show, bringing a burst of citrusy goodness into your truffles.
- Zest of an orange: The aromatic oils from the zest enhance the orange flavor, giving your truffles a vibrant kick.
- Vanilla extract: A splash of this adds warmth and depth, making the truffles even more irresistible.
- White chocolate chips or candy melts: These create a sweet coating that brings the whole treat together.
You’re welcome to get creative! Consider substituting the vanilla wafers with graham crackers or using dark chocolate for a more indulgent coating. The exact quantities of these ingredients are available at the bottom of the article for your convenience, ready for printing!
How to Make Orange Truffles
Now let’s dive into the fun part: making your Orange Truffles! This process is simple, and you might find yourself enjoying the journey as much as the destination. I promise these truffles will be worth every sweet and sticky second!
Step 1: Creaming the Butter and Sugar
Start by placing the softened butter and powdered sugar in a mixing bowl. Using an electric mixer, beat them together until the mixture is creamy and smooth. It should look fluffy and somewhat like whipped cream. This step is crucial for that melt-in-your-mouth texture!
Step 2: Adding the Citrus Flavors
Next, stir in the thawed frozen orange juice concentrate, zest, and vanilla extract. Mix them well until the flavors meld together deliciously. The aroma that fills your kitchen will be enough to excite anyone passing by! Trust me, the citrus kick is what makes these truffles truly shine!
Step 3: Incorporating the Wafers
Now it’s time to fold in the crushed vanilla wafers. This is where you create a delightful contrast of textures. Mix until the wafers are evenly distributed through the batter. You should see little specks of vanilla contrasting with the creamy orange mixture. It’s like a work of art, but one you can eat!
Step 4: Shaping the Truffles
With your mixture ready, grab a cookie scoop or just use your hands to shape the mixture into small balls. I recommend about one inch in size—perfect for popping in your mouth! Once you’ve shaped them all, place the balls on a baking sheet lined with parchment paper. They need to chill for about 30 minutes, allowing them to firm up.
Step 5: Melting the Chocolate
While the truffles chill, melt your white chocolate chips or candy melts. You can do this in a microwave-safe bowl, heating in 30-second intervals. Stir between each interval until smooth. Keep an eye on it; nobody likes burnt chocolate! This white coating will be the sweet hug that envelops your truffles.
Step 6: Dipping and Decorating
Once your truffles are chilled and firm, dip each one into the melted chocolate. I like to use a fork to slide it in and out, letting any excess chocolate drip off. If you’re feeling fancy, this is where you can add some fun toppings like crushed nuts or colorful sprinkles. They can be like little gems, each with its own personality!
Step 7: Setting the Truffles
Finally, return the dipped truffles to the parchment paper and sprinkle any additional toppings while the chocolate is still wet. Then, pop them in the refrigerator for about 15-20 minutes to set. When they come out, you’ll have beautiful little bites of heaven that are ready to impress!
Tips for Success
- Always use softened butter for easy mixing—it makes the truffles creamy and delicious.
- Feel free to taste the mixture before shaping—it should be bursting with flavor!
- For a smooth chocolate dip, ensure the chocolate is fully melted and glossy.
- Experiment with toppings to personalize your truffles; crushed nuts add a delightful crunch.
- Keep the truffles in an airtight container to maintain freshness for up to a week.
Equipment Needed for Orange Truffles
- Mixing bowl: Any bowl will do, but a medium-size is ideal for blending ingredients.
- Electric mixer: Handheld or stand mixer will make the creaming process a breeze.
- Cookie scoop: A small scoop helps in shaping uniform truffles; you can use your hands instead.
- Parchment paper: Essential for lining your baking sheet; foil or wax paper can also work.
- Microwave-safe bowl: For melting chocolate—any heatproof bowl will suffice!
Variations of Orange Truffles
- Dark Chocolate Coating: Swap out the white chocolate for dark chocolate to add a rich, bold flavor.
- Nutty Delight: Incorporate finely chopped hazelnuts or almonds into the truffle mixture for extra texture and taste.
- Coconut Orange Truffles: Mix shredded coconut into the truffle batter, or roll the finished truffles in coconut flakes for a tropical twist.
- Alcohol Infusion: Add a splash of orange liqueur, like Cointreau, to the mixture for an adult version of these truffles!
- Vegan Adaptation: Substitute butter with coconut oil and use vegan chocolate for a plant-based delight.
Serving Suggestions for Orange Truffles
- Pair your Orange Truffles with a hot cup of coffee or tea for a cozy afternoon treat.
- Serve them on a beautiful platter, alongside fresh fruit like strawberries or orange slices for a pop of color.
- Consider presenting them in decorative boxes as delightful homemade gifts for friends and family.
- Create a dessert table with a variety of treats, showcasing the truffles as the star attraction!
- For a festive touch, dust the truffles with powdered sugar or cocoa before serving, enhancing their visual appeal.
FAQs about Orange Truffles
As with any delightful recipe, questions are bound to arise! Let me answer some common ones to help you whip up these scrumptious Orange Truffles with confidence.
Can I use fresh orange juice instead of frozen concentrate?
Absolutely! Fresh orange juice will add a lovely brightness, but it’s best to use a bit less than the concentrate since it’s more watery. Don’t forget the zest for that zesty kick!
How do I store the truffles once they’re made?
Keep your chocolate truffles in an airtight container in the refrigerator. They’ll stay fresh for about a week, although I doubt they’ll last that long!
Can I make these truffles ahead of time?
Yes! These truffles are perfect for making ahead of time. Just coat them, refrigerate, and let their flavors meld together. They’ll taste even better the next day!
What if I’m allergic to nuts?
If you’re sensitive to nuts, rest assured that these Orange Truffles are nut-free! Just be careful with toppings. Always read labels if using store-bought products.
Can I freeze these truffles?
Definitely! You can freeze them for up to three months. Just make sure they’re fully cooled and in an airtight container to protect against freezer burn. Let them thaw in the fridge before enjoying!
Final Thoughts
There’s something magical about creating these delightful Orange Truffles. The process fills your kitchen with warm citrus scents, reminding you of sunny days. Each bite offers a sweet escape, blending the tangy brightness of orange with smooth chocolate. It’s a treat worth savoring! Whether you share them with loved ones or keep them as your little secret, these truffles bring joy in every delicious bite. So, roll up your sleeves, embrace the mess, and enjoy the simple pleasures of creating something extraordinary. Your family and friends will surely appreciate the love and effort you put into these bites of bliss!
Print
Orange Truffles: Discover the Sweet Citrus Delight Recipe!
- Total Time: 1 hour
- Yield: 24 truffles 1x
- Diet: Vegetarian
Description
Delicious chocolate-covered truffles infused with citrus flavor.
Ingredients
- 1 cup powdered sugar
- ½ cup butter, softened
- 1 cup crushed vanilla wafers
- ½ cup frozen orange juice concentrate, thawed
- Zest of 1 orange
- 1 teaspoon vanilla extract
- 1 cup white chocolate chips or candy melts
Instructions
- Beat butter and powdered sugar until creamy.
- Stir in orange juice, zest, and vanilla extract.
- Add crushed wafers and mix until combined.
- Shape into balls and chill for 30 minutes.
- Melt white chocolate and dip chilled truffles.
- Set on parchment paper and sprinkle toppings if desired.
- Refrigerate for 15-20 minutes to set.
Notes
- Use the zest of a fresh orange for a stronger flavor.
- Consider adding toppings such as crushed nuts or sprinkles.
- Store in an airtight container in the refrigerator.
- Prep Time: 15 minutes
- Cook Time: 15 minutes
- Category: Dessert
- Method: No-Bake
- Cuisine: American
Nutrition
- Serving Size: 2 truffles
- Calories: 150
- Sugar: 18g
- Sodium: 60mg
- Fat: 8g
- Saturated Fat: 5g
- Unsaturated Fat: 2g
- Trans Fat: 0g
- Carbohydrates: 18g
- Fiber: 0g
- Protein: 1g
- Cholesterol: 15mg