
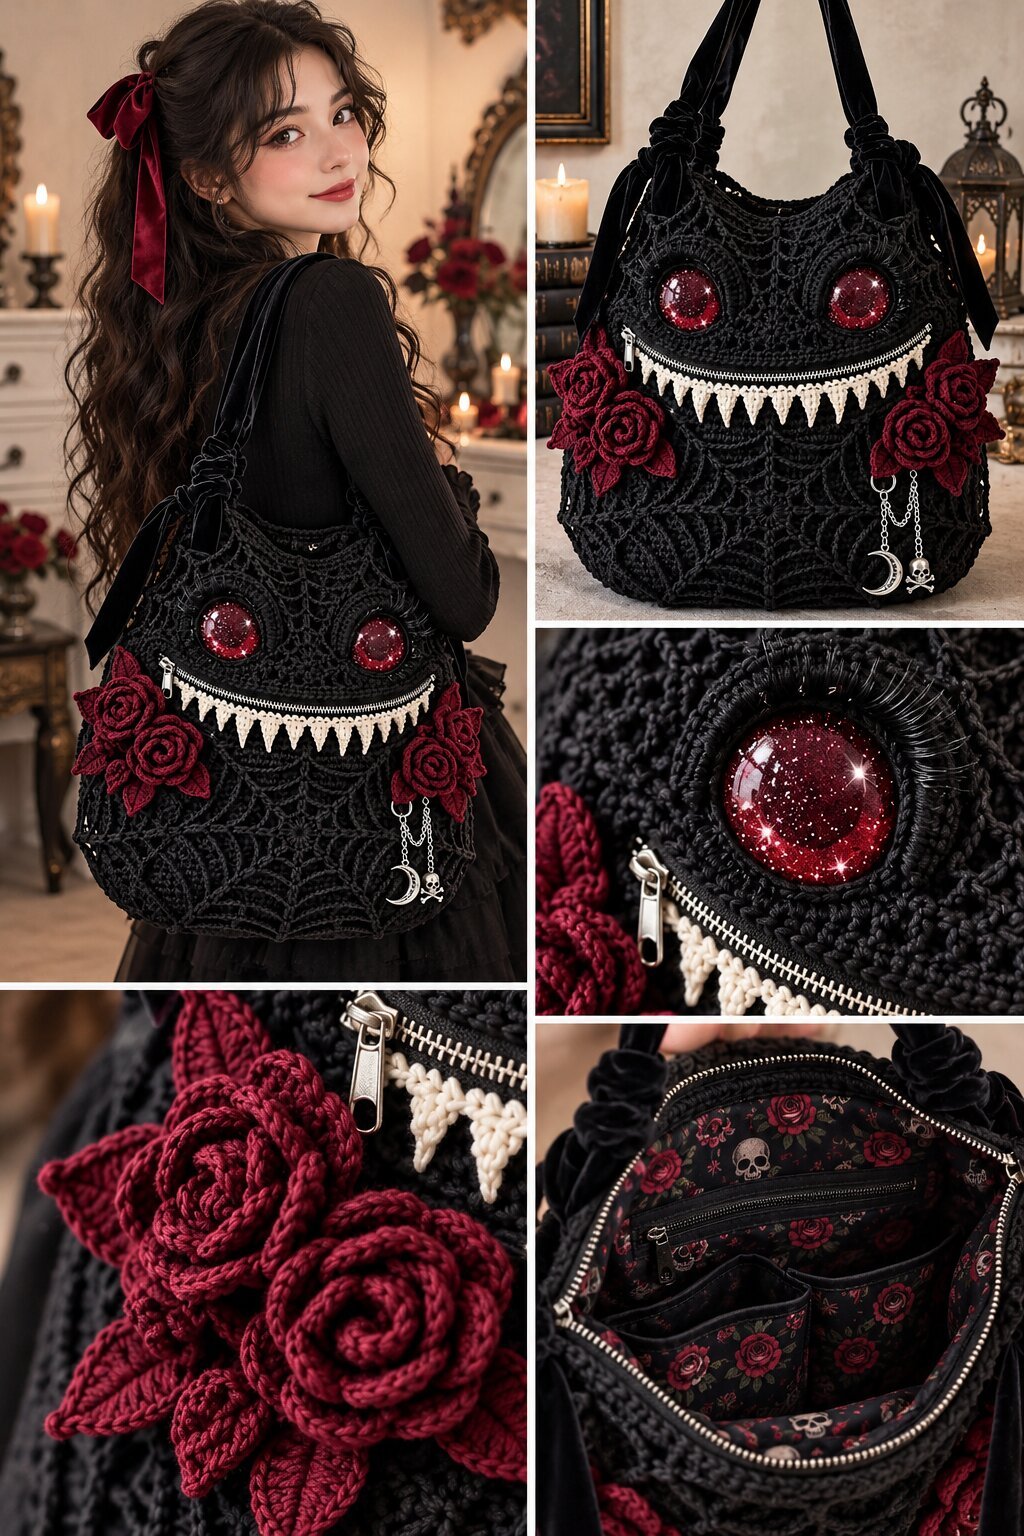
A black tote worked in an all-over spiderweb lace pattern, with two glittery red cabochon eyes ringed in dark lashes, a metal zipper that doubles as the monster’s mouth, and a row of cream crocheted fangs running along it. Deep burgundy crochet roses with leaf clusters sit at either side of the mouth, and one carries a dangling moon-and-skull charm chain. Black velvet straps gather into knotted bows where they meet the bag body. Inside, the lining is a dark floral fabric printed with roses and skulls, with a zipped pocket and open slip pockets.
The zipper is the clever part. It’s a functional closure and the monster’s grin at once, and the cream teeth give the front its only high-contrast detail against all that black. Everything else, the web texture, the eyes, the roses, is tonal or dark, so the face reads even from across a room.
This is a project for someone who has already made a structured crochet bag and wants to combine it with sewing: the lining, the zipper installation, and the velvet straps are as much a part of the build as the crochet itself.
Reading the Construction
The spiderweb texture looks like a radiating web motif, spokes of chain stitches with connecting arcs between them, worked flat and then shaped into the bag. The web centers near the bottom of the bag, which suggests the base may be worked from the center out in rounds, then continued upward for the sides. That would make the web pattern follow the bag’s curve naturally.
The fangs look like separate small triangles, worked as pointed shapes in cream and attached along the zipper tape afterward. That’s the easier route compared with working them directly into the bag fabric, since you can make them identical first and space them evenly.
The eyes appear to be glass or resin cabochons set into a crocheted ring, with a fringe of dark lashes around the edge. A reasonable way to recreate this is a tight round of crochet worked to the cabochon’s diameter, stitched down around it with the lashes added as a separate trim.
The roses look like spiral-worked rose motifs, a long strip of petal shapes rolled and tacked at the base, paired with several pointed leaves worked separately. They’re stitched on after the bag is finished.
Materials You’ll Need
- Black yarn for the bag body (a cotton or cotton-blend with some firmness is a reasonable suggestion, since a tote needs to hold its shape under weight)
- Cream yarn for the fangs
- Deep burgundy or wine-red yarn for the roses and leaves
- Two glass or resin cabochons for the eyes, with black fringe or lash trim
- A zipper sized to the bag’s opening, in a metal finish if you want the toothed look shown here
- Lining fabric, plus interfacing if you want extra structure
- Black velvet ribbon or fabric strips for the straps
- Small charms and a chain for the dangle detail
- A crochet hook sized to your yarn (see below)
- Yarn needle, sewing needle and thread
- Scissors and stitch markers
- Strong glue or thread suitable for securing the cabochons
Yarn and Hook Notes
Given how defined the web lines look, a worsted weight cotton or cotton blend is a sensible starting point, worked a bit tighter than the label suggests so the bag keeps its shape. A hook around 3.5mm to 4.5mm is a reasonable range to begin swatching in. A bag fabric that’s too loose will sag when loaded, so swatch the web pattern first and test how it holds up before committing.
Use a lighter hook size for the fangs and roses so those small pieces stay crisp.
Skill Level
This is an advanced project, though not because any one technique is extreme. It’s the combination: a web lace pattern that needs to stay consistent while shaping a rounded bag, small motifs made to match, a zipper installation that has to align with a crocheted opening, and a sewn lining. Someone who has made a crochet tote but never lined one, or never inserted a zipper into crochet, will find those the real learning curve.
Stitches Likely Involved
- Magic ring and chain (ch): the web center and spokes
- Single crochet (sc): firm edging around the zipper opening and eye rings
- Double crochet (dc) and treble crochet (tr): arcs between the web spokes
- Slip stitch (sl st): joining rounds and attaching the zipper
- A spiral rose motif: a long strip with increasing petals, rolled into a bloom
- Simple pointed triangle shaping: for the fangs
- Increase (inc): shaping the rounded base and sides
Building It: A Practical Sequence
Start with the web base and work upward, increasing evenly so the bag rounds out rather than flaring unevenly. Check the circumference against the zipper length you plan to use.
Make the zipper opening early. Plan where the mouth sits across the front and leave a clean, even edge for the zipper to attach to. A neat single crochet round around the opening makes sewing the zipper in much easier.
Crochet all the fangs first, then lay them along the zipper tape to check spacing before stitching any down.
Set the eyes after the bag shape is finished. Mark placement symmetrically and secure each cabochon with a crocheted ring, adding the lash trim last.
Make the roses and leaves separately, then arrange them at either side of the mouth before stitching them securely in place.
Sew the lining separately and fit it into the finished bag. Add pockets before inserting it, since they’re far easier to sew while the lining is flat.
Attach the velvet straps last, securing the knotted ends firmly to the bag body, since this is the main stress point.
Adjusting the Fit and Look
Bag size depends on how many rounds you work before closing the sides, so decide your desired capacity first and build around that. The eyes can be bigger or smaller depending on the cabochons you find, and the whole face can be softened with fewer fangs or a different color for the teeth.
If the lining feels like too much, a simple unlined version still works, though the bag will be less structured and items inside can snag the open web. A burgundy or deep purple version would shift the mood without changing the construction.
Where It’s Easy to Go Wrong
A web that sags under weight. An open lace pattern worked loosely won’t support a loaded bag. Keep tension firm and consider interfacing in the lining to add support.
Uneven eye placement. Because the eyes anchor the whole face, even a small asymmetry is noticeable. Mark both positions with pins and compare before sewing.
A zipper that ripples the fabric. If the crochet edge is stretched or the stitch count doesn’t match the zipper length, it will pucker. Measure both before you attach.
Fangs that vary in size. Make them all in one sitting with the same tension so they look uniform along the mouth.
Roses attached loosely. They’re heavy compared with the lace behind them. Stitch around the base thoroughly so they don’t pull the fabric.
Care
Spot cleaning is the safer approach for a bag with cabochons, a lining, and velvet straps. Avoid machine washing, which can damage the glue holding embellishments and the lining fabric. If the crochet needs refreshing, a gentle hand wash of the exterior only isn’t recommended once it’s lined, so keep it dry and clean with a damp cloth. Check your yarn label for any fiber-specific guidance.
Common Questions
Is this a beginner project?
No. The combination of lace shaping, zipper installation, and lining makes it better suited to someone who has finished a structured crochet bag already.
Do I need to sew a lining?
It’s strongly recommended. The open web would let small items fall through or snag, and the lining gives the bag structure.
Can I use a plain zipper instead of a metal one?
Yes, though a toothed metal zipper looks closer to the monster mouth shown here.
What can I use if I can’t find cabochons?
Large flat-backed beads, buttons, or felt circles with embroidered details would all work as eyes.