
Introduction to Tiramisu Cold Brew Coffee Cheesecake
As a busy mom, I know how challenging it can be to make time for the little pleasures in life, like a delightful dessert. That’s why I absolutely adore this Tiramisu Cold Brew Coffee Cheesecake. It’s not just a treat for the taste buds; it’s a glorious blend of creamy goodness, coffee richness, and a nostalgic kick of chocolate. Perfect for impressing guests or satisfying your family’s sweet cravings, this no-bake cheesecake can be whipped up in no time—making it an ideal choice for any hectic weeknight or leisurely weekend gathering!
Why You’ll Love This Tiramisu Cold Brew Coffee Cheesecake
This Tiramisu Cold Brew Coffee Cheesecake is a game-changer for dessert lovers. It comes together effortlessly without any baking, saving you precious time. The rich, creamy layers are incredibly satisfying, and each bite dances with the enchanting flavors of coffee and chocolate. Plus, it’s perfect for sharing with loved ones or treating yourself after a long day. Trust me, it’s a dessert that will end your meal on a high note!
Ingredients for Tiramisu Cold Brew Coffee Cheesecake
To create this luscious Tiramisu Cold Brew Coffee Cheesecake, gather the following delightful ingredients:
- Graham cracker crumbs or crushed biscotti: These create a scrumptious crust. If you’re feeling adventurous, biscotti adds a delightful crunch and flavor.
- Unsalted butter: Melted to bind your crust together, ensuring a rich, buttery taste without added saltiness.
- Cream cheese: The star of the filling! Softened to perfection, it gives the cheesecake its creamy texture and tangy kick.
- Powdered sugar: For that sweet balance! It dissolves easily in the cream cheese, creating a smooth mix.
- Cold brew coffee: Strongly brewed, it infuses your cheesecake with that delightful coffee flavor. It’s an essential ingredient for that classic tiramisu taste.
- Vanilla extract: A must-have for added warmth and depth, enhancing all the other flavors beautifully.
- Heavy whipping cream: When whipped to stiff peaks, it makes the cheesecake light and airy, giving it that dreamy quality.
- Ladyfingers: These are traditionally used in tiramisu. They soak up the coffee and add a unique texture to the cheesecake.
- Unsweetened cocoa powder: For the finishing touch! Dust this on top for a rich cocoa flavor that perfectly ties the dessert together.
For exact quantities needed, you can find them at the bottom of the article, where they’re available for printing.

How to Make Tiramisu Cold Brew Coffee Cheesecake
Step 1: Prepare the Crust
First, grab a mixing bowl and combine your graham cracker crumbs or crushed biscotti with the melted unsalted butter. This mixture should ooze flavor, forming a delightful crust.
Next, firmly press this crumbly concoction into the bottom of a greased 9-inch springform pan. I find that using the back of a measuring cup helps create an even layer. It’s a fun little workout for your hands!
Once pressed, refrigerate the crust for about 10 minutes, allowing it to set while you handle the cheesecake filling.
Step 2: Mix the Cheesecake Filling
In a clean mixing bowl, beat the softened cream cheese and powdered sugar until smooth. The texture should be velvety—think of spreading clouds on a dreamy day.
Now, mix in the vanilla extract and half a cup of your cold brew coffee. This is where the magic starts! You’ll smell that rich aroma wafting through your kitchen, like a warm hug.
Step 3: Whip the Cream
In another bowl, whip the heavy whipping cream until stiff peaks form. This is the secret ingredient that makes your Tiramisu Cold Brew Coffee Cheesecake airy and light.
Once it reaches the right consistency, gently fold it into the cream cheese mixture. Avoid stirring too hard—think of it as introducing friends at a party. You want them to mingle but not overwhelm one another!
Step 4: Layer with Ladyfingers
Take your ladyfingers and dip each half briefly in the remaining cold brew coffee. Just a quick dip! You want them moist, not soggy, so they maintain their shape and texture.
Layer these delectable coffee-soaked pieces atop your chilled crust, slightly overlapping them. This builds the foundation of luxurious flavors, reminiscent of traditional tiramisu.
Step 5: Assemble the Cheesecake
Now it’s time to spread the creamy cheesecake filling evenly over the ladyfinger layer. Don’t be shy—use a spatula to coax every last bit from the bowl!
With each scoop, you’re building layers of indulgence that will wow anyone who takes a bite. Just envision the reactions around the dinner table!
Step 6: Chill and Set
Cover your masterpiece with plastic wrap and pop it in the refrigerator for at least 4 hours or until firm. This crucial step allows the flavors to meld together beautifully.
If you can, make this a day in advance. Trust me, the flavors will deepen overnight, and your patience will be rewarded!
Step 7: Dust with Cocoa
Once set, it’s time for the grand finale! Remove the cheesecake from the springform pan and dust the top generously with unsweetened cocoa powder.
This last touch adds a sophisticated charm. It’s like putting the finishing strokes on a painting, turning your dessert into a true work of art.
Tips for Success
- Use room temperature cream cheese for easier mixing and a smoother filling.
- Don’t skimp on whipping the cream; stiff peaks will keep the cheesecake fluffy.
- Be swift when dipping ladyfingers in coffee to avoid them becoming overly soggy.
- For enhanced flavor, make this cheesecake a day in advance.
- Experiment with different coffee blends for unique taste variations.
Equipment Needed
- 9-inch springform pan: A must-have for easy removal, but a regular pie dish can work, too.
- Mixing bowls: Have at least two, one for the cheesecake filling and one for whipping cream.
- Electric mixer: Saves time and energy—your arms will thank you!
- Spatula: This handy tool helps spread your fillings evenly.
- Measuring cups and spoons: For accurate ingredient proportions.
Variations
- Decadent Chocolate Drizzle: For an extra touch of indulgence, drizzle melted dark chocolate over the cheesecake before serving.
- Nutty Flavor: Add crushed hazelnuts or walnuts to the crust for a crunchy texture and nutty flavor that pairs beautifully with coffee.
- Vegetarian-Friendly Option: Swap traditional ladyfingers for gluten-free options or almond biscotti to cater to dietary preferences.
- Sweetener Swap: Use agave nectar or honey instead of powdered sugar for a natural sweetener option.
- Flavored Cold Brew: Experiment with flavored cold brew coffee, such as vanilla or mocha, to add unique twists to your cheesecake.
Serving Suggestions
- Pair your Tiramisu Cold Brew Coffee Cheesecake with a dollop of freshly whipped cream for added richness.
- Serve with a shot of espresso or a glass of cold brew coffee for a coffee lover’s dream.
- Garnish with chocolate shavings or a sprinkle of cocoa powder on each slice for a beautiful presentation.
- Add a side of berries for a touch of freshness that complements the dessert perfectly.
FAQs about Tiramisu Cold Brew Coffee Cheesecake
Can I use regular coffee instead of cold brew? Absolutely! While cold brew gives a smooth flavor, you can use regular brewed coffee. Just let it cool before dipping your ladyfingers.
How long should I refrigerate the cheesecake? I recommend chilling it for at least 4 hours. However, letting it sit overnight enhances the flavors even more!
Can I make this cheesecake ahead of time? Yes! In fact, preparing your Tiramisu Cold Brew Coffee Cheesecake a day in advance is a wonderful idea. It allows the flavors to develop beautifully.
Is it possible to make this cheesecake gluten-free? Yes! You can substitute traditional ladyfingers with gluten-free options or use crushed gluten-free cookies for the crust.
What can I do with leftovers? If you have any cheesecake leftovers (which is rare!), cover them well and store them in the fridge for up to 3 days. Enjoy as a sweet treat whenever the craving strikes!
Final Thoughts
Making Tiramisu Cold Brew Coffee Cheesecake is more than just a cooking adventure; it’s a heartfelt experience that brings joy to your table. Each layer, from the creamy filling to the delicate ladyfingers, tells a delicious story of indulgence and love. I cherish the moments spent sharing this delightful dessert with family and friends, watching their faces light up with each bite. This cheesecake is not just food; it’s a celebration of togetherness. So, take that leap into the world of luscious desserts, and let this decadent treat become a cherished memory for you and your loved ones!
Print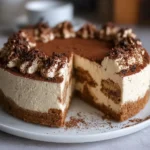
Tiramisu Cold Brew Coffee Cheesecake is a must-try delight!
- Total Time: 4 hours 20 minutes
- Yield: 8 servings 1x
- Diet: Vegetarian
Description
Tiramisu Cold Brew Coffee Cheesecake is a creamy and delicious dessert combining the rich flavors of coffee, cream cheese, and ladyfingers with a chocolate dusting.
Ingredients
- 1.5 cups graham cracker crumbs or crushed biscotti
- 6 tbsp unsalted butter, melted
- 16 oz cream cheese, softened
- 0.75 cup powdered sugar
- 1 cup cold brew coffee, strongly brewed
- 1 tsp vanilla extract
- 1.5 cups heavy whipping cream, cold
- 12 pieces ladyfingers, cut in half
- 2 tbsp unsweetened cocoa powder, for dusting
Instructions
- In a mixing bowl, combine graham cracker crumbs and melted butter. Press into the bottom of a greased 9-inch springform pan and refrigerate for 10 minutes.
- In a mixing bowl, beat cream cheese and powdered sugar until smooth. Mix in vanilla extract and 1/2 cup cold brew coffee.
- In a separate bowl, whip heavy whipping cream until stiff peaks form. Gently fold it into the cream cheese mixture.
- Dip the ladyfingers briefly into the remaining 1/2 cup of cold brew coffee and layer them over the crust.
- Spread the cheesecake mixture evenly over the ladyfinger layer.
- Cover and refrigerate for at least 4 hours or until firm.
- Before serving, dust the top of the cheesecake with cocoa powder.
- Slice and enjoy chilled.
Notes
- For best results, use strong cold brew coffee.
- Ensure the cream cheese is at room temperature for easy mixing.
- Can be made a day in advance for enhanced flavor.
- Prep Time: 20 minutes
- Cook Time: 0 minutes
- Category: Dessert
- Method: No-bake
- Cuisine: Italian
Nutrition
- Serving Size: 1 slice
- Calories: 320
- Sugar: 18g
- Sodium: 250mg
- Fat: 20g
- Saturated Fat: 10g
- Unsaturated Fat: 8g
- Trans Fat: 0g
- Carbohydrates: 30g
- Fiber: 1g
- Protein: 4g
- Cholesterol: 50mg