
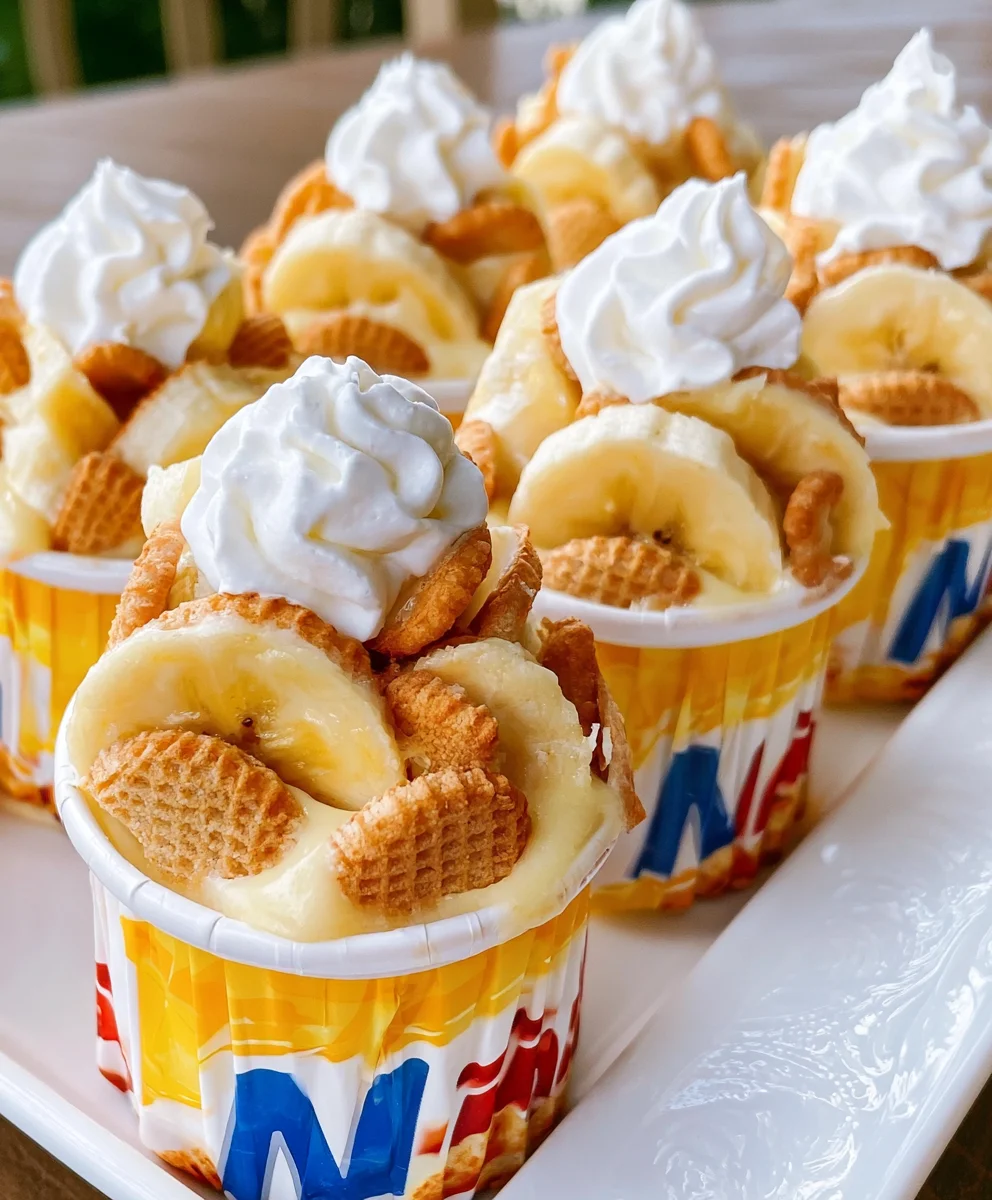
Introduction to Walking Banana Pudding
Hey there, fellow home cooks! Let me introduce you to a delightful treat that’s sure to put a smile on your face—Walking Banana Pudding! If you’re like me, you often find yourself juggling a million things at once, and dessert can feel like just another item on the to-do list. This recipe is your quick solution for a busy day or a fun dish to impress your loved ones at gatherings. With its interactive twist, Walking Banana Pudding is both easy to make and absolutely delicious, turning any moment into a special occasion!
Why You’ll Love This Walking Banana Pudding
You’re going to love how easy and speedy this Walking Banana Pudding is to whip up! In just ten minutes, you’ll have a fun dessert that everyone will adore. The creamy pudding, sweet bananas, and crunchy wafers create a delightful harmony of flavors and textures. Plus, it’s portable! It’s perfect for parties, picnics, or just because—it brings joy in every bite.
Ingredients for Walking Banana Pudding
Gathering the right ingredients is the first step to crafting your Walking Banana Pudding masterpiece. Here’s what you’ll need:
- Instant Banana Pudding: The star of the show! This pudding mix brings that classic banana flavor and creaminess to your treat.
- Milk: You’ll need some milk to bring the pudding to life. It adds that smooth texture we all love.
- Mini Vanilla Wafers: These crunchy little fellows create a delightful contrast to the creamy pudding. They’re the perfect vehicle for this fun dessert.
- Bananas: Sliced bananas offer natural sweetness and a great texture. They elevate your dessert to a whole new level.
- Cool Whip: The final touch! A dollop of Cool Whip adds an airy sweetness that makes every bite feel like a cloud.
Don’t forget, you can play around with these ingredients. For a change, consider using mini teddy graham bags instead of vanilla wafers for a fun twist. If you’re looking for a different flavor, swap in chocolate pudding for a chocolaty delight! Ingredients with exact quantities are at the bottom of the article for your convenience, making it easy for you to print out and get cooking!
How to Make Walking Banana Pudding
Step 1: Prepare the Pudding
Let’s kick things off by making the pudding, which is the heart of our Walking Banana Pudding. Start by grabbing a medium mixing bowl. Empty the box of instant banana pudding into the bowl and pour in the milk. Stir them together until well combined. Once you’ve done that, set the mixture aside for about five minutes. This letting-it-set part is crucial! Waiting allows the pudding to thicken to the perfect consistency. It’s almost like giving it a little nap, allowing all the flavors to meld together into creamy bliss. As it thickens, your patience will be pleasantly rewarded with that classic, luscious banana flavor we all adore. So, don’t rush this step—take a moment to enjoy the anticipation of what’s to come!
Step 2: Prepare the Wafers
Now, let’s move on to the stars of our dessert—the mini vanilla wafers! These little gems are not just tasty, but they make serving this treat a breeze. Open the tops of the bags carefully, and you’ll see the wafers standing at attention. With a gentle flip, turn down the edges of the bag. This creates a convenient opening for filling. Plus, it’s a fun little presentation that adds to the excitement! Make sure to lay them flat so they’re ready to be filled with that irresistible pudding. Trust me, your guests will love the interactive twist as they dig in!
Step 3: Assemble the Dessert
Now comes the fun part—assembly! Grab your prepared pudding and spoon it generously into each of the wafer bags. Fill them about halfway, giving your guests plenty of room to enjoy every bite. Next, it’s time to bring in the sweet bananas. Add a few slices into each bag, allowing their natural sweetness to mingle with the pudding. Lastly, finish off with a dollop of Cool Whip on top of those bananas. This airy addition adds a delightful creaminess that perfectly complements our banana pudding creation. Giving your dessert that final touch truly elevates it to superstar status! Now, you have a fun, interactive treat that’s not only delicious but also an absolute crowd-pleaser!
Tips for Success
- Assemble the Walking Banana Pudding closer to serving time for maximum crunch.
- Use ripe bananas; they’re sweeter and more flavorful.
- Try layering different flavors of pudding for a unique twist.
- Keep leftover pudding in the fridge for up to a week, but the wafers may get soggy.
- Don’t hesitate to experiment with different toppings like chocolate shavings or sprinkles!
Equipment Needed for Walking Banana Pudding
- Medium Mixing Bowl: For combining pudding and milk. A sturdy glass or plastic bowl works well.
- Spoon: You’ll need this to mix and fill. A standard tablespoon is perfect!
- Scissors: To cut open the bags of wafers; kitchen scissors do the trick.
- Measuring Cups: Handy for measuring the milk, though you can eyeball it if you’re in a hurry!
Variations of Walking Banana Pudding
- Chocolate Delight: Swap the banana pudding for chocolate pudding for a rich and decadent treat!
- Fruit Medley: Add other fruits like strawberries or blueberries for a refreshing twist, enhancing the flavor profile.
- Dairy-Free Option: Use almond milk and a dairy-free whipped topping to enjoy a vegan version that still tastes amazing!
- Nuts for Crunch: Toss in some chopped nuts like pecans or walnuts to add a delightful crunch and extra flavor.
- Peanut Butter Swirl: Add a spoonful of peanut butter to the pudding for a nutty flavor that complements the bananas beautifully.
Serving Suggestions for Walking Banana Pudding
- Chilled Drinks: Pair it with iced tea or lemonade for a refreshing contrast to the creamy dessert.
- Fruit Platters: Serve alongside a colorful fruit platter to enhance the theme of freshness.
- Simple Presentation: Use clear cups for a beautiful display, showing off the layers of deliciousness inside.
- Snack Mix: Offer a side of trail mix for a crunchy counterpoint.
- Chocolate Sauce: Drizzle some chocolate sauce on top for added indulgence.
FAQs about Walking Banana Pudding
As with any delightful recipe, questions are bound to arise. Let’s tackle some of the most common queries about Walking Banana Pudding that I’ve gathered over my culinary adventures.
Can I make Walking Banana Pudding ahead of time?
It’s best to assemble this dessert just before serving. This ensures the wafers retain their crunch and don’t get soggy. However, you can prepare the pudding and slice the bananas in advance to save time!
Is Walking Banana Pudding suitable for kids?
Absolutely! Kids love the fun of eating directly from the bags, plus they can add as many toppings as they like. It’s a great treat for parties, ensuring smiles all around!
What if I don’t have banana pudding mix?
No worries! You can easily substitute with vanilla pudding for a classic taste. For a fun twist, chocolate pudding can also be used, transforming the whole flavor profile while keeping it delicious.
How do I store leftover Walking Banana Pudding?
For any leftovers, store the pudding mixture in the fridge. Keep the wafers separate until you’re ready to enjoy them again. This will help avoid sogginess!
Can I use fresh whipped cream instead of Cool Whip?
Of course! If you’re up for making fresh whipped cream, it will add a lovely, homemade touch to your Walking Banana Pudding. Just lightly sweeten it to complement the dessert.
Final Thoughts on Walking Banana Pudding
Walking Banana Pudding is not just a dessert; it’s a delightful experience wrapped in each crunchy, creamy bite.
As a busy mom, I cherish recipes that bring joy without overwhelming my schedule.
This fun and interactive treat allows everyone to join in the excitement, whether at a gathering or simply enjoying a Sunday afternoon.
Each spoonful transports you back to carefree days, filled with laughter and love.
So, grab those mini wafer bags, and let’s create some sweet memories together, one scoop at a time!
Print
Walking Banana Pudding
- Total Time: 10 minutes
- Yield: 8 servings 1x
- Diet: Vegetarian
Description
A fun and interactive dessert recipe that combines banana pudding with a twist, perfect for gatherings and kids’ parties.
Ingredients
- 5.1 ounces box instant banana pudding
- 2 cups milk
- 8 packages single serving mini vanilla wafers
- 1 banana sliced
- 8 ounces tub cool whip
Instructions
- In a medium mixing bowl, combine the pudding mix and milk. Allow the pudding to set for 5 minutes.
- Cut open the tops of the bags of vanilla wafers and flip over the edges of the bag.
- Spoon the pudding into each bag of vanilla wafers.
- Add the bananas to the bags and top with a dollop of cool whip.
Notes
- Can use mini teddy graham bags instead of vanilla wafers, though it will change the flavor.
- Can substitute with vanilla pudding for a classic taste or use chocolate pudding for a twist.
- Vanilla pudding cups can be used for an easy, no-mix option.
- For best crunch, assemble closer to serving time.
- Prep Time: 10 minutes
- Cook Time: 0 minutes
- Category: Dessert
- Method: Mixing
- Cuisine: American
Nutrition
- Serving Size: 1 bag
- Calories: 150
- Sugar: 15g
- Sodium: 150mg
- Fat: 5g
- Saturated Fat: 2g
- Unsaturated Fat: 3g
- Trans Fat: 0g
- Carbohydrates: 25g
- Fiber: 1g
- Protein: 2g
- Cholesterol: 0mg