
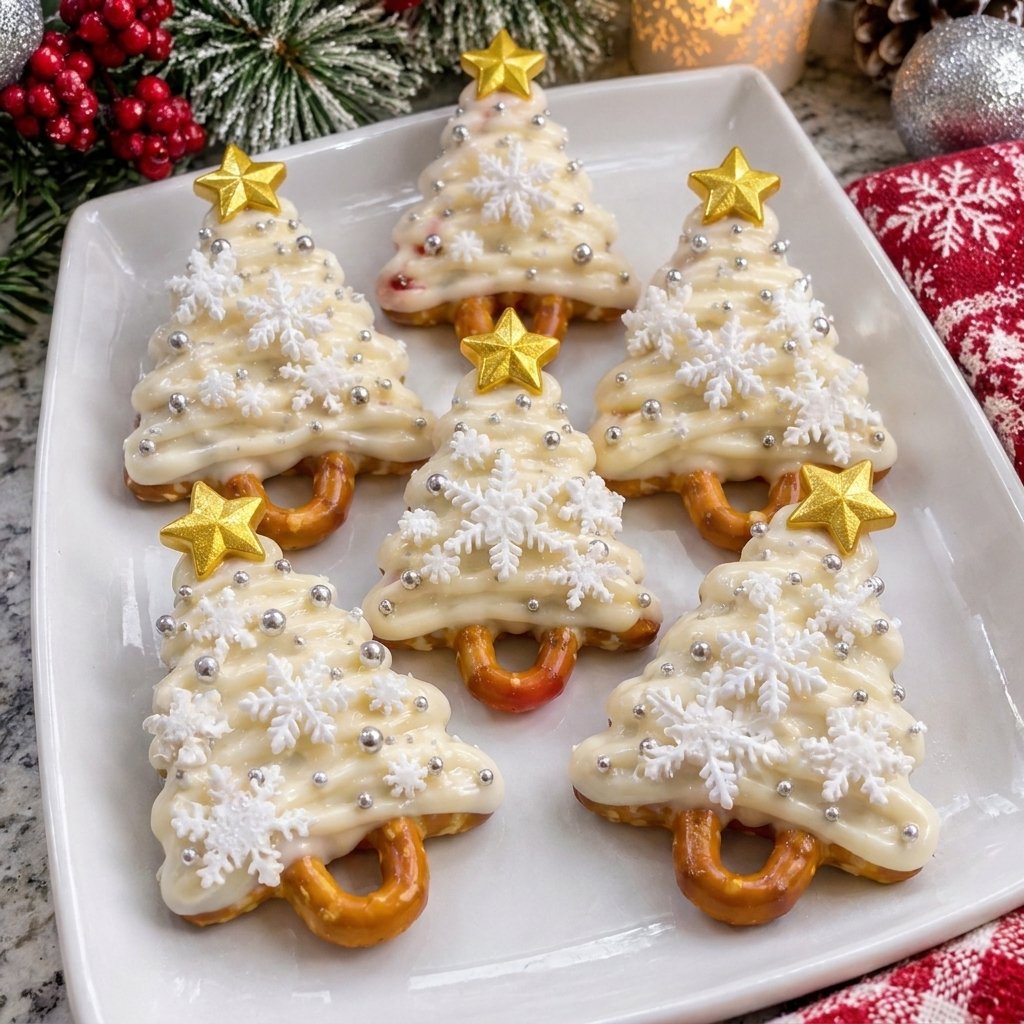
Introduction to White Chocolate Snowflake Pretzel Trees
Are you looking for a fun and festive treat to share this holiday season? Let me introduce you to these delightful White Chocolate Snowflake Pretzel Trees! They’re not only whimsical and adorable but also incredibly easy to whip up. With just a few ingredients and minimal prep time, you can create a dessert that’s sure to dazzle your family and friends. Whether it’s a quick solution for a busy day or a charming dish to impress your loved ones at gatherings, these pretzel trees will become your go-to holiday creation!
Why You’ll Love This White Chocolate Snowflake Pretzel Trees
You’re going to adore these White Chocolate Snowflake Pretzel Trees for so many reasons! They come together in a flash, making them perfect for busy days. The sweet and salty combo is absolutely irresistible, delighting everyone from kids to grown-ups. Plus, their festive sparkle adds joy to any occasion. With each tree crafted in mere minutes, you’ll quickly find them to be a holiday favorite!
Ingredients for White Chocolate Snowflake Pretzel Trees
Creating these festive White Chocolate Snowflake Pretzel Trees is a breeze with just a handful of ingredients. Here’s what you’ll need:
- Mini pretzel twists: These are the foundation of your trees, providing a crunchy base that perfectly contrasts the sweetness of the chocolate.
- White chocolate melting wafers: The star of the show! These melt smoothly and set beautifully, offering a creamy sweetness that pairs excellently with pretzels.
- Edible silver pearl sprinkles: These add a touch of elegance and sparkle, making your trees look extra festive for the holiday cheer.
- Edible white snowflake decorations: A must-have for that winter wonderland effect! They’ll make your trees look magical.
- Edible gold star decorations: These dazzle on top, giving each tree the perfect finishing touch to celebrate the season.
- Coconut oil (optional): A simple addition that helps achieve a thinner chocolate consistency for easier piping if necessary.
- White sanding sugar (optional): This sugary sprinkle adds an additional snowy effect, enhancing the winter aesthetic of your trees.
For exact measurements and a convenient printable recipe, check the bottom of this article. Don’t worry; everything you need is laid out clearly to make your baking experience as smooth as melting chocolate!
How to Make White Chocolate Snowflake Pretzel Trees
Prepare the Baking Sheet
First things first! You’ll want to line a large baking sheet with parchment paper. This simple step keeps your White Chocolate Snowflake Pretzel Trees from sticking. Imagine trying to pull melting chocolate off a pan—no thank you! The parchment not only makes clean-up easier, but it also helps maintain the integrity of your charming trees. Ensure the parchment paper is flat and snug, creating a perfect little canvas for your delightful creations!
Arrange the Pretzels
Now for the fun part—building your little pretzel trees! Take three mini pretzel twists and form them into a triangular shape. Overlap them slightly for a stable structure that resembles a Christmas tree. Repeat this process until you have eight trees ready to decorate. Picture how lovely they will look lined up on a platter! Plus, the crunchy pretzels will give a satisfying bite that pairs beautifully with the velvety white chocolate.
Melt the White Chocolate
Next up is melting the white chocolate. Grab a microwave-safe bowl and toss in the white chocolate melting wafers. Microwave in 20-second intervals, stirring each time, until everything is melted and smooth. Be patient, as it’s easy to overheat! If you want a thinner consistency for piping, stir in a teaspoon of coconut oil. This not only helps the chocolate flow better but also creates a glossy finish on your trees. Delicious!
Create the Christmas Trees
Once your chocolate is ready, let’s get decorating! Transfer the melted white chocolate into a piping bag. If you don’t have one, a zip-top bag with a small corner snipped off works great too. Pipe thick zigzag lines over each pretzel formation, starting narrow at the top and gradually widening as you move down. The chocolate should connect all three pretzels. Just think—this will hold your trees together while adding a scrumptious layer of sweetness!
Add Silver Decorations
With the chocolate still soft, it’s time to sparkle! Sprinkle edible silver pearls evenly across each tree, allowing them to adhere to the gooey chocolate. These shiny balls will catch the light beautifully and bring an element of festivity. Just imagine how gorgeous they’ll look! Stay quick with this step, as timing is everything for ensuring those pearls stick to the chocolate perfectly.
Decorate with Snowflakes and Gold Stars
Let’s make these trees truly magical! Carefully place one white snowflake in the center of each tree—this makes them look like they came from a winter wonderland. Then, crown each tree with an edible gold star at the top. They’ll add just the right amount of shine, bringing your edible creations to life. Don’t forget to sprinkle a little white sanding sugar on top for that fresh-fallen snow effect. What a festive finish!
Let the Chocolate Set
Now it’s time for a little patience! Pop your decorated trees into the refrigerator for about 10–15 minutes. This sets the chocolate firmly, making sure your trees hold their shape. Think of it as a mini vacation for your pretzel trees—they deserve to chill! Trust me, the wait will be worth it when you see how perfect and sturdy they turn out.
Serve
Once your chocolate has set beautifully, gently remove your pretzel trees from the parchment paper. Arrange them on a festive serving platter for maximum impact! Whether you’re showcasing them at a holiday gathering or sharing them with family, they’re sure to catch everyone’s eye. Just imagine the smiles at the sight of these charming little delights, perfectly ready to savor. Enjoy the oohs and aahs!
Tips for Success
- Use quality white chocolate melting wafers for a smoother finish.
- Keep your workspace tidy to avoid any mess! It makes baking more enjoyable.
- When piping chocolate, work quickly to ensure smooth application.
- Let your pretzel trees fully cool to avoid any droopy decorations.
- Have fun mixing and matching decorations to create unique trees!
Equipment Needed
- Microwave-safe bowl: A regular bowl works, but glass or ceramic is best for melting chocolate.
- Parchment paper: Wax paper can be used, but parchment is ideal for non-stick results.
- Piping bag: A zip-top bag with a snipped corner is a handy alternative.
- Baking sheet: Any flat, rimmed tray works perfectly for setting your creations.
Variations
- Swap white chocolate for dark or milk chocolate to cater to different taste buds.
- Try adding crushed peppermint candies as a festive twist; they add a refreshing crunch!
- Use gluten-free pretzels to make these treats suitable for those with dietary restrictions.
- Incorporate different colored sanding sugars for extra flair during the holiday season.
- Add a dash of sea salt on top for a delightful sweet and salty flavor contrast.
Serving Suggestions
- Pair your White Chocolate Snowflake Pretzel Trees with hot cocoa or spiced apple cider for a cozy treat.
- Display them on a whimsical holiday-themed platter to enhance their festive charm.
- Consider adding a side of fresh fruit for a burst of color and freshness on your dessert table.
FAQs about White Chocolate Snowflake Pretzel Trees
Can I use regular chocolate instead of white chocolate for these trees?
Absolutely! Using dark or milk chocolate gives a different flavor profile while maintaining that delightful combination of sweet and salty. Just keep in mind that it will alter the look of your trees, but they’ll still be delicious!
How can I store my pretzel trees once they’re made?
Store your White Chocolate Snowflake Pretzel Trees in an airtight container at room temperature. They’ll stay fresh for several days. Avoid refrigerating them, as condensation can make the chocolate appearance less appealing.
Can I make these ahead of time?
Yes, you can! These treats can be prepared a day or two in advance. Just make sure to store them properly to keep them from getting too soft or sticky. They’ll be just as festive when it’s time to serve!
Are there any allergen concerns with this recipe?
Keep in mind that pretzels can sometimes contain gluten, and chocolate may have traces of nuts. Always check labels and consider using gluten-free pretzels and allergen-friendly chocolate, especially if serving guests with dietary restrictions.
How can I make my trees more festive?
Get creative! Add crushed peppermint candies, colorful sprinkles, or even edible glitter for an extra festive flair. The joy of these treats is in how you can personalize them!
Preparation Cues and Common Mistakes
For a smooth preparation of your White Chocolate Snowflake Pretzel Trees, keep an eye on the following cues and avoid common pitfalls. Proper timing and technique can greatly enhance your results!
- Ensure the chocolate is completely melted and smooth before piping to avoid lumps, which could disrupt the design.
- Use a teaspoon to test the consistency of your melted chocolate before transferring it to the piping bag; it should flow easily.
- Pay attention to the alignment of your pretzels; a stable base helps in achieving a neat final appearance.
- Be cautious not to overfill your piping bag, as this could lead to messy chocolate application. Fill it halfway for better control.
- Don’t rush the cooling time after decorating; letting them set properly keeps the decorations intact and maintains their shape.
Final Thoughts
Creating these White Chocolate Snowflake Pretzel Trees brings sheer joy to your holiday celebrations. The magical combination of pretzels and sweet white chocolate is not just a treat but a way to create heartwarming memories with family and friends. As you watch loved ones delight in their unique designs, you’ll feel a sense of pride. Plus, the ease of preparation means you can focus on what really matters: spending time together. These delightful trees will surely become a cherished tradition, bringing smiles and festive spirit each year. Let the joy of baking lift your holiday season!
Print
White Chocolate Snowflake Pretzel Trees
- Total Time: 35 minutes
- Yield: 8 Christmas tree treats 1x
- Diet: Vegetarian
Description
Delicious white chocolate pretzel trees decorated with edible snowflakes and gold stars, perfect for holiday celebrations.
Ingredients
- 24 mini pretzel twists
- 12 oz (340 g) white chocolate melting wafers
- 2 tablespoons edible silver pearl sprinkles
- 8 edible white snowflake decorations
- 8 edible gold star decorations
- 1 teaspoon coconut oil (optional, for thinning chocolate)
- 1 tablespoon white sanding sugar (optional)
Instructions
- Prepare the baking sheet: Line a large baking sheet with parchment paper to prevent sticking.
- Arrange the pretzels: Place three mini pretzel twists in a triangular Christmas tree shape, slightly overlapping them. Repeat to create 8 trees.
- Melt the white chocolate: Add white chocolate melting wafers to a microwave-safe bowl. Microwave in 20-second intervals, stirring between each, until completely smooth. Stir in coconut oil if needed.
- Create the Christmas trees: Transfer the melted white chocolate into a piping bag. Pipe thick zigzag lines over each pretzel arrangement, starting narrow at the top and gradually widening toward the bottom. Make sure the chocolate connects all three pretzels.
- Add silver decorations: While the chocolate is still soft, sprinkle edible silver pearls evenly across each tree.
- Decorate with snowflakes: Carefully place one edible white snowflake decoration in the center of each Christmas tree.
- Add gold stars: Position one edible gold star at the top of every tree. Sprinkle with white sanding sugar for an extra snowy appearance.
- Let the chocolate set: Refrigerate the trees for 10–15 minutes, or until the white chocolate is completely firm.
- Serve: Gently remove the Christmas trees from the parchment paper and arrange them on a festive serving platter.
Notes
- For a thinner consistency, coconut oil may be added to the melted white chocolate.
- White sanding sugar can enhance the snowy appearance of the trees.
- Make sure to refrigerate long enough for the chocolate to set properly.
- Prep Time: 20 minutes
- Cook Time: 0 minutes
- Category: Dessert
- Method: No-Bake
- Cuisine: American
Nutrition
- Serving Size: 1 pretzel tree
- Calories: 150
- Sugar: 10g
- Sodium: 200mg
- Fat: 8g
- Saturated Fat: 5g
- Unsaturated Fat: 2g
- Trans Fat: 0g
- Carbohydrates: 20g
- Fiber: 1g
- Protein: 2g
- Cholesterol: 0mg