
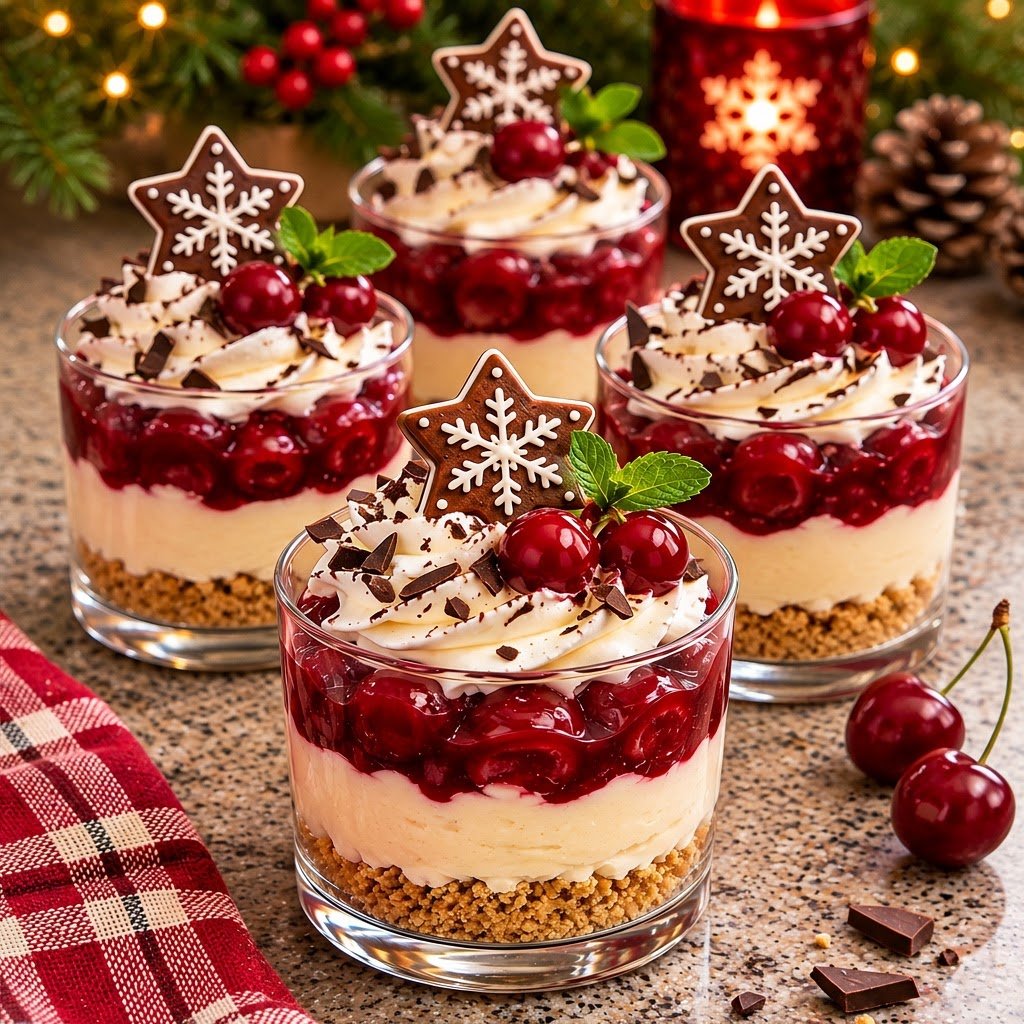
Introduction to Christmas Cherry Vanilla Cheesecake Cups
With the holidays fast approaching, finding sweet treats that are both simple and scrumptious becomes essential. That’s where my Christmas Cherry Vanilla Cheesecake Cups come into play! These delightful little cups combine the rich flavors of vanilla and cream cheese topped with juicy cherries, making them a perfect dessert to impress your loved ones. Plus, they’re a quick solution for busy days when you want to create something special without much fuss. Let’s dive into this festive recipe—it’s not just dessert; it’s a little moment of joy served in a cup!
Why You’ll Love This Christmas Cherry Vanilla Cheesecake Cups
These Christmas Cherry Vanilla Cheesecake Cups are not just easy to whip up; they offer a delightful burst of flavor that your family will adore. With minimal prep time and a no-bake element, they fit seamlessly into any busy schedule. You’ll enjoy the creamy texture paired with the sweet cherry topping, creating a dessert that’s as festive as it is delicious. Trust me, these cups will be the highlight of your holiday gatherings!
Ingredients for Christmas Cherry Vanilla Cheesecake Cups
To create these delightful Christmas Cherry Vanilla Cheesecake Cups, you’ll need a few simple yet tasty ingredients. Here’s a quick rundown:
- Crushed vanilla cookies: These form the base of your cheesecake cups. Choose any brand you love for that sweet, buttery flavor.
- Melted butter: It helps bind the cookie crust together, giving it a rich and crumbly texture.
- Cream cheese: The star of the show! This creamy cheese adds that delicious richness that cheesecake lovers crave.
- Cold heavy whipping cream: Whipping this cream creates lightness that balances the dense cream cheese, making the filling luscious.
- Powdered sugar: This sweetener dissolves quickly, giving a smooth finish to the cream cheese mixture without any grit.
- Vanilla extract: A splash of this extract enhances the flavor with a warm, inviting note. Pure vanilla is best, if possible.
- Pitted cherries: Fresh or frozen, these juicy gems provide a vibrant topping that adds a pop of tartness.
- Granulated sugar: Helps soften the cherries, drawing out their natural sweetness while they cook.
- Lemon juice: Just a hint brightens the flavor of the cherry topping and balances the sweetness beautifully.
- Cornstarch mixed with water: This thickening agent ensures your cherry topping stays glossy and doesn’t run off your cups.
- Whipped cream: A dollop on top adds a light and airy touch to your cheesecake cups.
- Fresh pitted cherries: These are optional for decoration, adding a splash of color and freshness to your presentation.
- Chocolate star-shaped cookies: These whimsical treats can be used as eye-catching garnishes—fun and festive!
- Chocolate shavings: Add them on top for a touch of elegance and a hint of rich cocoa flavor.
- Small fresh mint leaves: These bright green leaves introduce a refreshing contrast and make your cheesecake cups look extra special.
For exact measurements, check the bottom of this article, where you’ll find everything neatly printed for your convenience!
How to Make Christmas Cherry Vanilla Cheesecake Cups
Now that we have our ingredients ready, let’s get to the fun part! Making Christmas Cherry Vanilla Cheesecake Cups is all about layering flavors and textures. Follow these steps, and you’ll have beautiful, delicious desserts to share with friends and family.
Step 1: Prepare the Cookie Crust
Start by mixing your crushed vanilla cookies with melted butter in a bowl.
I find it helps to use a spoon to ensure everything is well combined.
Divide this crumbly mixture into your dessert glasses, pressing it gently into the bottoms.
This creates a lovely foundation that crunches with every bite.
Step 2: Make the Cream Cheese Mixture
Next, we’re diving into the cream cheese mixture.
Grab a mixing bowl and beat together the softened cream cheese, powdered sugar, and vanilla extract until it’s perfectly smooth.
Patience is key here; the smoother the mixture, the creamier the final cheesecake will be!
Step 3: Whip the Heavy Cream
In a separate bowl, whip the cold heavy cream until you reach stiff peaks.
Be careful not to over-whip, or you might end up with buttery bits instead of fluffy goodness!
Once your cream is ready, gently fold it into the cream cheese mixture.
This is what gives our cups that beautiful light texture.
Step 4: Cook the Cherry Topping
Time to move onto those fabulous cherries!
Combine the pitted cherries, granulated sugar, and lemon juice in a saucepan over medium heat.
Cook for about 5-7 minutes until the cherries start to soften and release their juices.
Next, stir in the cornstarch slurry and cook for another 1-2 minutes until you have a glossy and thick topping.
Just thinking about it makes my mouth water!
Step 5: Assemble the Cheesecake Cups
Now comes the fun part—assembling your cheesecake cups!
Start by piping the creamy cheesecake filling over the cookie crust in each glass.
Then, spoon the cooled cherry topping over the cheesecake layer, allowing some of those vibrant red cherries to shine through.
The contrast of colors will make these cups truly festive!
Step 6: Refrigerate and Chill
After assembling, it’s time to let these beauties chill in the refrigerator.
Cover them with plastic wrap and let them sit for at least two hours.
This helps the layers set up perfectly, so the flavors meld delightfully.
Trust me, the wait will be worth it!
Step 7: Decorate before Serving
Finally, just before serving, it’s time to get creative with decorations!
Top each cheesecake cup with a generous dollop of whipped cream, a few pitted cherries, and a sprinkle of chocolate shavings.
Don’t forget to add a cute chocolate star-shaped cookie and a small fresh mint leaf for that special festive touch.
These little additions make your dessert eye-catching and exciting!
Tips for Success
- Make sure your cream cheese is softened to avoid lumps—nobody wants that!
- Chill your mixing bowl and beaters for whipping cream to get better volume.
- Use fresh cherries for the best flavor, but frozen works in a pinch.
- Don’t skip the chilling time; it’s crucial for the right texture.
- Feel free to get creative with toppings to impress your guests!
Equipment Needed
- Mixing bowls: Use any size you have on hand; smaller bowls work for mixing cream.
- Whisk or electric mixer: A sturdy whisk is great for small batches, but an electric mixer whips cream faster.
- Clear dessert glasses or cups: Any glass or cup will do—just ensure they’re transparent for a stunning view of the layers!
- Immersion blender or regular blender: Handy for a smoother cherry topping if desired.
- Piping bag or plastic sandwich bag: To easily pipe your cheesecake mixture into glasses.
Variations of Christmas Cherry Vanilla Cheesecake Cups
- Chocolate Cherry Delight: Add cocoa powder to the cookie crust for a chocolatey twist that complements the cherries beautifully.
- Berry Medley: Swap out the cherries for a mix of strawberries, blueberries, and raspberries for a colorful and fruity variation.
- Vegan Option: Use dairy-free cream cheese and coconut whipped cream to create a plant-based version of these delightful cheesecake cups.
- Gluten-Free Crust: Substitute crushed gluten-free cookies for the crust to cater to gluten-sensitive guests while maintaining the same delicious flavor.
- Nutty Flavor: Incorporate crushed almonds or walnuts in the crust for an added crunch and nuttiness that enhances the dessert experience.
Serving Suggestions for Christmas Cherry Vanilla Cheesecake Cups
- Pair these cups with a light, fragrant herbal tea, like chamomile or peppermint, for a refreshing contrast.
- Serve alongside small holiday cookies for a delightful dessert platter that adds variety.
- Presentation matters! Arrange the cups on a festive tray, garnished with fresh mint for a pop of color.
- For a playful touch, sprinkle some crushed vanilla cookies beside the cups for guests to add as they like.
FAQs about Christmas Cherry Vanilla Cheesecake Cups
Can I use frozen cherries instead of fresh for the topping?
Absolutely! Frozen cherries work perfectly in this recipe, though you’ll want to thaw and drain them beforehand to avoid excess moisture.
How long can I store the cheesecake cups in the refrigerator?
You can store these delightful Christmas Cherry Vanilla Cheesecake Cups in the refrigerator for up to three days. Just make sure they’re well covered to keep them fresh!
Is there a low-sugar version of this recipe?
Yes! You can reduce the sugar in both the filling and the cherry topping. Consider using a sugar substitute if you’d like to cut back even further on sweetness.
Can I make these cheesecake cups ahead of time?
Definitely! These cups can be made a day in advance. In fact, chilling overnight allows the flavors to develop even more, making them taste divine when ready to serve.
What can I use instead of vanilla cookies for the crust?
If you’re looking for an alternative, graham crackers or even chocolate cookies work wonderfully in place of vanilla cookies. Each option will give you a unique base flavor.
Final Thoughts
Creating these Christmas Cherry Vanilla Cheesecake Cups is not just about whipping up a dessert; it’s about sharing love and joy with those around you. Each luscious layer tells a story, from the buttery cookie crust to the creamy filling topped with cherries, inviting everyone to indulge in festive sweetness. With their vibrant colors and delightful flavors, these cups add a touch of elegance to any holiday gathering. So, whether you’re hosting a family feast or an intimate get-together, I hope these delightful cheesecakes bring a smile to your face and warmth to your heart!
Print
Christmas Cherry Vanilla Cheesecake Cups
- Total Time: 2 hours 40 minutes
- Yield: 4–6 servings 1x
- Diet: Vegetarian
Description
Delicious Christmas Cherry Vanilla Cheesecake Cups with a cookie crust and topped with cherries.
Ingredients
- 1½ cups (160 g) crushed vanilla cookies
- 4 tablespoons (55 g) melted butter
- 8 oz (225 g) cream cheese, softened
- ¾ cup (180 ml) cold heavy whipping cream
- ⅓ cup powdered sugar
- 1 teaspoon vanilla extract
- 2 cups (300 g) pitted cherries, fresh or frozen
- 3 tablespoons granulated sugar
- 1 tablespoon lemon juice
- 1½ teaspoons cornstarch mixed with 1 tablespoon water
- Whipped cream
- Fresh pitted cherries
- Chocolate star-shaped cookies with white icing
- Chocolate shavings
- Small fresh mint leaves
Instructions
- Mix crushed vanilla cookies with melted butter. Divide among 4–6 clear dessert glasses and press gently into the bottoms.
- Beat the cream cheese, powdered sugar, and vanilla until smooth.
- Whip the cold heavy cream until stiff peaks form, then gently fold it into the cream cheese mixture.
- Combine cherries, sugar, and lemon juice in a saucepan. Cook over medium heat for 5–7 minutes until the cherries soften.
- Stir in the cornstarch slurry and cook for another 1–2 minutes until glossy and thickened. Cool completely.
- Pipe the cheesecake filling over the cookie crust, then spoon the cooled cherry topping over each glass.
- Refrigerate for at least 2 hours.
- Before serving, decorate with whipped cream, pitted cherries, chocolate shavings, a chocolate star cookie, and fresh mint.
Notes
- Use fresh cherries if available for the best flavor.
- Allow the cheesecake cups to chill adequately to set properly.
- Prep Time: 30 minutes
- Cook Time: 10 minutes
- Category: Dessert
- Method: Chilling and Cooking
- Cuisine: American
Nutrition
- Serving Size: 1 cup
- Calories: 320
- Sugar: 20g
- Sodium: 150mg
- Fat: 18g
- Saturated Fat: 10g
- Unsaturated Fat: 6g
- Trans Fat: 0g
- Carbohydrates: 35g
- Fiber: 2g
- Protein: 4g
- Cholesterol: 40mg