
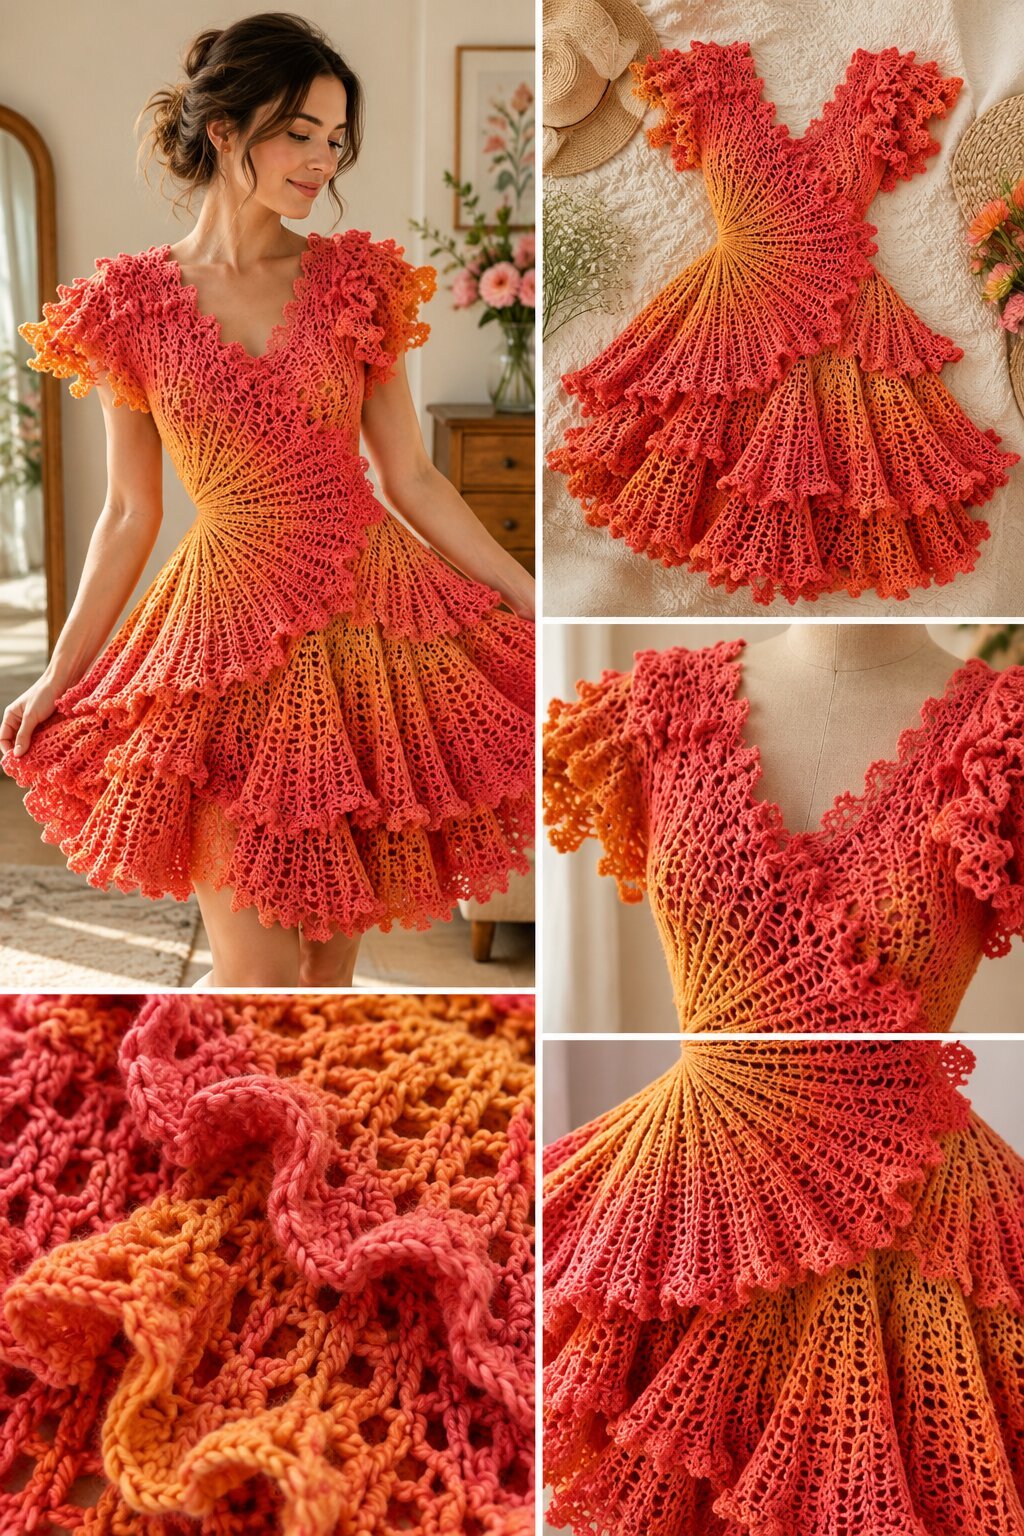
A short, open-work dress shifts from coral-red to bright orange and back again, with the color change running through the yarn itself, so no seams interrupt it. The neckline is a deep V with a scalloped edge. Ruffled flutter sleeves stand away from the shoulders. At the waist, the stitches radiate from a single point like the ribs of a folding fan, and from there the skirt spreads into three overlapping tiers, each one finished with a small picot-style edge. The fabric is airy mesh throughout, with larger holes at the skirt and a tighter net at the bodice.
What follows is a walkthrough of what the photos show and how you could build something similar. Sizes and materials below are starting points, since the images show the finished dress and not the original instructions.
What gives the dress its shape
Three features do most of the work, and they’re worth looking at one at a time.
The radiating waist. In the flat-lay and the dress-form shot, the stitches fan outward from a point near the side of the waist. That pattern usually comes from working in wedges or fan-shaped sections, where each row gets longer as you move outward, or from a spiral of increases that sit in the same spot every round. The result is a bodice that tapers in at the waist without any darts.
The tiered skirt. The skirt looks like at least three layers, each one wider than the one above, with each tier ending in a ruffled edge. The tiers could be worked separately and sewn on, or built by working into the front loops of one round and picking up the free loops later for the next tier. The second approach gives a cleaner join and a stepped look.
The flutter sleeves. Short, frilly, and wider at the outer edge. They resemble the skirt tiers in miniature, which helps tie the design together.
Reading the color and texture
The ombré is the main visual feature, and the close-up photo shows it clearly. The yarn changes from deep coral to orange to a pale golden yellow within a few stitches. That can be done with a long-gradient or self-striping yarn, which saves you from managing color changes by hand. The dress seems to repeat the gradient in each tier, so each ruffle has its own yellow-to-red sweep.
The fabric is open mesh with chain-space loops, probably a mix of double crochet and chains, or a simple net stitch. In the close-up, the ruffled edge looks soft and slightly fuzzy, which suggests a cotton blend or lightweight acrylic with some halo, not a crisp mercerized cotton.
Getting the ruffles to ripple
Ruffles come from adding more stitches than the foundation has room for. If you want a similar effect, try one of these:
- Increase heavily in a single round, for example by working two or three stitches into every chain space, so the edge can’t lie flat.
- Work extra rows on a short edge, so the fabric has to curve to fit the longer outer rim.
- Add a finishing round of chain loops or picots to give each ruffle a defined edge, as seen on the hems in the photos.
The more aggressive the increase, the tighter the ruffle. Try a small swatch first, because mesh behaves very differently from solid fabric, and what looks like a gentle wave in one stitch pattern can turn into a tight frill in another.
Yarn and hook suggestions
- Yarn: A fingering or lace-weight cotton blend in a long-gradient colorway, running from coral through orange. Lightweight yarn is the key to the drape. Anything heavier will stiffen the tiers and flatten the flare.
- Hook: A starting point is 2.5 to 3.5 mm. Go up a size for the skirt if the mesh looks tight, and down a size for the bodice if you want a firmer fit.
- Yardage: Dresses like this use a lot of yarn, especially with three tiers. Buy more than you think you need, since gradient yarns can vary between dye lots and you won’t want to run out mid-skirt.
- Other supplies: Tapestry needle, stitch markers, blocking mats and pins, and a slip or lining.
Swatch the mesh, then swatch a ruffle. The two measurements won’t match, and you’ll need both.
Fit and customization
The photos show a close-fitting top with a flared skirt, so the bodice needs the most careful sizing. Measure your bust, waist, and the distance from shoulder to waist, then check the radiating section against those numbers before committing to the whole dress.
A few adjustments are easy:
- Length: Add or remove a tier, or change the number of rows in each one.
- Sleeves: Make them longer for a more covered look, or leave them off and finish the armholes with a simple edging.
- Neckline: The V can be deepened or raised, and a single round of picots keeps the scalloped finish.
- Color: A blue-to-teal gradient or a pink-to-purple one would create a different mood with the same construction.
Because the fabric is open, expect to wear a slip or underlayer.
Blocking and care
Blocking is where this dress comes together. Pin each tier flat, spread the ruffles, and let it dry completely. Mesh opens up and relaxes dramatically once it’s wet, so the finished size will be larger than the unblocked fabric.
Wash by hand in cool water and dry flat. Because the skirt is heavy relative to the shoulders, store it folded, not on a hanger.
Frequently asked questions
Is this suitable for beginners?
It uses lace mesh, shaping, and ruffles, so it suits someone with some garment experience. Confident beginners could try a simplified version, such as a straight bodice with a single ruffled tier.
Do I need gradient yarn?
No. You can change colors by hand every few rounds, but long-gradient yarn gives a smoother blend and saves work.
How much yarn will I need?
That depends on size, hook, and number of tiers. A multi-tier dress in fine yarn can run to several hundred grams, so estimate from your swatch, not from a guess.
Can I make it longer?
Yes. Add rounds to each tier, or add a fourth tier at the bottom.