
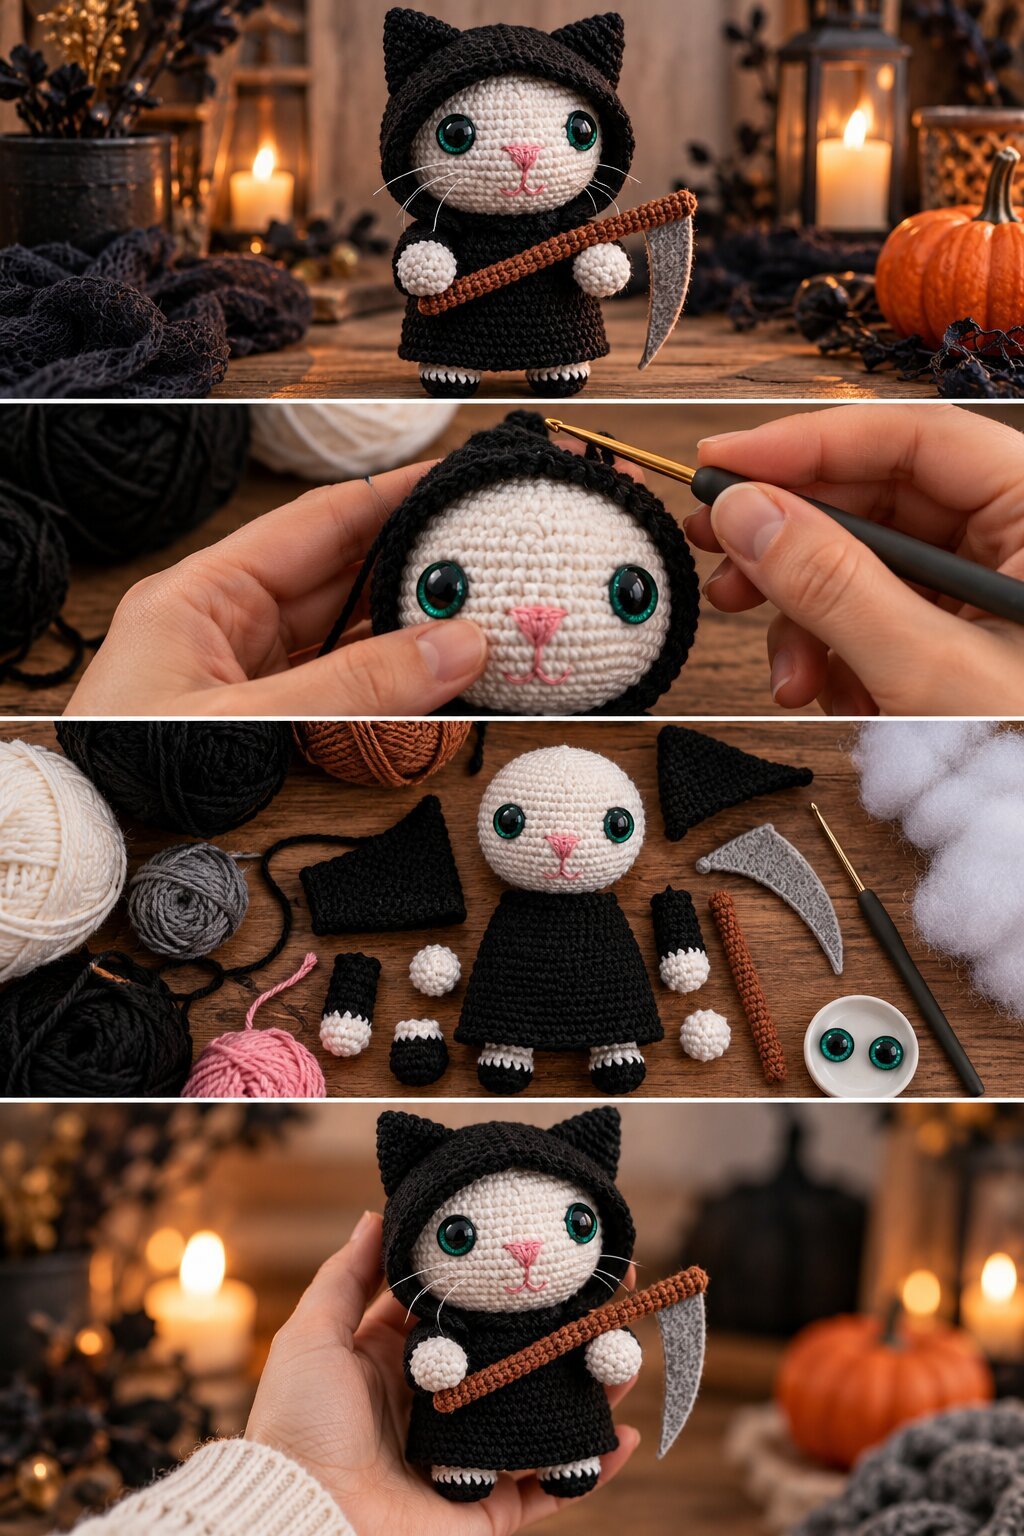
A small cream-colored cat stands upright inside a black hooded robe, with two pointed ears poking through the top of the hood. Its face is round and smooth, with large teal-green eyes, a pink triangle nose, a stitched pink mouth, and a few white whiskers. The robe flares out into a short A-line skirt. Two round cream paws hold a rust-brown scythe, whose blade is a curved piece of gray felt. Tiny black feet with white toe tips peek out from under the hem, which is a detail that keeps the figure from being entirely black and white.
What follows is a walkthrough of what the photos show and how you could build something similar. Sizes and materials below are starting points, since the images show the finished cat and not the original instructions.
What the photos tell us about the construction
The process photo lays out the pieces: a round head, a cone-shaped body with the robe built in, two arms with black sleeves and cream paws, two feet, a separate hood, two ears, a scythe handle, and a felt blade. That tells us the cat is made in parts and sewn together, which is the standard approach for amigurumi at this scale.
The stitches look like single crochet in tight spiral rounds, with the fine, even texture you get from a small hook and smooth yarn. The cream head shows a visible slight grain, which suggests a cotton or cotton-blend yarn. The black robe has a denser look, so it was probably worked on the same hook size, with black yarn simply hiding stitch definition.
The hood is the main design decision
Everything about the character comes from the hood. It frames the face, hides the top of the head, and lets the ears stand up without making the cat look like it’s wearing a hat.
From the flat photo, the hood looks like a separate rectangular or slightly trapezoidal piece, possibly worked flat in rows and then seamed, then fitted over the head. Another way to get a similar result is to crochet it in the round as a shallow cup that sits over the top of the head and extends down the sides of the face.
A few practical points:
- Make the hood slightly larger than the head so it can sit with a visible fold around the face.
- Add a round of single crochet or slip stitches around the face opening to create the thicker edge you see in the photos.
- Sew the ears onto the hood, not the head, so they sit at the right height.
- Tack the hood to the head at three or four points so it doesn’t shift when the cat is handled.
The face
The face does most of the storytelling, and it’s mostly embroidery and eye placement.
- Eyes: The large teal eyes look like glass or craft eyes with a glossy finish, around 10 to 12 mm for a head this size. Place them low on the face and fairly wide apart, with about five or six stitches between them. That spacing gives the soft, slightly sad look in the photo.
- Nose and mouth: A small pink triangle, embroidered with several satin stitches, then a short vertical line and two curved lines for the mouth.
- Whiskers: They look like thin white thread or fishing line, a few on each cheek. Pull them through the cheeks with a needle, knot inside, and trim to a length that doesn’t overpower the face.
Pin the eyes in place before locking them in. A small shift in spacing changes the expression more than any other detail.
Yarn and hook suggestions
The fabric in the photos looks dense and fine, so a smaller hook than the yarn label suggests is the right call.
- Yarn: Cotton or cotton blend in fingering to DK weight. You’ll need black, cream, a small amount of pink, rust or brown for the scythe handle, and gray for the blade, though gray felt works well if you’d rather not crochet it.
- Hook: A good starting point is 2.0 to 2.5 mm. Go smaller if fiberfill shows through between stitches.
- Eyes: 10 to 12 mm safety eyes in teal or green.
- Other supplies: Fiberfill, a tapestry needle, stitch markers, white thread for whiskers, and a little pellet or glass bead weight for the feet, if you want the cat to stand without leaning.
Test a small swatch circle before starting the head. If you can see white through the stitches when you stretch it, drop a hook size.
Building the cat in a workable order
- Head. Work a round, slightly flattened sphere in cream. Stuff firmly. Embroider the nose and mouth before closing, while you can still reach the back of the fabric.
- Body. Crochet it in black as a cone that flares at the base. A few increase rounds at the end will create the skirt effect. Consider a flat base to help it stand.
- Feet. Two small black pieces with a white band near the top, to suggest toes or socks. Stuff lightly and attach under the hem.
- Arms. Black sleeves ending in cream paws. Make the paw a small ball and join it to the sleeve with a color change, so no seam is needed.
- Hood and ears. Make the hood as a separate piece, then add two triangular ears and sew them on.
- Scythe. The handle looks like a narrow brown tube, worked in tight single crochet. Add a small piece of wire inside if you want it straight. Cut the blade from gray felt in a curved crescent shape, and glue and stitch it to the handle.
- Assembly. Sew the head to the body, attach the arms so the paws hold the handle, then set the hood on and tack it down.
Details that change the finished look
Keeping the head from tipping. A big head on a cone body can fall forward. Stuff the neck area firmly and sew the head to the body through several rounds, not just one.
Making the scythe hold. The handle is held between the paws and sits diagonally across the body. Sew the paws directly to the handle in one or two spots, so it stays in place without needing to be glued.
Felt versus crochet for the blade. Felt gives a clean, sharp edge, and it’s simpler. A crocheted blade would need stiffening, and the curve is harder to control.
Handling black yarn. Dark yarn is hard to see in dim light, so work in good lighting and use a light-colored stitch marker.
Safety notes
With glued parts, whiskers, and a felt blade, this is better suited to display than toddler play. If you plan to give it to a child, embroider the eyes, replace the whiskers with a few stitched lines, and sew the blade firmly in place.
Frequently asked questions
Can I make it without the scythe?
Yes. The hooded cat still reads as a reaper, though the scythe makes the theme obvious.
Can I use a different color for the cat?
Any light neutral works. A gray or orange cat would give the same structure a different character.
Is this beginner-friendly?
It uses basic stitches and shaping, but the number of parts and the embroidery make it a better fit for someone comfortable with amigurumi.
How big will it be?
With the yarn and hook above, a finished height of around 15 to 18 cm (6 to 7 inches) is a reasonable expectation. Treat this as an estimate, since your gauge and stuffing will change it.