
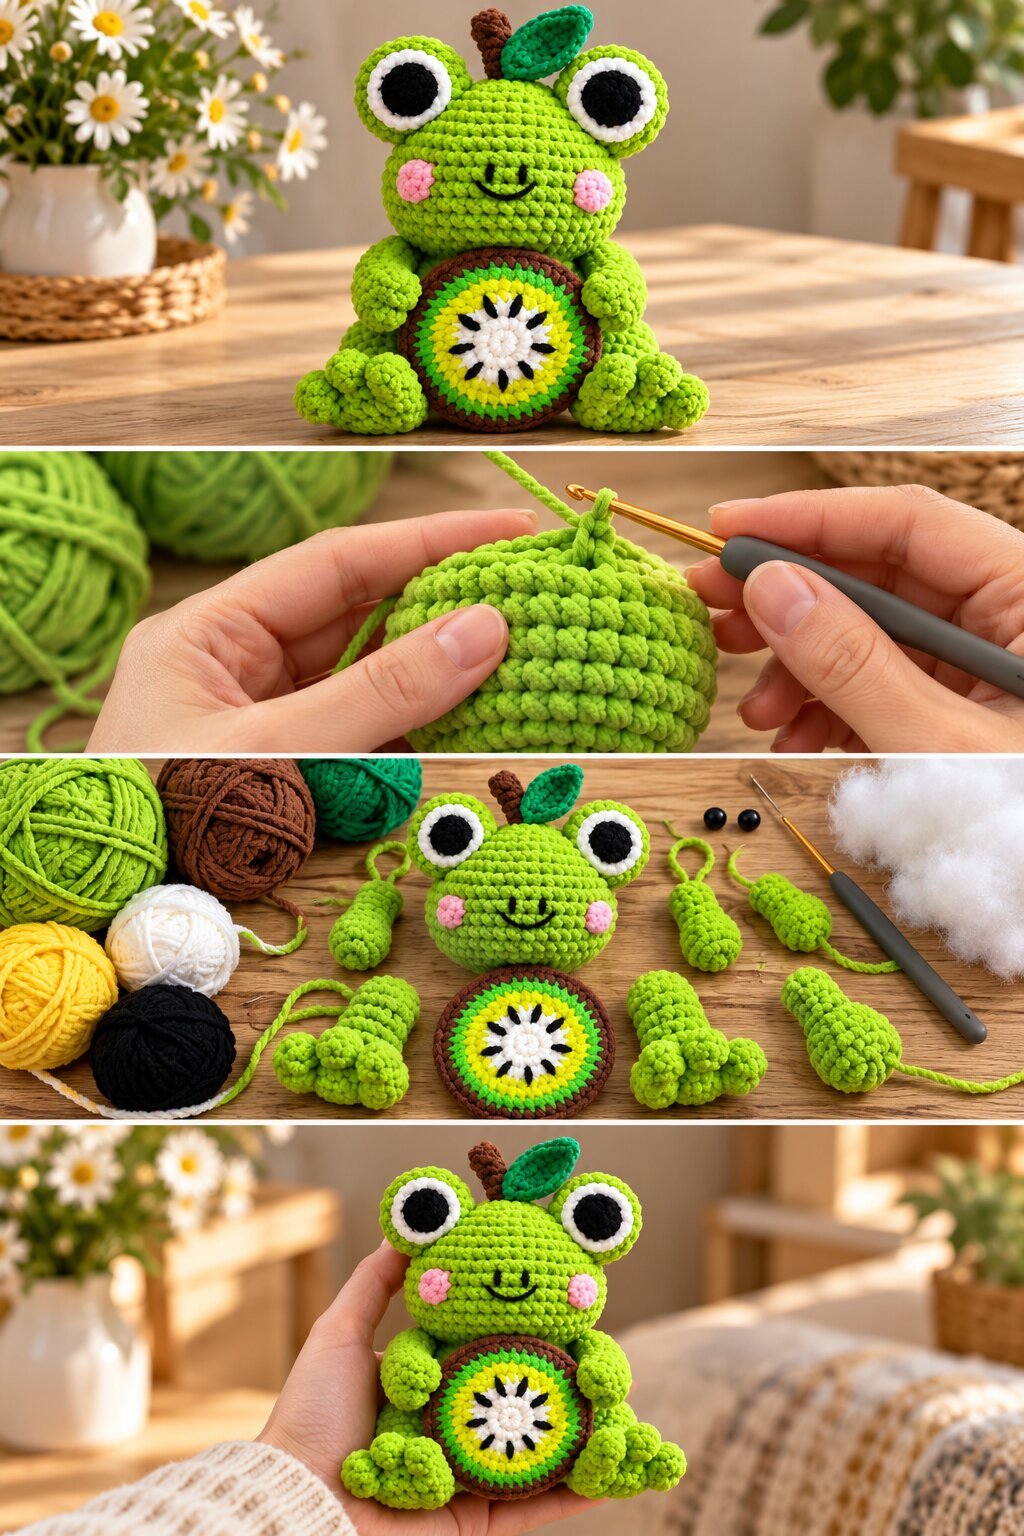
A bright lime-green frog sits upright with its arms resting against its sides and its feet splayed out in front. Its round, wide head carries two oversized eyes on top, each a white ring around a black pupil, with pink cheek circles and a small black smile stitched below. A short brown stem and a deep green leaf sit between the eyes, so the whole head reads as a piece of fruit. On the belly is the actual joke: a flat crocheted kiwi slice with a brown rim, a green ring, a yellow ring, and a white center with black seeds radiating outward.
This post covers what the photos show and how you could build something similar. The sizes and materials below are starting points, since the images show the finished frog, not the original instructions.
What gives the frog its look
The silhouette is short and squat, with the head noticeably wider than the body. That proportion is what makes it feel plush. The arms are small stuffed tubes with a few bumps at the end for fingers, and the legs end in three rounded toe lobes, which gives the feet a froggy, slightly webbed look without any extra shaping.
The stitch fabric is tight and even. In the close-up photo, the rounds look like single crochet worked in a continuous spiral, with the usual slight diagonal drift. The yarn appears plump and smooth, closer to a soft acrylic or milk cotton than a fuzzy yarn. That matters for the finish: smooth yarn shows stitch definition, and a fuzzy one would blur the small details on the kiwi slice.
The kiwi slice
The slice is the part worth planning most carefully. Judging from the photos, it’s a flat disc worked outward from the center in four color bands: white, yellow, bright green, and brown at the edge. The black seeds look embroidered on top of the white center, fanning out like spokes.
A similar disc can be made like this:
- Start in the round with white and work a few increase rounds to make a small flat circle.
- Switch to yellow for one or two rounds, then to bright green for one or two, then brown for the rim. Keep increasing evenly so the disc stays flat.
- Add the seeds last, using black yarn or embroidery thread in short straight stitches radiating from the center. Space them evenly, and add a second, shorter ring of seeds if you want a fuller look.
If the edge ruffles, you’re increasing too fast. If it cups, you’re not increasing enough. A single round of slip stitches in the brown rim can firm up the outline. The disc looks sewn flat on the belly, so lightly backing it with a thin layer of fiberfill or a felt circle before attaching will help it hold its shape.
Yarn and hook suggestions
The stitches in the photos look dense, so a hook smaller than the yarn label suggests is the right call.
- Yarn: DK or light worsted in a smooth acrylic or cotton blend. You need lime green for the body, plus brown, dark green, yellow, white, and black. Pink can be yarn or felt for the cheeks.
- Hook: a good starting point is 2.5 to 3.0 mm, going smaller if fiberfill shows through. Ergonomic handles like the gray one in the photos help with the long stretches of tight single crochet.
- Eyes: the loose black beads in the process photo look like pupils, which would be sewn onto crocheted white discs. Black safety eyes or embroidered pupils work equally well.
- Other supplies: fiberfill, a tapestry needle, stitch markers, and pins for positioning parts before sewing.
Swatch a small circle before you commit. If you can see white through the stitches when you stretch it, drop a hook size.
Building it in a workable order
The materials photo shows the frog made in separate pieces, which is the easiest way to handle a design with this many small parts.
- Head and body. The head looks like a wide, flattened sphere. Work it in the round, increasing to the widest point, then decreasing. Stuff firmly, because a soft head slumps forward on a small body.
- Arms and legs. Make two of each. Arms are narrow tubes with small finger bumps. Legs are slightly thicker and finish in three toe lobes. Stuff lightly so they stay flexible and sit naturally.
- Eyes. Crochet two small white discs, attach the black pupils, and sew them on top of the head, slightly raised. The eye placement is what makes the frog’s expression.
- Stem and leaf. The stem is a short brown tube, and the leaf is a flat oval in dark green. Both can be tiny, so make a spare in case one comes out off-proportion.
- Kiwi slice. Make the disc as described above, then embroider the seeds.
- Face details. Embroider the smile with black yarn or thread. Add pink cheek circles last, and keep the smile small, since a wide one changes the character.
- Assembly. Pin the arms to the body’s sides, set the legs at the base so the frog balances, sew the kiwi slice to the belly, then attach the head, eyes, stem, and leaf.
Small details that change the result
Making it sit upright. A frog this squat can tip backward if the base is light. Stuff the lower body more firmly than the top, and keep the legs pointing forward and slightly outward.
Matching the lime green. Bright greens vary a lot between dye lots. Buy enough for the whole body, arms, and legs in one go, so the pieces match.
Placing the eyes. Sew them symmetrically, a bit apart from the stem, with the white rims touching the top of the head. Pin them and look from the front before stitching.
Cheeks. Felt circles glued and stitched look cleaner than crocheted ones at this scale. If you embroider them instead, fill in with tight satin stitches.
Safety notes
With embroidered features and sewn-on parts, this works well as a gift for children, but choose features based on the age of the child. Safety eyes locked in place are fine for most ages. For babies and toddlers, embroider the pupils and sew everything with doubled thread. Check that the stem, leaf, and any small parts are firmly attached before giving it away.
Frequently asked questions
Can I skip the stem and leaf?
Yes. Without them the frog still reads as a frog with a kiwi belly, though the fruit connection is less obvious.
Do I need to use the same colors?
No. A pale yellow body with a pink slice could turn it into another fruit character. Just keep a contrasting rim on the slice.
What if my kiwi disc isn’t lying flat?
Check your increases. A round that’s too short will cup, and one that’s too long will ruffle. Block it gently by pressing under a book after a light steam.
Is this suitable for beginners?
It uses mostly single crochet, increases, and decreases, but the number of small parts and the embroidery make it better for someone comfortable with amigurumi basics.