
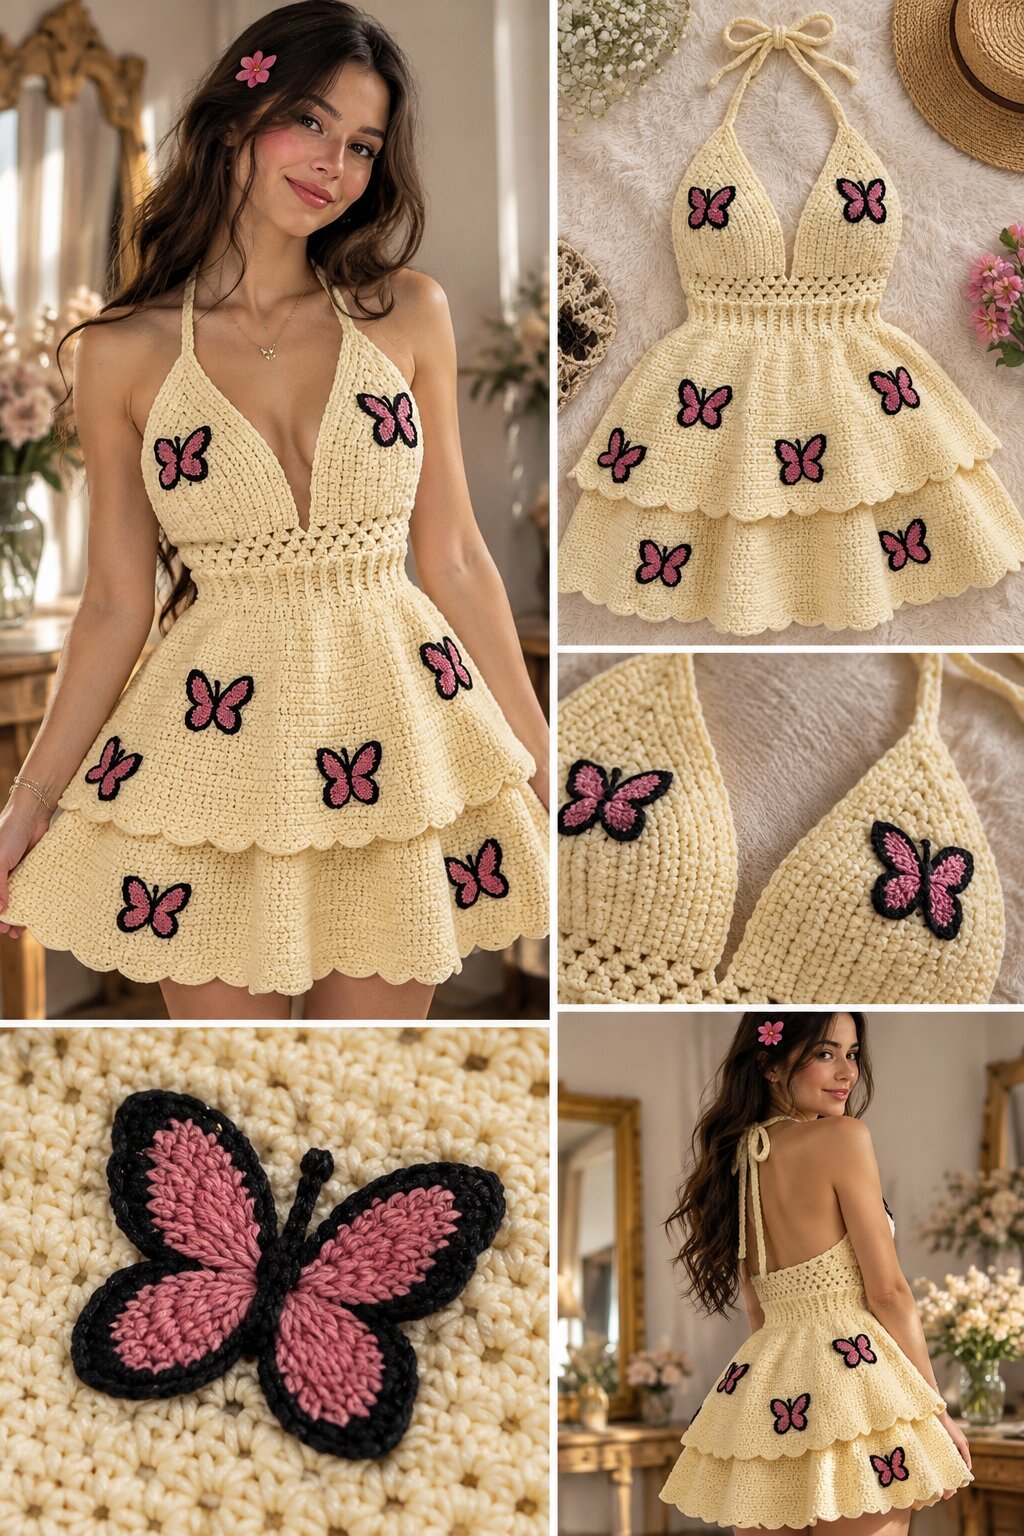
A butter-yellow halter dress with a deep V neckline, a fitted open-back bodice, and a two-tier flared skirt, each tier finished in a scalloped edge. Small butterflies in pink with black outlines are scattered across the cups and both skirt tiers, placed at different angles so they look like they landed there rather than being lined up. The halter ties are plain crocheted cords that knot at the back of the neck, and the back is open down to the waist.
The shape is simple. The butterflies carry the personality. Pink and black on pale yellow is high contrast, so even a handful of small motifs reads clearly. And because each butterfly is its own piece, you can add or remove them without changing the dress itself.
This suits someone who has made a halter top or a simple skirt and wants to combine the two with some applique work. Though the project is called a gown here, the finished length in the photos is a short mini, so expect something closer to a sundress.
Reading the Construction
The bodice cups look like triangles worked in a dense stitch, probably single crochet, narrowing toward the neck where the halter cord continues. Below them is a band of open mesh with a row of vertical ribbing-like texture beneath it, which likely forms a fitted waistband. That band shows in the close-ups as the one point where the fabric changes character, and it probably does the work of holding the bodice snug before the skirt begins.
The skirt looks like two separate flared tiers. The upper tier starts at the waistband, flares outward, and ends in a scalloped edge that overlaps the lower tier, which has its own scalloped hem. That kind of build usually means each tier is a round of increases from a foundation row, with the second tier worked from a lower point on the first rather than the waist. The scallops look like a simple shell or picot border added at the end of each tier.
The butterflies appear to be separate small motifs, with a black outline and pink inner wings, and what looks like a short stitched or raised texture in the wing centers. A reasonable way to recreate them is to crochet each as a flat piece, with the black body and outline worked first and the pink wing sections added as a second color, then stitch them down.
Materials You’ll Need
- Pale yellow yarn for the dress (a cotton or cotton blend is a reasonable suggestion, since it holds the structure of a fitted bodice and flared skirt)
- Pink yarn and black yarn for the butterflies
- A crochet hook sized to your yarn (see below)
- Yarn needle for attaching butterflies and weaving in ends
- Scissors
- Stitch markers, useful for spacing skirt increases evenly
- A tape measure, since fit depends on your own measurements
Yarn and Hook Notes
The fabric looks fairly dense with a soft, slightly chunky texture, so a DK to light worsted weight cotton is a sensible starting point. A hook in the 3.5mm to 4.5mm range is reasonable for that weight, though you may want a slightly smaller hook for the cups so they stay firm. Swatch the skirt stitch and the bodice stitch separately, since the skirt should drape while the bodice needs to hold its shape.
Skill Level
Confident beginner to intermediate. The cups and skirt tiers are repetitive, and the butterflies are small. The parts that ask for more care are the fitted open-back bodice, the even spacing of the increases around two flared tiers, and making a set of butterflies that match.
Stitches Likely Involved
- Chain (ch): foundation, mesh band, and halter cords
- Slip stitch (sl st): joining rounds and the scalloped edging
- Single crochet (sc): bodice cups and butterfly outlines
- Half double crochet (hdc) and double crochet (dc): the skirt tiers and mesh band
- Shell or picot stitch: the scalloped edges
- Increase (inc) and decrease (dec): shaping the cups and flaring each skirt tier
- A simple color-change technique: for the two-color butterflies
Building It: A Practical Sequence
Start with the cups. Work two triangles from the bottom up, decreasing toward the top, and try them against your bust measurement before continuing.
Join them with the open mesh band and work the fitted waistband below it, checking that it sits comfortably at the ribs.
Add the halter cords. Crochet long chains or flat cords from the top points of the cups so they tie at the back of the neck.
Work the upper skirt tier from the waistband, increasing evenly so the flare is symmetrical, and finish it with a scalloped border.
Work the lower tier from the underside of the first tier, using more increases to give it extra fullness, then add its own scallops.
Crochet the butterflies. Make one, check its size against the dress, then make the rest and lay them out before stitching.
Stitch everything down and weave in ends. Block lightly so the scallops lie flat.
Adjusting the Fit and Look
Bust and waist fit come from your own measurements and gauge swatch. Skirt length is easy to change by adding or skipping rounds, and a third tier would make it fuller. For a quicker version, leave off the butterflies and let the scalloped tiers be the feature. A pastel pink or lavender dress with white butterflies would keep the same look in a different mood.
Where It’s Easy to Go Wrong
Uneven increases in the skirt. The flare will lean to one side. Mark the increase points at the start of each tier.
Cups that gape. Without a gauge swatch the neckline can sit too loose. Try the cups on before joining.
Butterflies that vary in size. Make them all together with the same tension so they match.
Scallops that curl. Block the hem or work the border a hook size larger.
Halter cords that are too short. Make them longer than you think you need, since you can always trim them.
Care
Hand wash in cool water and lay flat to dry. Avoid high heat, which can shrink cotton and flatten the scalloped trim. Follow the yarn label for specific care.
Common Questions
Is this a beginner project?
It suits confident beginners. The open-back bodice and two-tier skirt take a little more care than a basic top.
Is this actually a gown?
In the photos it is a short mini dress. A longer version could be made by adding rounds to the skirt tiers.
Can I skip the butterflies?
Yes. The dress works on its own, and the butterflies can be added later.
What if I want a closed back?
You could extend the bodice upward in the back, or add a button closure along the center.