
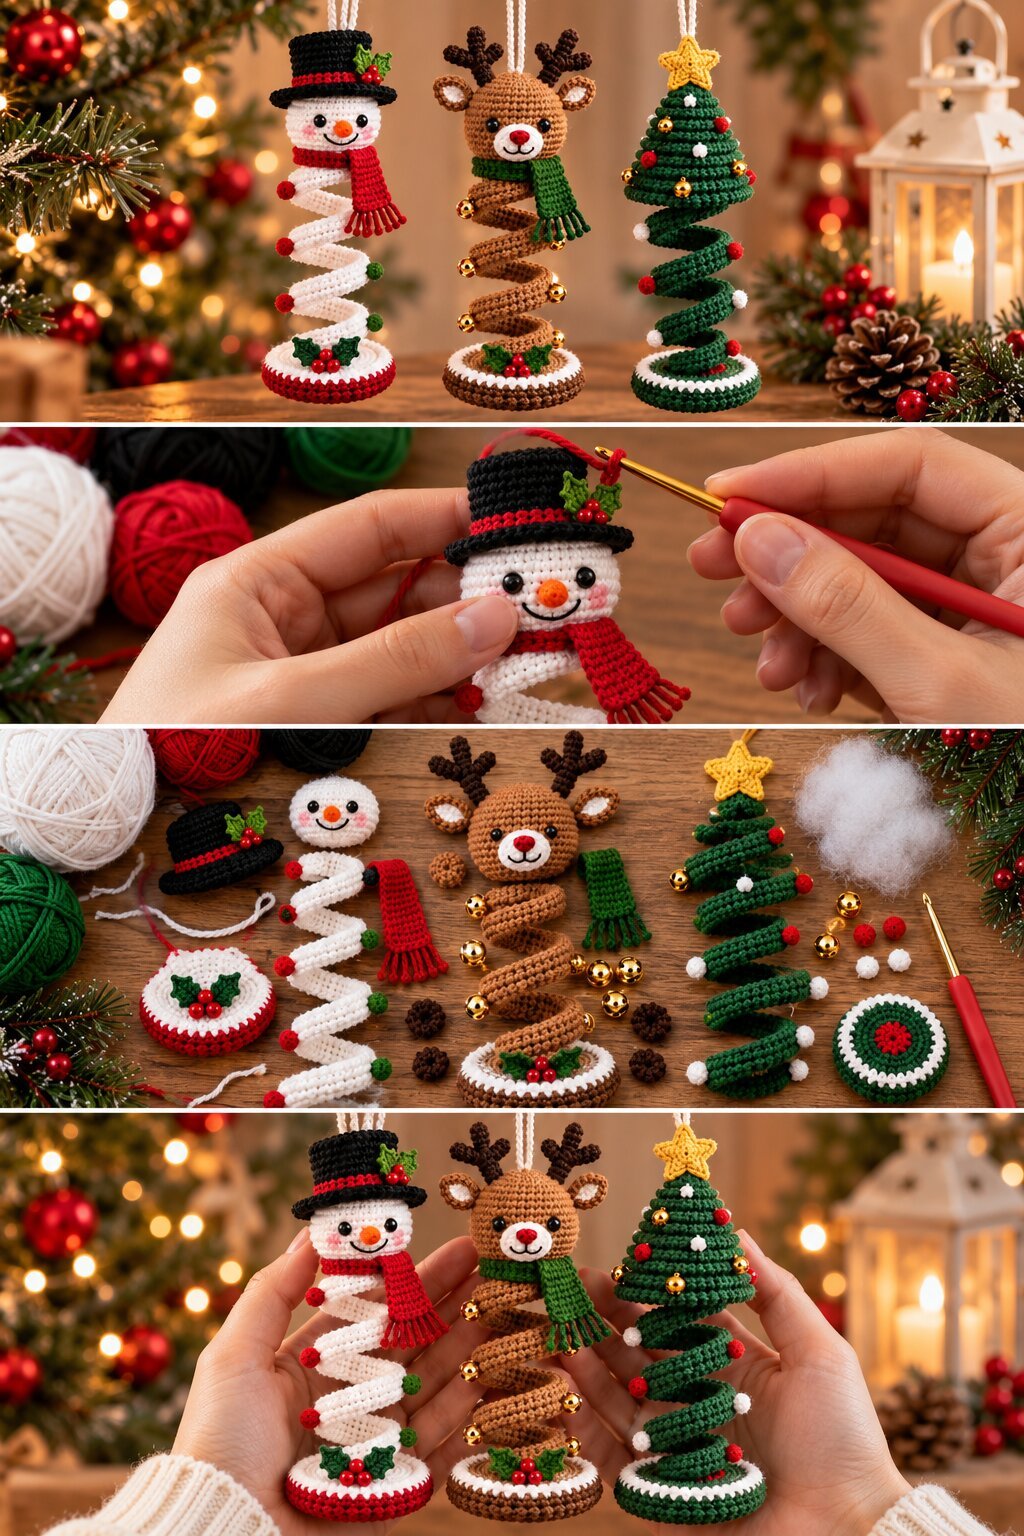
Three small figures stand on round, flat bases, each rising from a coiled, spring-like stem. The snowman has a white spiral and a black top hat with a red band and a sprig of holly. The reindeer has a brown spiral, a green scarf, and a red nose. The tree is a tight green cone topped with a yellow star, and it loosens into a spiral toward the base. Each one has a loop at the top, so they work as tree ornaments, but the bases are wide enough for them to stand on a shelf or mantel as well.
This post goes through what’s visible in the photos and how you could build something similar. Treat the numbers below as starting points, since the photos show the finished look and not the original instructions.
What makes the spiral ornaments work
The spring-shaped body is the main feature. Each figure’s head or cone sits on top of a coiled strip with gaps between the loops, which gives the ornaments height without much bulk. The coil looks like a narrow crocheted tube or band, worked in a tight, dense stitch. A fabric that firm holds its shape, which matters because the loops have to support the head and stay evenly spaced.
The photos don’t show how the stem is made, so here are two reasonable ways to get the same effect:
- A long, narrow tube worked in continuous rounds over a bendable core, such as a pipe cleaner, then wrapped around a pen or dowel to set the coil.
- A long flat strip crocheted in rows, joined along one edge to form a tube, then coiled the same way.
The tube method is more likely to keep a smooth, rounded look, like the loops in the photo. A core wire also lets you adjust the spacing after assembly, which helps if one ornament leans.
Reading the three designs
Snowman. The head is a white sphere with black bead eyes, an orange carrot nose, and pink cheeks. The red-and-white scarf has fringe at one end. The hat is a small black cylinder with a red stripe near the brim and a holly accent. Small red and green dots sit along the spiral, probably pompom-style bobbles or beads. The base is white with a red outer ring.
Reindeer. A tan-brown head carries dark brown antlers, ears with lighter inner patches, and a red nose. A green scarf with fringe sits at the neck. Gold jingle bells are dotted along the brown coil. The base is brown with a white edge and a holly cluster in the center.
Tree. The upper section is a green cone worked in tight spiral rounds, dotted with red and white accents and a few gold beads. A yellow star sits on top. Below the cone, the green stem opens into a loose coil with a few white and red dots. The base is green with a white ring and a red center, which echoes the tree’s colors.
The shared base style (a flat disc with a contrasting edge) pulls the set together. Each base picks up the main color of its figure and adds a Christmas accent.
Yarn and hook suggestions
The stitches in the photos look small and tight, so a fine yarn is the best match. As a starting point:
- Yarn: cotton or cotton-blend in sport or DK weight gives crisp stitch definition. Acrylic works too, but it may feel softer and less structured in the coil.
- Hook: go down a size or two from the yarn label’s recommendation. A 2.0 to 2.5 mm hook is a reasonable place to start with DK. The fabric should be firm enough that stuffing doesn’t show through.
- Colors: white, red, dark green, tan brown, dark brown, black, orange, and a little yellow cover the set. Gold beads or bells handle the metallic accents.
- Other supplies: fiberfill, black beads or 6 mm safety eyes for the snowman and reindeer, a tapestry needle, pipe cleaners or thin craft wire for the coils, and a short length of cord or yarn for each hanging loop.
Test your gauge by making the base disc first. If you can see fiberfill through the stitches, drop a hook size.
Building the pieces in a sensible order
The process photos show the pieces made separately and joined at the end, which is a good approach for ornaments this small.
- Make the bases first. A flat, circular disc worked in the round with a color change for the edge. Add the holly or center detail afterward.
- Work the heads. Crochet the snowman and reindeer heads as small stuffed spheres, and the tree as a cone. Stuff firmly, since these sit on top of a thin stem and a floppy head will tip the whole ornament.
- Add details to the heads before attaching them. Embroider mouths and cheeks, place eyes and noses, and sew on ears and antlers. It’s easier to do this while the head is loose in your hand.
- Crochet the spiral stems. Make each one long enough to coil, then shape it around a cylinder. Allow extra length rather than too little, because you can trim excess but can’t easily lengthen a finished coil.
- Make the accessories. The scarves are small rectangles with fringe, the hat is a short cylinder with a brim, and the star is a flat five-point shape.
- Assemble. Sew the stem to the base, then the head to the stem. Add the hanging loop last, anchored through the top of the head or cone so it carries the weight without pulling on the stuffing.
Getting the details right
Tiny bobbles and dots. The red, green, and white dots along the spirals could be small pompoms, beads, or crocheted bobbles. Beads are the quickest. Small hand-crocheted balls, stuffed lightly, look closest to the dimensional dots in the photos.
Fringe. Cut yarn lengths slightly longer than you want the fringe to be, fold each in half, and pull through the scarf edge with your hook. Trim evenly when all are in.
Bells. The reindeer’s gold bells would be stitched to the coil with sturdy thread. Sew each one on at two points, not one, so it doesn’t spin or work loose.
Keeping the coil even. Wrap the stem around the same dowel for all three ornaments so the loops match in size. For the tree, a slightly smaller wrap diameter near the top will help the stem blend into the cone.
Safety and display
The bells, beads, and small stuffed pieces make these better as decorations for adults to handle than as toys. If children will be around, skip loose beads, embroider the eyes, and sew everything on firmly. For hanging, choose a sturdy branch, since the base discs add weight.
Frequently asked questions
Can I make a single ornament instead of the set?
Yes. Each figure is independent, so you could start with just the tree and add the others later.
Do I need wire inside the coil?
It isn’t strictly required, but a bendable core helps the spiral keep its shape and lets you adjust the spacing after assembly. Without one, a very firm stitch and a well-stuffed tube are your best options.
Can I use different colors?
Easily. Swap the reindeer’s tan for gray, or give the tree a white or silver finish. Keep the base edge in a contrasting color to preserve the look.
What if my head leans on the stem?
Add more fiberfill to the head’s base, and make sure the stem is attached at the center of the base. A thin wire running from the stem up into the head also steadies it.