Introduction to No-Bake Mini Cheesecakes
Hey there, fellow dessert lovers! If you’re anything like me, life gets pretty busy, especially if you’re juggling work, kids, or simply everything in between. That’s why I’m thrilled to share this delightful recipe for no-bake mini cheesecakes. These little bites of heaven are not just simple to whip up, but they’re also perfect for almost any occasion!
Whether it’s a last-minute gathering or a treat for your family, these no-bake mini cheesecakes are sure to impress. Plus, they satisfy that sweet tooth without the fuss! Let’s dive into this easy, delicious treat that will make your life a little sweeter.
Why You’ll Love This No-Bake Mini Cheesecakes
These no-bake mini cheesecakes are a lifesaver for busy moms and professionals alike. They’re super quick to make and require no baking skills—so, no worries about burning anything!
With their creamy texture and decadent flavor, they’re irresistible. Plus, you can customize them however you like! You’ll be amazed at how something so easy can taste so good. Each bite brings joy without the stress!
Ingredients for No-Bake Mini Cheesecakes
To make these delightful no-bake mini cheesecakes, you’ll need some key ingredients that come together for a heavenly experience.
- Cream Cheese: This is the star of the show! Softened cream cheese gives the cheesecake its rich, creamy texture. Full-fat is ideal for that authentic taste.
- Sugar: A touch of sweetness to balance the tanginess of the cream cheese. You can adjust this to your taste preference, too.
- Vanilla Extract: Just a splash enhances the flavor. It adds a warm aroma and creamy essence that makes these cheesecakes irresistible.
- Heavy Cream: Whipping cream creates that light, fluffy texture. Ensure it’s cold before whipping to achieve those perfect stiff peaks!
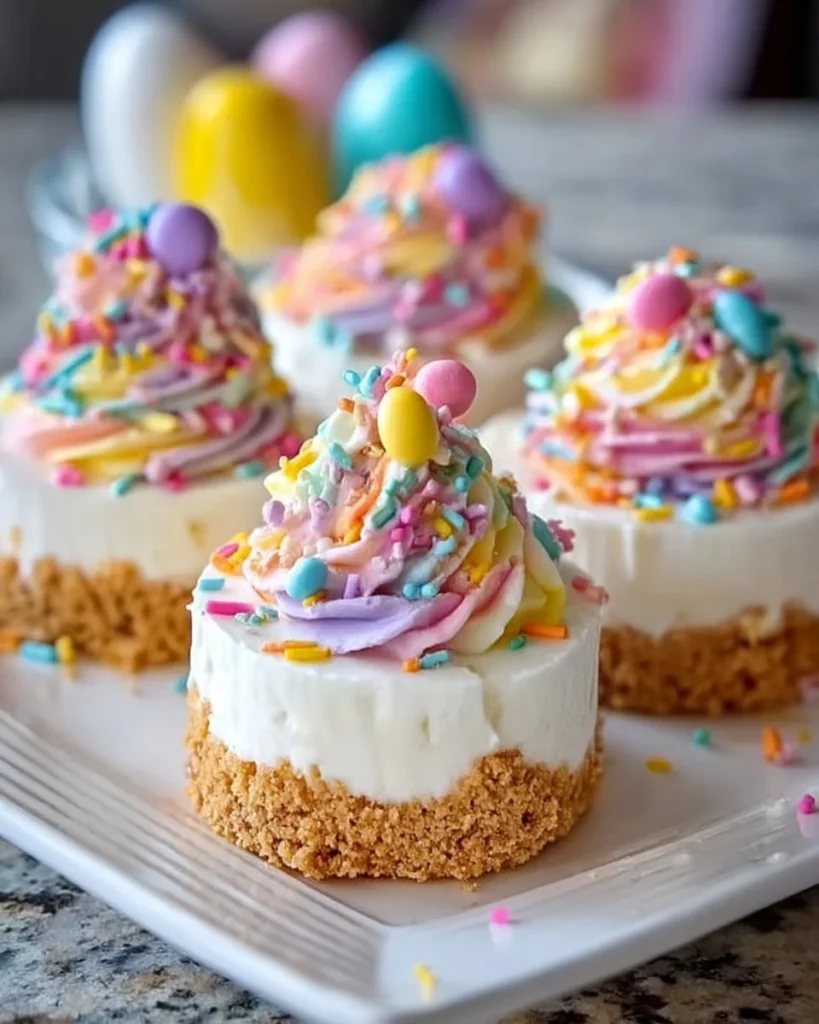
- Graham Cracker Crumbs: These form the crust, giving a delightful crunch and a sweet contrast to the creamy filling. You can use store-bought crumbs or crush your own!
- Colorful Sprinkles or Festive Candies: These are optional but add a fun, joyful finish. They make the mini cheesecakes look as good as they taste!
For precise measurements, check the bottom of this article where you can find the quantities needed for each ingredient. Happy cooking!
How to Make No-Bake Mini Cheesecakes
Making no-bake mini cheesecakes is easier than you might think! Here’s a simple step-by-step guide that takes you through the process. Grab your mixing bowl, and let’s get started!
Step 1: Prepare the Cream Cheese Mixture
First, we want to beat that cream cheese! In a medium bowl, combine the softened cream cheese, sugar, and vanilla extract. Using an electric mixer, beat everything together until it’s smooth and creamy. Take your time with this step; smoothness is key! Imagine that lovely texture waiting for you. You’ve got this!
Step 2: Whip the Heavy Cream
Now, let’s whip the heavy cream! Pour it into a chilled bowl and start mixing on medium speed. Whip until you see stiff peaks forming. You know you’re done when the cream holds its shape and doesn’t collapse. If you over-whip, it can become grainy, so keep an eye on it. This fluffy texture is what we want for our cheesecakes!
Step 3: Combine Cream Cheese and Whipped Cream
Next, it’s time to combine the whipped cream and cream cheese mixture. Gently fold one-third of the whipped cream into the cream cheese mixture using a spatula. This method helps maintain that airy texture. Repeat with the rest of the whipped cream until everything is blended smoothly. Just be gentle—it’s like wrapping your cheesecake mixture in a cozy blanket!
Step 4: Prepare the Crust
Don’t forget about the crust! Grab your mini cupcake liners and fill the bottoms with graham cracker crumbs. You want a firm layer, so pack them down gently with your fingers or the back of a spoon. This bite-sized base is the perfect crunch that complements the creamy filling. It’s like laying down the foundation for a delicious dessert!
Step 5: Fill the Mini Cheesecakes
Now for the fun part—filling the mini cheesecakes! Using a spoon or a piping bag, scoop the cream cheese mixture and carefully fill each cupcake liner. Aim to leave a little space at the top as they will expand slightly during chilling. You want them neat, so slow and steady wins the race here!
Step 6: Chill and Set
Patience is key here! Place the filled cupcake liners in the refrigerator and chill for at least 240 minutes, or until set. This chilling time lets the flavors meld and the cheesecakes firm up perfectly. Think of it as letting the good things in life take their time—it’s worth it!
Step 7: Add Toppings
Finally, it’s decorating time! Before serving, sprinkle your mini cheesecakes with colorful sprinkles or festive candies. You can get creative here—chocolate chips, fruit, or crushed cookies are all great options, too. Make them sparkle with joy—just like how you feel when you see them!
Tips for Success
- Always use softened cream cheese for easier mixing.
- Chill your mixing bowl before whipping the heavy cream—it helps achieve better peaks.
- Don’t rush the folding process; being gentle keeps the mixture light and airy.
- Pack the graham cracker crumbs lightly, ensuring a nice crunchy base.
- Experiment with toppings for a personal touch that your family will love!
Equipment Needed
- Mixing bowls: Use any size, but a medium bowl works best for the cream cheese mixture.
- Electric mixer: A hand mixer is perfect, but whisking by hand can work in a pinch!
- Measuring cups and spoons: Essential for accurate ingredient quantities.
- Mini cupcake liners: Look for fun designs to make your treats pop!
- Spatula: A silicone spatula is great for folding and scraping.
Variations on No-Bake Mini Cheesecakes
- Fruit Flavors: Add fruit puree, like strawberry or blueberry, to the cream cheese mixture for a burst of flavor.
- Chocolate Delight: Fold in melted chocolate or cocoa powder for a rich chocolate version that chocolate lovers will adore.
- Nutty Twist: Incorporate crushed nuts into the crust or filling for added texture and flavor, such as pecans or almonds.
- Dairy-Free Option: Use dairy-free cream cheese and coconut cream instead of heavy cream for a dairy-free treat.
- Gluten-Free Version: Substitute graham cracker crumbs with gluten-free cookie crumbs to keep it gluten-free.
- Cheesecake Swirl: Layer different flavored fillings and create a marble effect for a visually stunning presentation.
Serving Suggestions for No-Bake Mini Cheesecakes
- Pair with fresh berries or a fruit compote for a refreshing contrast.
- Serve alongside a scoop of vanilla ice cream for added indulgence.
- Drizzle with chocolate or caramel sauce for a decadent touch.
- Present on a colorful platter, garnished with mint leaves for a fresh pop.
- Offer coffee or herbal tea on the side to balance the sweetness.
FAQs about No-Bake Mini Cheesecakes
Can I make these no-bake mini cheesecakes ahead of time?
Absolutely! These delightful treats can be made a day or two in advance. Just keep them stored in the fridge, covered. They’ll taste just as delicious, if not better, after chilling!
How can I customize the flavors of my mini cheesecakes?
Getting creative with flavors is part of the fun! You can add fruit purees, chocolate, or even peanut butter to your cream cheese mixture. Swirl in some jam for a fruity kick or add spices like cinnamon for warmth.
What can I use instead of graham cracker crumbs for the crust?
If you’re not a fan of graham crackers, you can try crushed Oreos, digestive biscuits, or even gluten-free cookie crumbs. Each will bring a unique flavor and texture!
Can I freeze no-bake mini cheesecakes?
Yes, you can freeze them! Just wrap each mini cheesecake tightly in plastic wrap. They’ll last for up to a month. When you’re ready to enjoy, thaw them in the refrigerator overnight.
What’s the best way to serve these mini cheesecakes?
These mini cheesecakes look delightful on a platter with fresh fruit or a drizzle of chocolate sauce. Serve them alongside coffee or tea for a wonderful finish to any meal!
Final Thoughts
As I wrap up this sweet adventure, I hope you’re feeling inspired to make these no-bake mini cheesecakes. They’re not just delicious, but also a chance to create joyful moments in the kitchen. The smiles on your loved ones’ faces as they take their first bite are priceless. These little treats are perfect for any gathering, fancy or casual. Plus, they’re so easy to whip up that you’ll become a dessert hero in no time! So, grab your ingredients, unleash your creativity, and let the delightful flavors bring happiness to your table!
Print
No-Bake Mini Cheesecakes: A Simple & Delicious Treat!
- Total Time: 260 minutes
- Yield: 12 mini cheesecakes 1x
- Diet: Vegetarian
Description
A simple and delicious no-bake mini cheesecake recipe perfect for any occasion.
Ingredients
- 8 oz cream cheese, softened
- 1/2 cup sugar
- 1 tsp vanilla extract
- 1 cup heavy cream
- Graham cracker crumbs (for the crust)
- Colorful sprinkles or festive candies (for topping)
Instructions
- Beat the cream cheese with sugar and vanilla extract until smooth and creamy.
- Whip the heavy cream until stiff peaks form.
- Combine the whipped cream into the cream cheese mixture gently.
- Prep the crust with a layer of graham cracker crumbs in mini cupcake liners.
- Spoon the cream cheese mixture on top of the crumbs.
- Chill in the refrigerator for at least 240 minutes or until set.
- Top with sprinkles or candies before serving.
Notes
- For best results, use full-fat cream cheese.
- Chilling time is crucial for the cheesecake to set properly.
- Feel free to customize the toppings with your favorite candies.
- Prep Time: 20 minutes
- Cook Time: 0 minutes
- Category: Dessert
- Method: No-Bake
- Cuisine: American
Nutrition
- Serving Size: 1 mini cheesecake
- Calories: 250
- Sugar: 10 g
- Sodium: 150 mg
- Fat: 20 g
- Saturated Fat: 10 g
- Unsaturated Fat: 5 g
- Trans Fat: 0 g
- Carbohydrates: 15 g
- Fiber: 1 g
- Protein: 3 g
- Cholesterol: 40 mg