
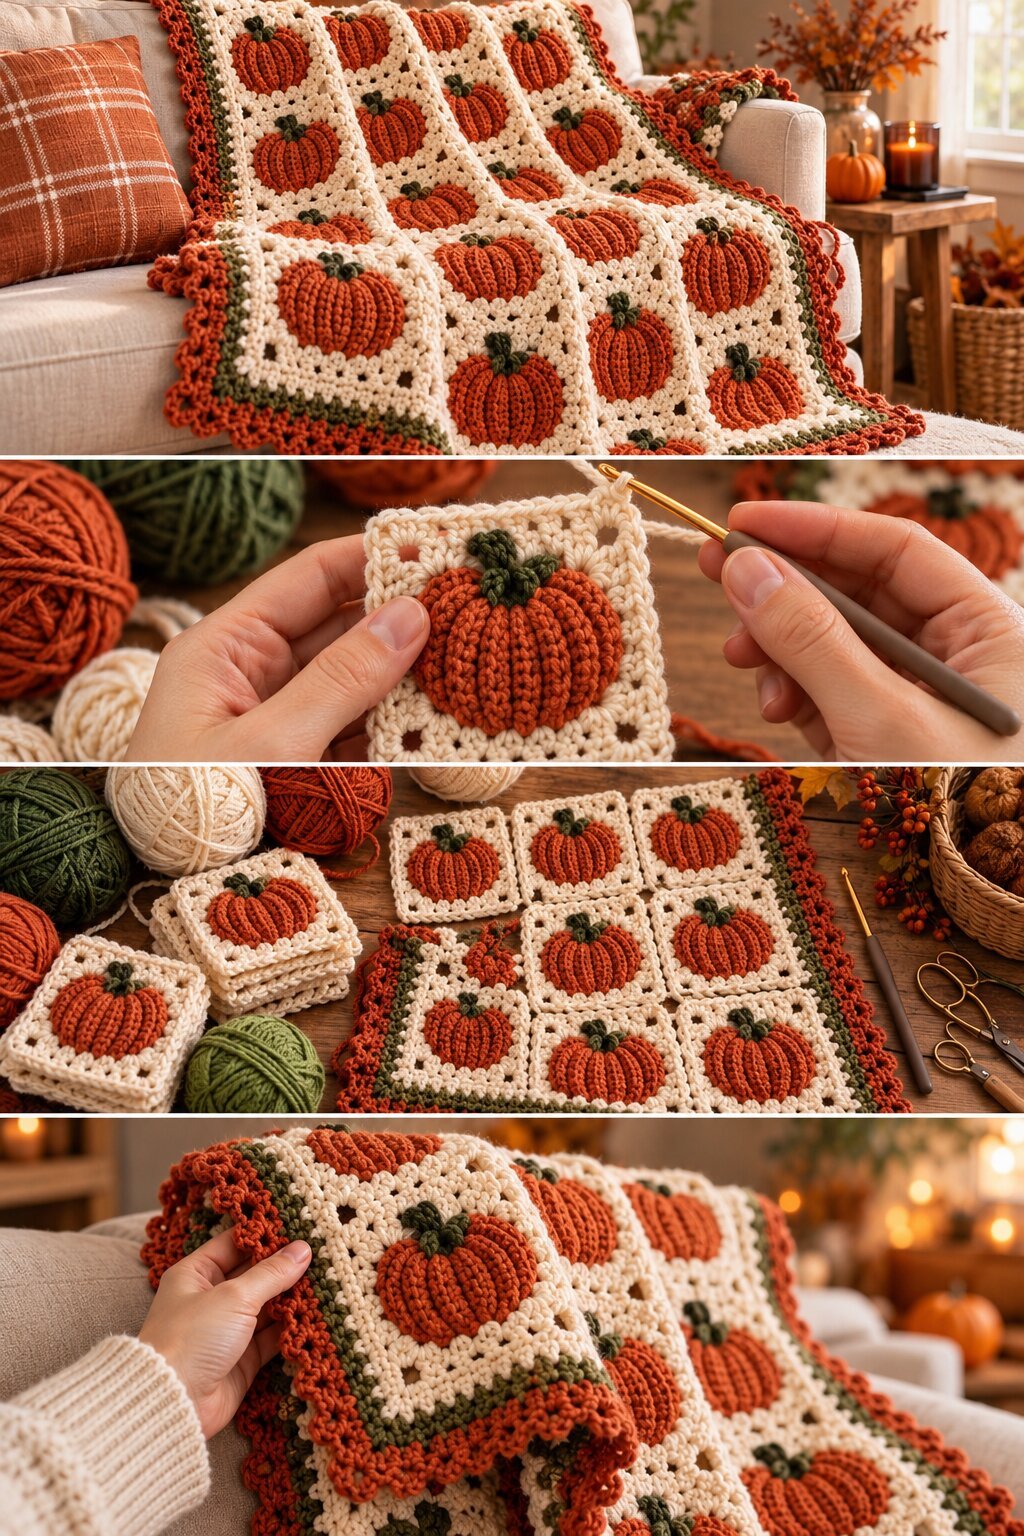
A cream throw draped over the arm of a sofa, built from granny squares that each hold a single pumpkin. The pumpkins are rust orange with vertical ribbing, so they look sectioned like real ones, and each has a short olive-green stem and a couple of tiny leaves at the top. The squares are joined in columns, with small open holes at the corners where the granny frames meet. Around the whole blanket runs a border in stages: a narrow olive stripe, then a wider rust band finished in a ruffled, scalloped edge. The overall palette is just three colors plus cream, which keeps the pumpkins from competing with each other.
This post covers what the photo shows and how you could build something similar. Sizes and materials below are starting points, since the image shows the finished blanket and not the original instructions.
How the blanket is put together
The structure is simple, and that’s an advantage. Each square is the same, so once you’ve worked one, the rest is repetition.
The pumpkin. The ribbed texture suggests the pumpkin is worked in rows or rounds with stitches placed into the back loop only, or with post stitches, so the vertical lines stand up from the fabric. A similar effect could be built by working a small oval in rust yarn, then adding raised ribs with front post stitches, or by crocheting the pumpkin as a separate appliqué and sewing it onto the center. The pumpkins in the photo look slightly domed, which suggests either a bit of stuffing or simply a dense, ribbed stitch that puffs up on its own.
The stem. A small olive piece, probably a short chain or a few stitches in a tiny rectangle, with a couple of leaf-like points. It sits slightly overlapped on the top of the pumpkin.
The frame. Cream granny rounds surround the pumpkin. Each square looks like it has two or three rounds of clusters, with chain corners that leave the little open gaps visible at the joins. The cream is dense enough to make the pumpkins stand out, and open enough to keep the blanket drapey.
Working the squares
There are two practical routes, and the choice affects how much sewing you do later.
- Pumpkin first, frame second. Make the pumpkin as the center, then work the granny rounds around it. Every square comes out in one piece, but the pumpkin needs to be flat enough for the rounds to attach cleanly.
- Frame first, pumpkin sewn on. Make a plain granny square with an open center, then sew the pumpkin on afterward. It’s easier to control the pumpkin’s shape, but it adds a finishing step for every square.
Either way, make a test square first and measure it. A blanket is only as accurate as its square size, and a few millimeters of variation multiplies quickly across the whole piece.
Joining and layout
The photo shows the squares joined in rows with a neat, almost invisible seam, and the corners meet in small gaps, which is typical of granny squares joined with a flat method. Options include:
- Join as you go: The last round of each square is worked into the neighboring square. It saves a separate seaming step.
- Whipstitch or mattress stitch: Sew the squares together from the back, working through the back loops only for a flat seam.
- Slip stitch join: Crochet through both layers from the front or back. It creates a slightly raised seam, which can look like a deliberate grid.
Count how many squares you need across and down, then lay them out on the floor before joining. Check that every pumpkin sits upright in the same direction.
The border
The edging is the most distinctive finishing detail, and it looks like three stages:
- An olive round of single crochet to define the edge and add a pop of color.
- A rust round or two of double or half double crochet, which thickens the border.
- A final scalloped or ruffled round, probably shells or clusters worked several stitches into each space, so the edge waves.
Work an extra stitch or two into each corner so the border doesn’t pull inward. If the ruffle looks too tight, add one more stitch to each cluster. If it flops, take one away.
Yarn and hook suggestions
- Yarn: A soft, washable worsted weight in cotton blend or acrylic is a good match, since a throw sees plenty of use. The photo shows a plump, slightly fuzzy texture, so avoid slick or mercerized yarns. You’ll need cream for the frames, rust or burnt orange for the pumpkins and border, and olive green for stems and the border stripe.
- Hook: A starting point is 4.5 to 5.5 mm. Go down a size for the pumpkins so the ribs hold their shape, and up a size for the granny rounds if the fabric feels stiff.
- Other supplies: Tapestry needle, stitch markers, and a handful of safety pins to hold squares together while you lay out the design.
Make one full square, then wash and dry it the way you plan to care for the blanket. Measure again afterward, since the size may shift.
Planning the size
A throw like this typically runs somewhere between a lap blanket and a sofa throw, depending on how many squares you use. As a rough guide, count your finished square width and multiply: a throw that’s four squares wide and five or six squares long will drape over a sofa arm the way the photo shows. These are planning numbers, not an official size.
- Lap blanket: Fewer squares, such as three by four.
- Sofa throw: Four by five or four by six.
- Larger throw or bed topper: Add more rows and columns.
Remember the border adds several centimeters on every side.
Customization ideas
- Colors: Mustard, deep red, or plum pumpkins on a cream or oatmeal background keep the same structure.
- Mixed pumpkins: Alternate rust, orange, and mustard, or add a few white pumpkins for variety.
- Stems: Brown instead of olive for a more traditional look.
- Leaves and vines: Add a short chain tendril or tiny leaf beside the stem.
- Size: Make a single square into a pillow cover or a table runner with a row of squares.
Care and finishing
Choose machine-washable yarn if the blanket will be used daily. Weave in all the ends carefully, since a blanket with this many squares has a lot of them, and a few loose ones will work free over time. Block the squares before joining so they match in size, and block the finished blanket flat, shaping the scalloped edge with pins while it’s damp.
Frequently asked questions
Is this beginner-friendly?
It uses granny rounds, simple shaping for the pumpkin, and a straight join, so it’s accessible to someone who has made a few granny squares. The ribbed pumpkin and the border are the trickiest parts.
How much yarn will I need?
That depends on size, hook, and yarn. Make one square, weigh it, then multiply by the number of squares and add extra for the border.
Can I make the pumpkins separately?
Yes. Sewing them on after the squares are done gives you more control over the shape.
Can I use scrap yarn?
Yes. Pumpkins in assorted oranges look good, and a single cream background keeps everything cohesive.